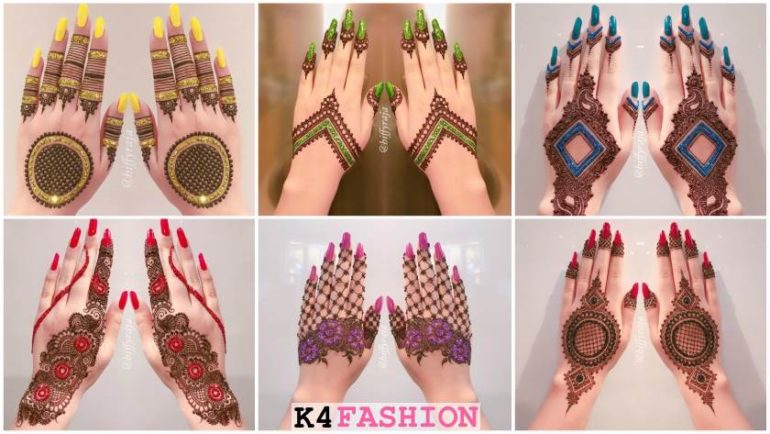
Simple Mehndi Designs for Hands Step By Step Tutorials for Beginners.
Looking for some inspiration to beautify your hands? Look no further because we have got the answer to your problem. Henna is one of the most beautiful hand decorators. It is easy to apply, remove and stays on for a few days. It looks great and has a calming and cooling effect on the person who applies it. This is an easy way to beautify your hands for a change.
Getting henna applied from some professional is a pricey task. So we have brought to you a complete tutorial on how to apply henna. Just get on the bandwagon and get started. You need to be patient to learn the nuances of applying henna to your hands. So let us get started with the Simple Mehndi designs step by step tutorials from Nighat Kazim.
Simple Mehndi designs Step by Step Tutorials
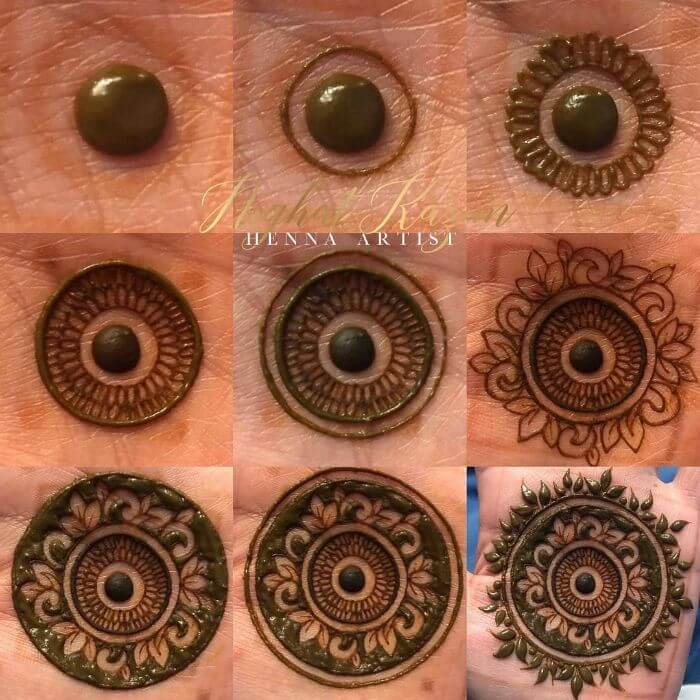
1. The basic circular mandala design
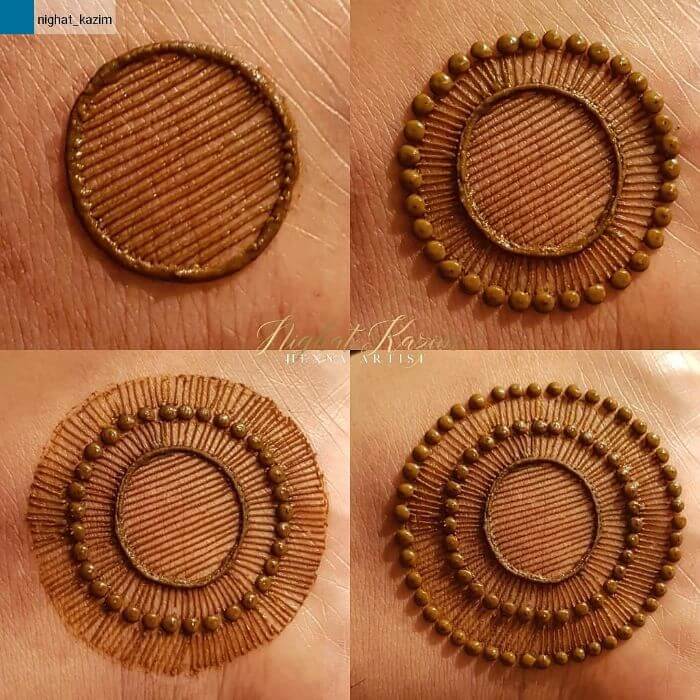

This basic circular henna design looks spectacular. You can learn it and then practice it to be a pro at this design. Start with making a circle. Now fill it with parallel lines. Make a bigger concentric circle surrounding the previous one with henna dots. Now fill the inner area again with parallel lines. Repeat the last step again. Now you have a big circular motif in the middle of your palm.
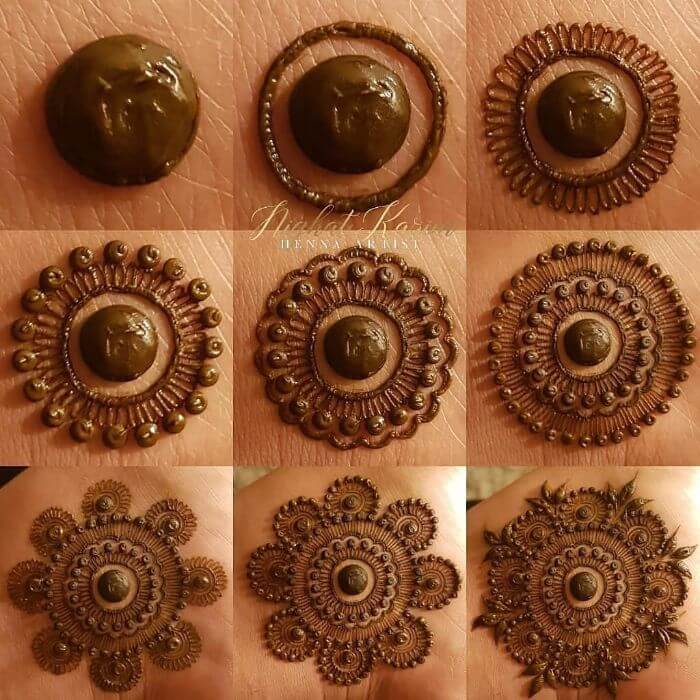
2. The circle design with more intricacies
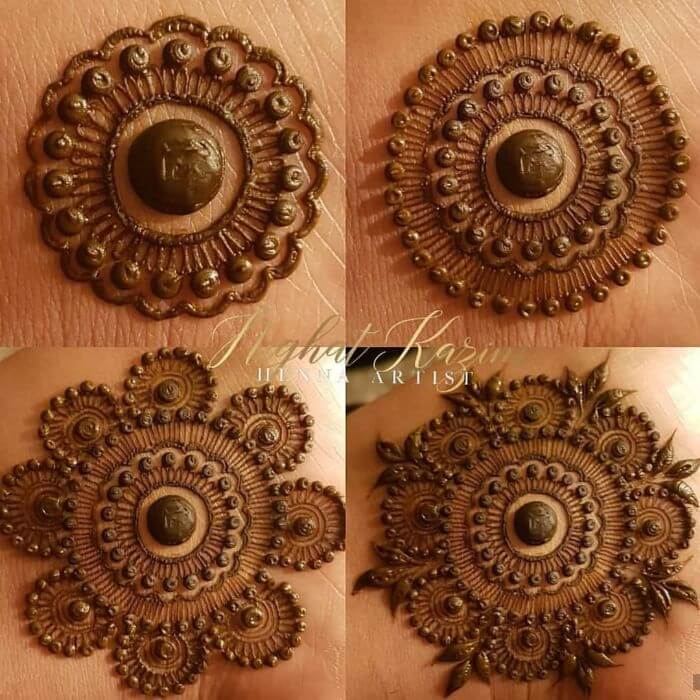
Circular motifs are an all time favourite with everyone. So here we have one more circular motif design. Start with a large circular mehndi dot. Now make a concentric circle around it. Make a larger concentric circle with henna dots, fill the gap with thin lines. Then make a flower design around it. Make a larger circle around it with henna dots and fill the gap with henna lines. Now make small circular designs around the larger design.
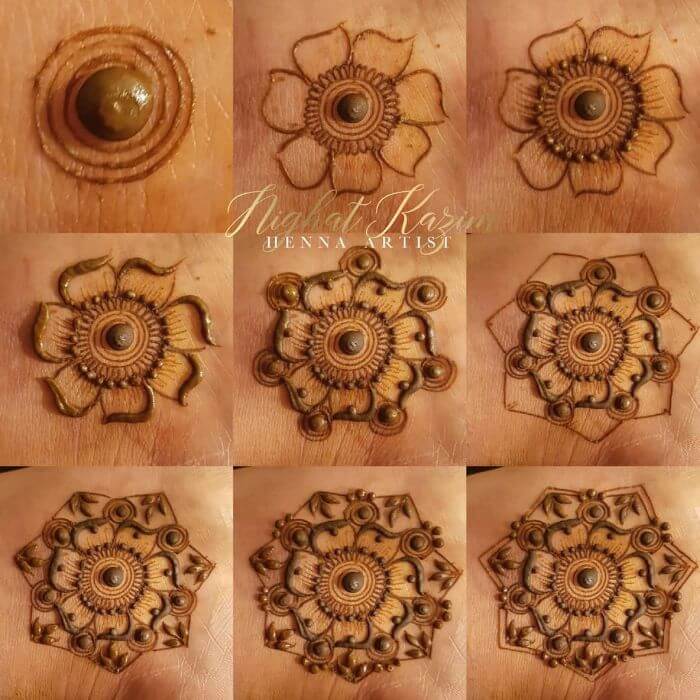
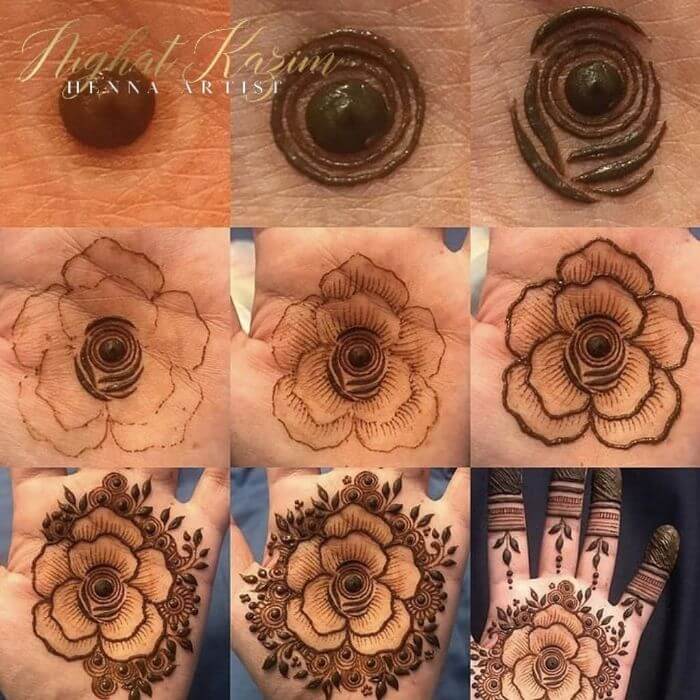
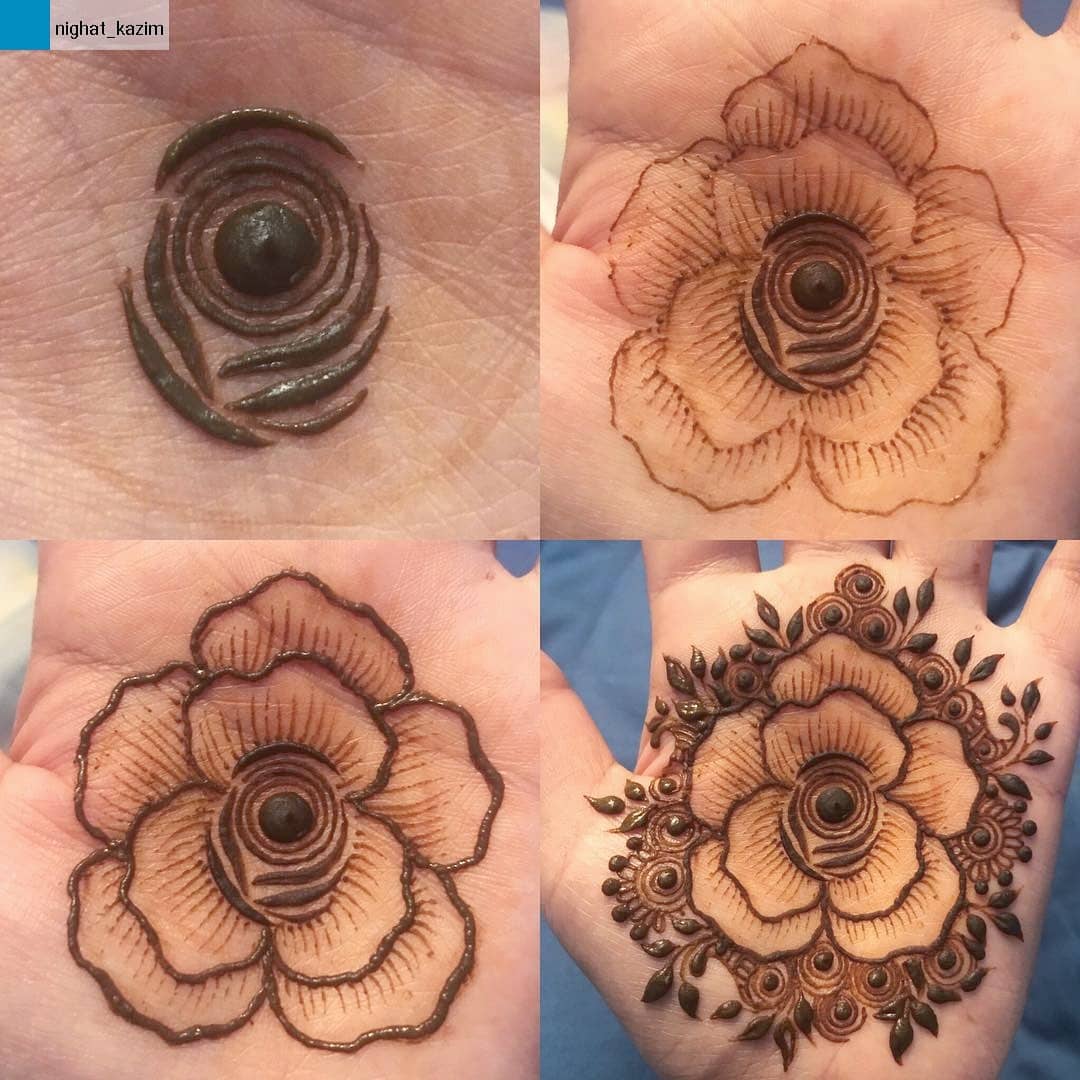
3. The flower mehndi design step by step
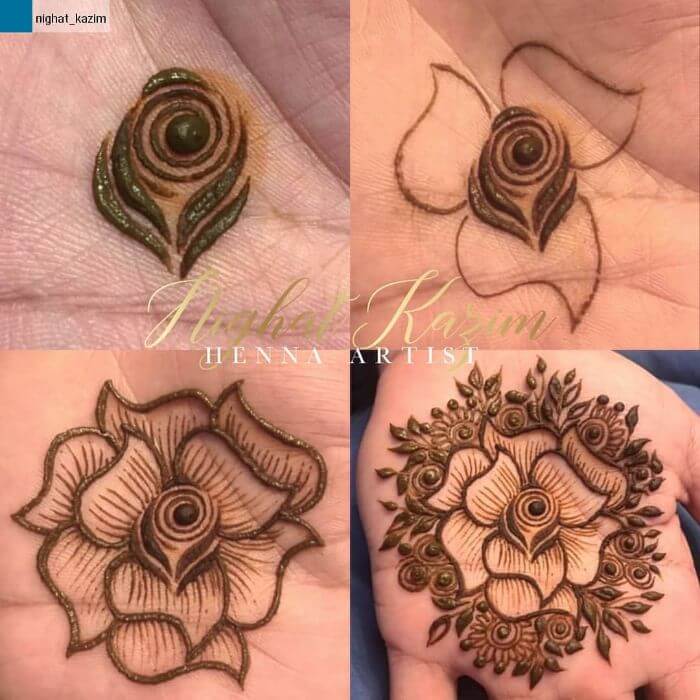
This is a very beautiful flower henna design. It can be easily made using simple techniques. Start from the middle of the palm with a medium sized henna dot. Draw a small spiral around it. Make some curves around it. Draw some petals around the central bulb of the flower. Draw fine line design around the central bulb. Once the flower is complete, make leaves, spirals, etc. around the flower.
4. Beautiful circle based mehndi design step by step
This simplistic circular henna design is easy to make. Start with henna dot in the middle of your palm. Now make a circle around it. Make two layers of leaves on the circle. Surround it with two more circles. Make leaves and flowers around the Circle. Make another circle around and fill in with henna in the gap. End it with one more larger circle and draw leaves around it.
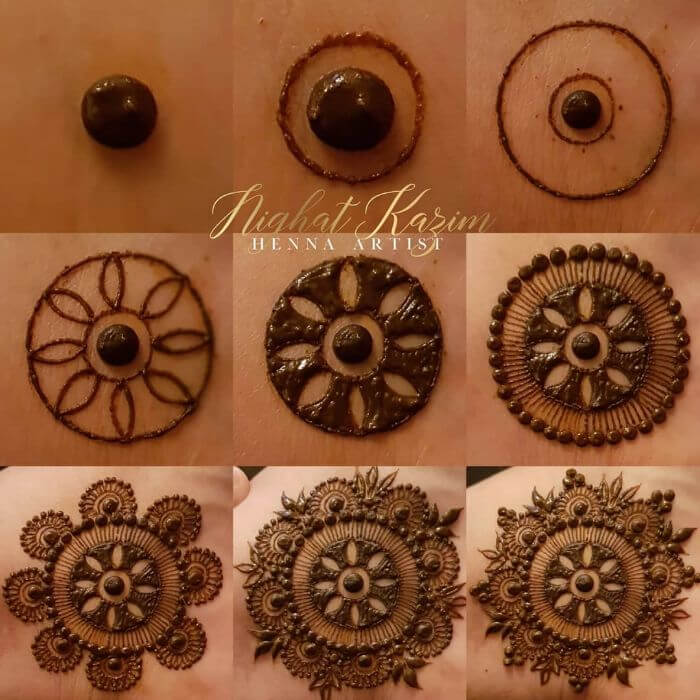
5. Rich mehndi design tutorial step by step
Start with a henna dot in the middle of the palm. Now make a concentric circle around it. Make a larger concentric circle with henna dots, fill the gap with thin lines. Then make a flower design around it. Make a larger circle around it with henna dots and fill the gap with henna lines. Then make eight similar inner circular designs around the big motif, Fill in the gaps with floral or foliage designs.
6. Heart based mehndi design step by step
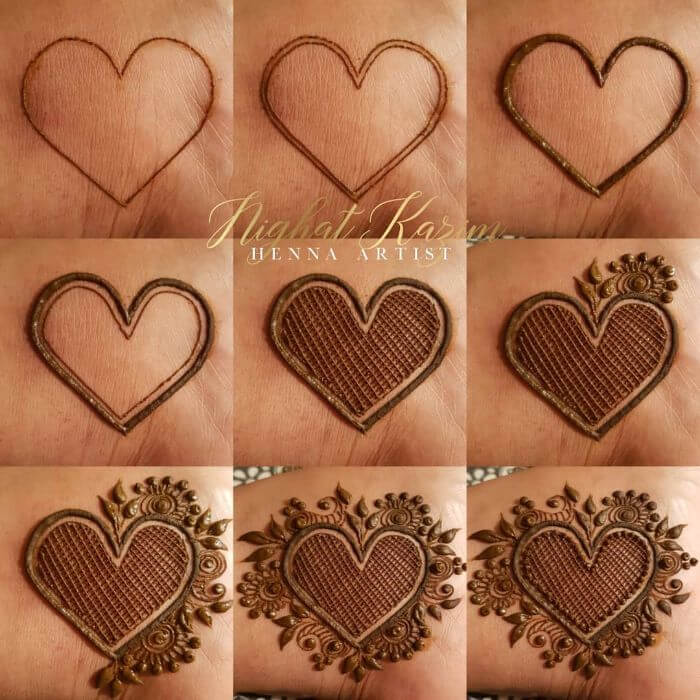
This heart design mehndi is an absolute fit for valentine’s day or your marriage anniversary. Start with a heart shape in the middle of the palm. Fill it in with a net of lines. Double line the heart design. Now make some foliage designs around the heart. This will give the message that the love grows out of the heart.
7. Rose Mehndi design step by step tutorial
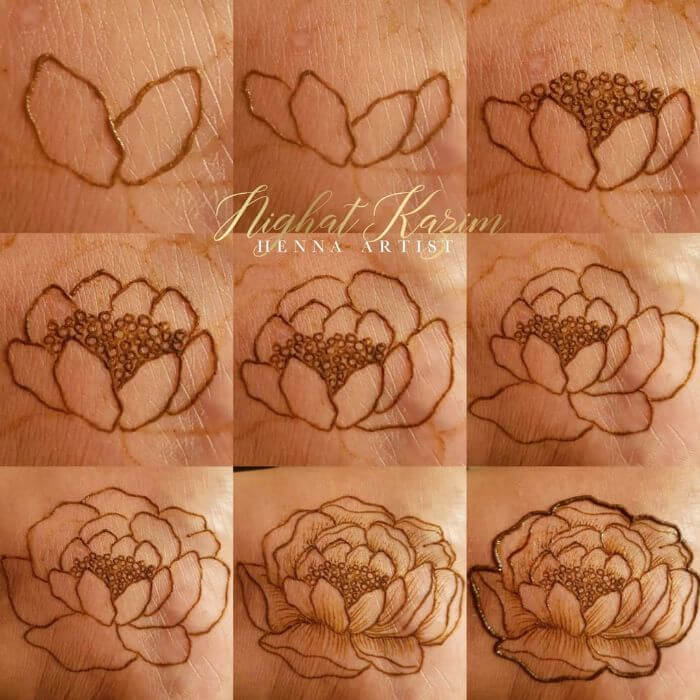
You can start this beautiful mehndi design by tracing the design on your hand for easy movement. Start with the inner petals. Draw the structure of the petals, then fill in the central bulb of the rose. Once you have made all the petals, start with the finer line designs inside the petals. Line the outer design of the flower with double lined henna.
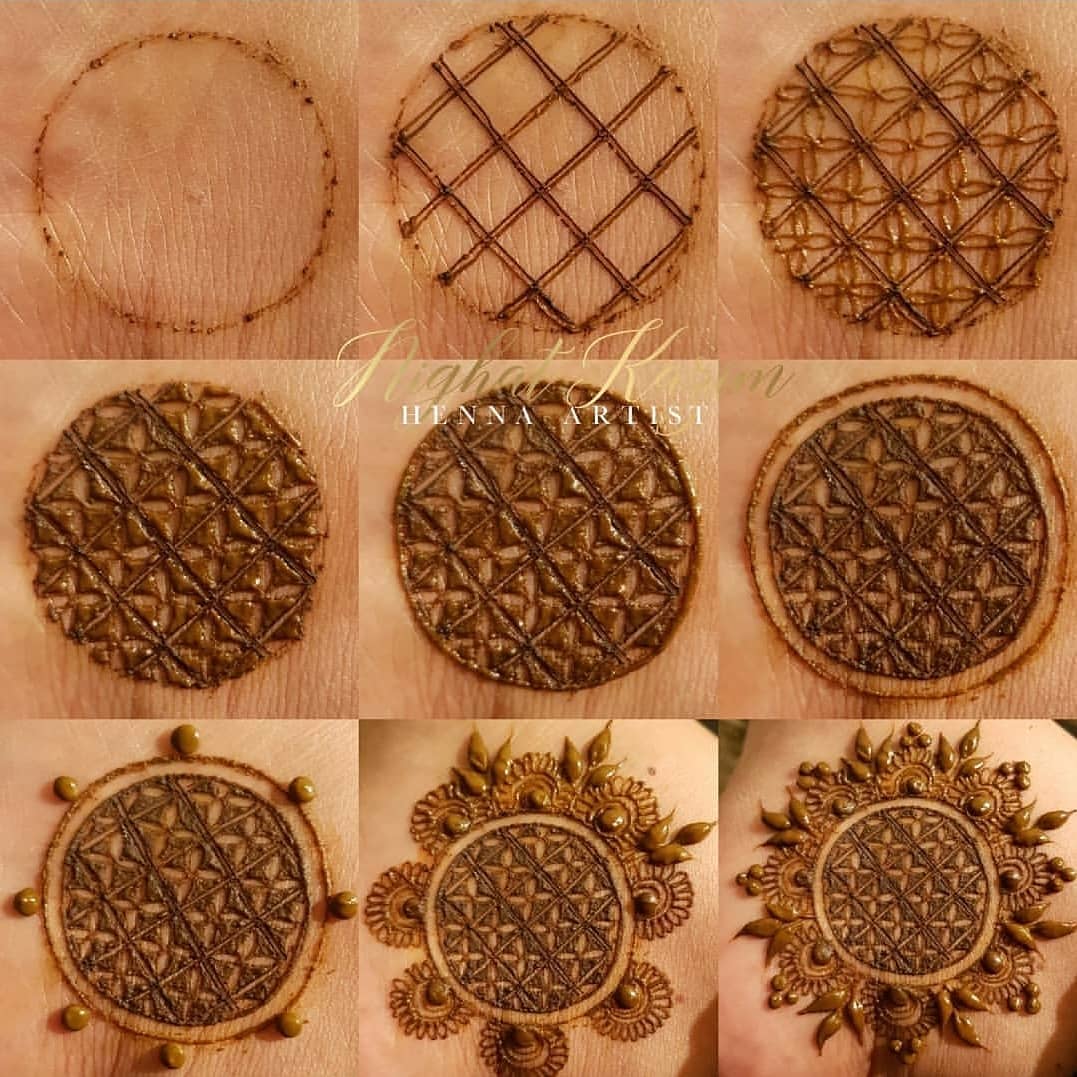
8. Beautifully filled in mehndi design step by step
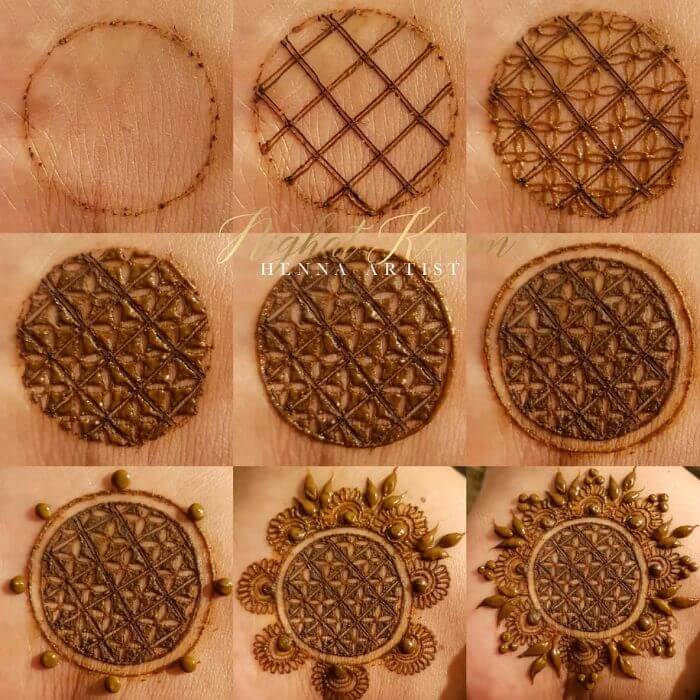
This is a beautiful unique henna motif. Start with drawing a big circle in the middle of your palm. Make a net inside the circle with double lined henna. Now make geometric floral designs inside the net. Fill in the design. Make a bigger concentric circle outside. Then make eight henna dots outside the design. Make circular designs around the henna dots. Fill in the remaining space with foliage design.
9. Polygon mehndi design step by step
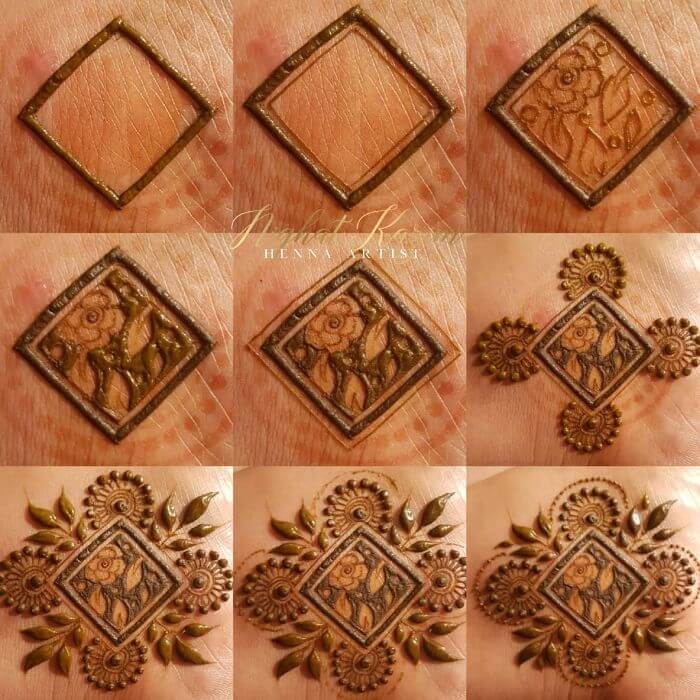
This polygon design is unique and easy to make. Start with a polygon and double line it. Now make a foliage pattern inside it, fill the design in the shown way. Make a larger polygon around the previous one. Then make henna dots at the four corners. Make lines design around the henna dots. make a dotted design around them. Fill in the remaining space with leaves.
10. Flower mehndi design step by step
Start with a henna dot, Make a spiral around it.Make leaves design around the spiral. Make henna dots around the design. Make some petal on the dots. Embolden the half petals. Make henna dots and spiral design at the ends of the fading petals. Add triangular design on top of the petals. Draw leaves inwards from the triangular tip. Add dots to detail and a double line henna to define the design.
11. Ankle henna application mehndi design step by step
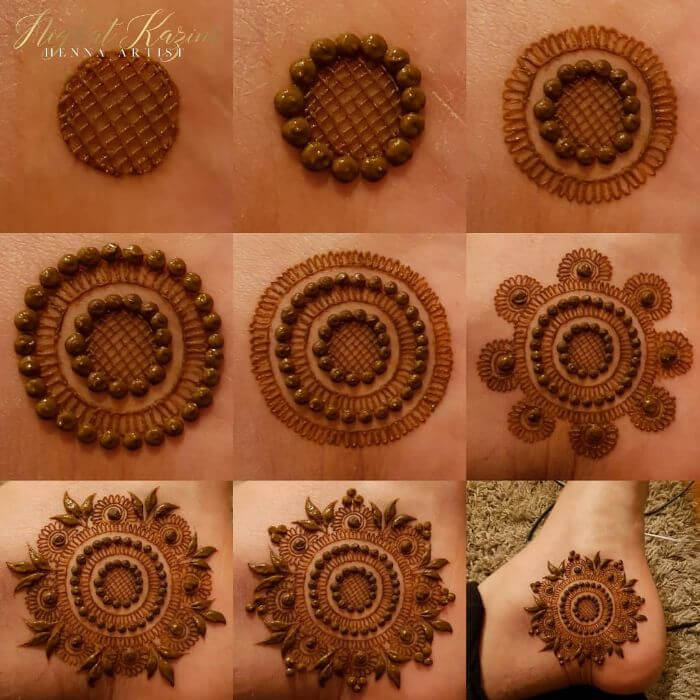
Start with a circle on your palm. Fill it with henna net. Make Henna dots around the circle. Make two more circles around the previous one. Fill them with henna lines design. Make henna dots around the outer edge. Then make one more circle which is bigger of the all. Make leaves design on it. Make eight henna dots around the main design. Cover the dots with henna circles and leaves design. Fill in the gaps with foliage. You can make this design on your ankle as well.
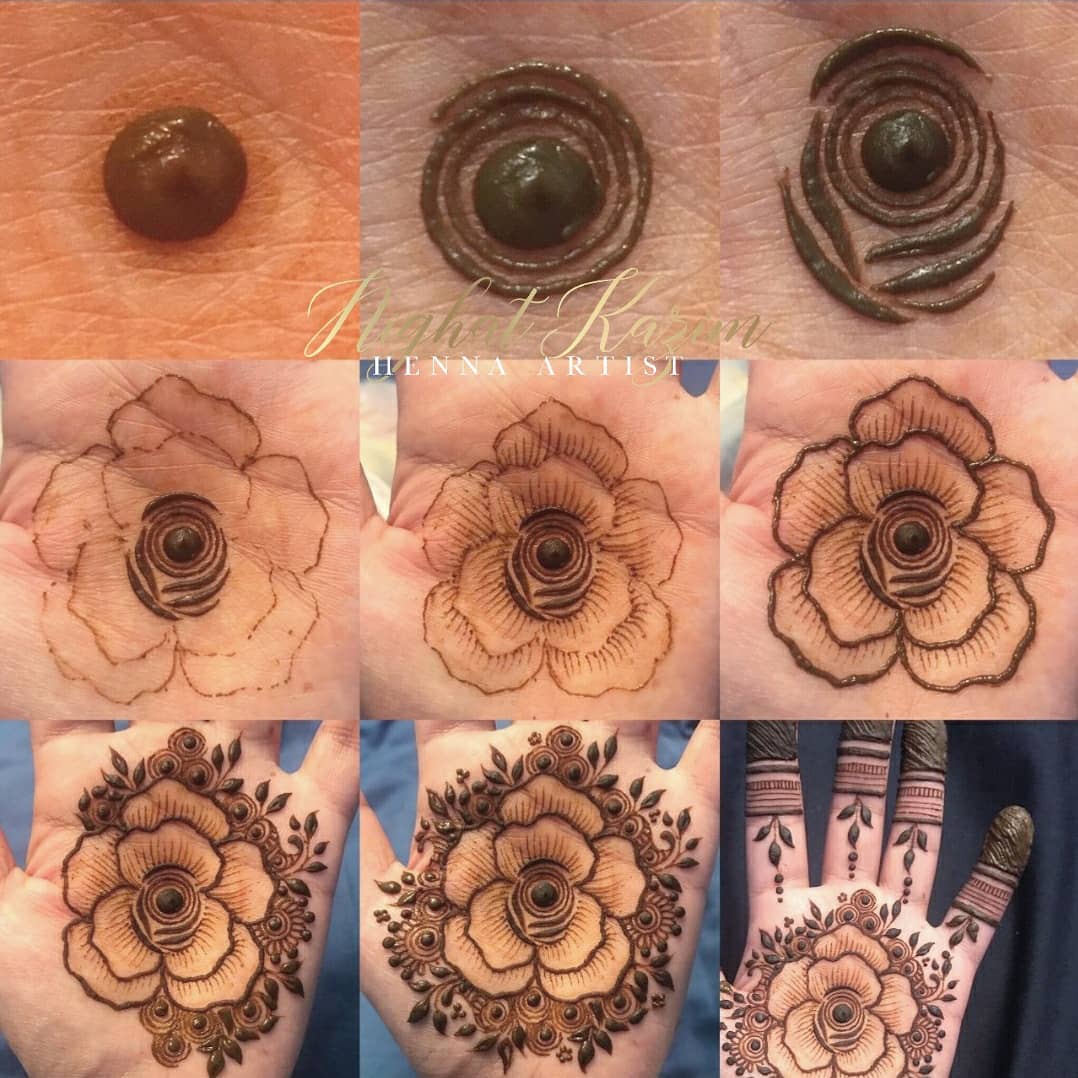
12. Easy big flower mehndi design step by step
This flower design is easy to make. Start from the middle of the palm with a medium sized henna dot. Draw a small spiral around it. Make some curves around it. Draw some petals around the central bulb of the flower. Draw fine line design around the central bulb. Once the flower is complete, make leaves, spirals, etc. around the flower. Also cover the finger tips in beautiful henna design.
13. Beautiful mandala mehndi design step by step
Start with a henna dot, surround it with two concentric circles of varying sizes. Make oval designs inside the two circles. Fill in the gap between the circles leaving out the ovals. Now make a really big concentric circle around it with henna dots. Fill in the gap with lines design. Make eight henna dots around the design. Make a circle around the dots and form leaves design around it. Fill in the gaps with foliage patterns.
14. Square based mehndi design step by step
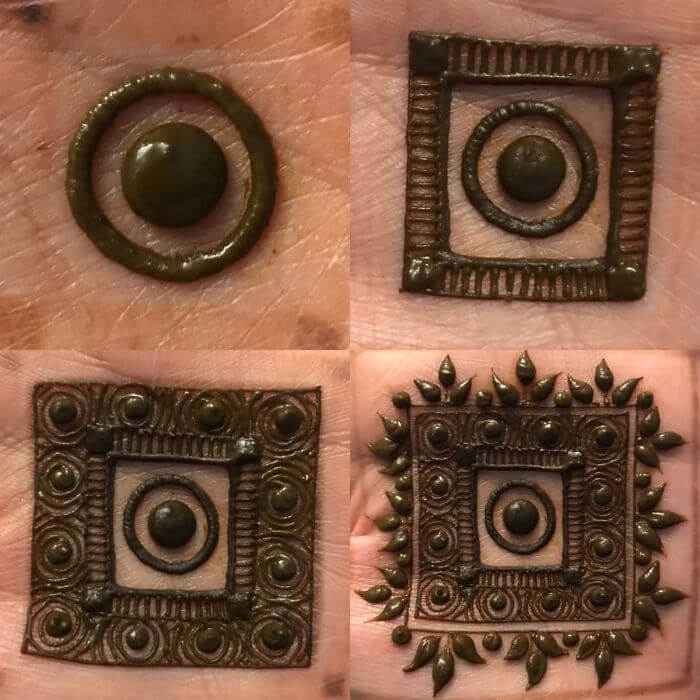
Start with a henna dot in the middle of your palm. Surround it with a concentric circle Now make a square around this circle. Make Another square which is at a gap from the previous one. Fill in the gap with henna lines design. Now make a rather big square around it and fill in the gap with spirals. Complete the design with another square and foliage design around it.
15. Compilation of various mehndi designs

This is a great compilation of mehndi designs with a great message. we hope everyone understands the underlying message. We are here to preach art and the skill of an artist. Go on try these beautiful mehndi designs on your own hands or on your friend’s hands.
16. Beautiful mehndi designs
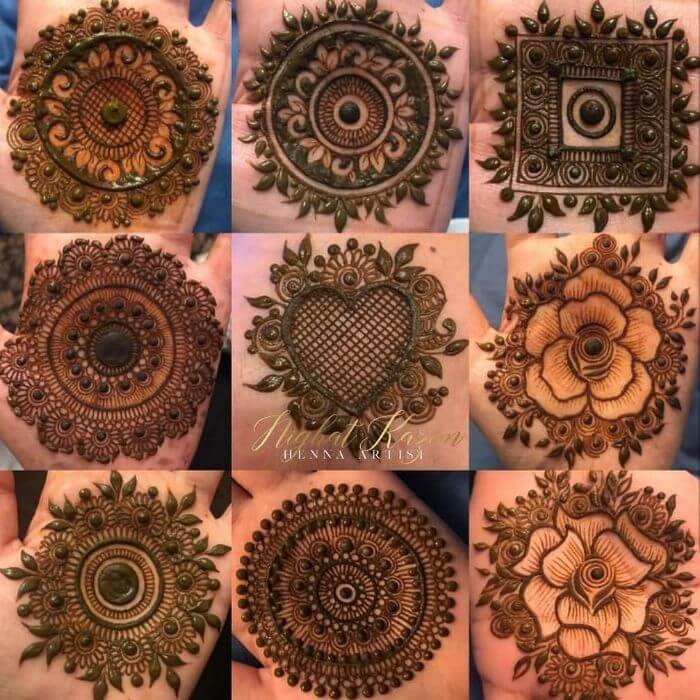
This is a compilation of all the beautiful mehndi designs which can be easily realised. All you need to do is go back, brush up your skills and then practice. Practice makes a man/woman perfect. Go on practice the art and come up unique designs of your own.
17. The Multiple Henna Design Inspirations
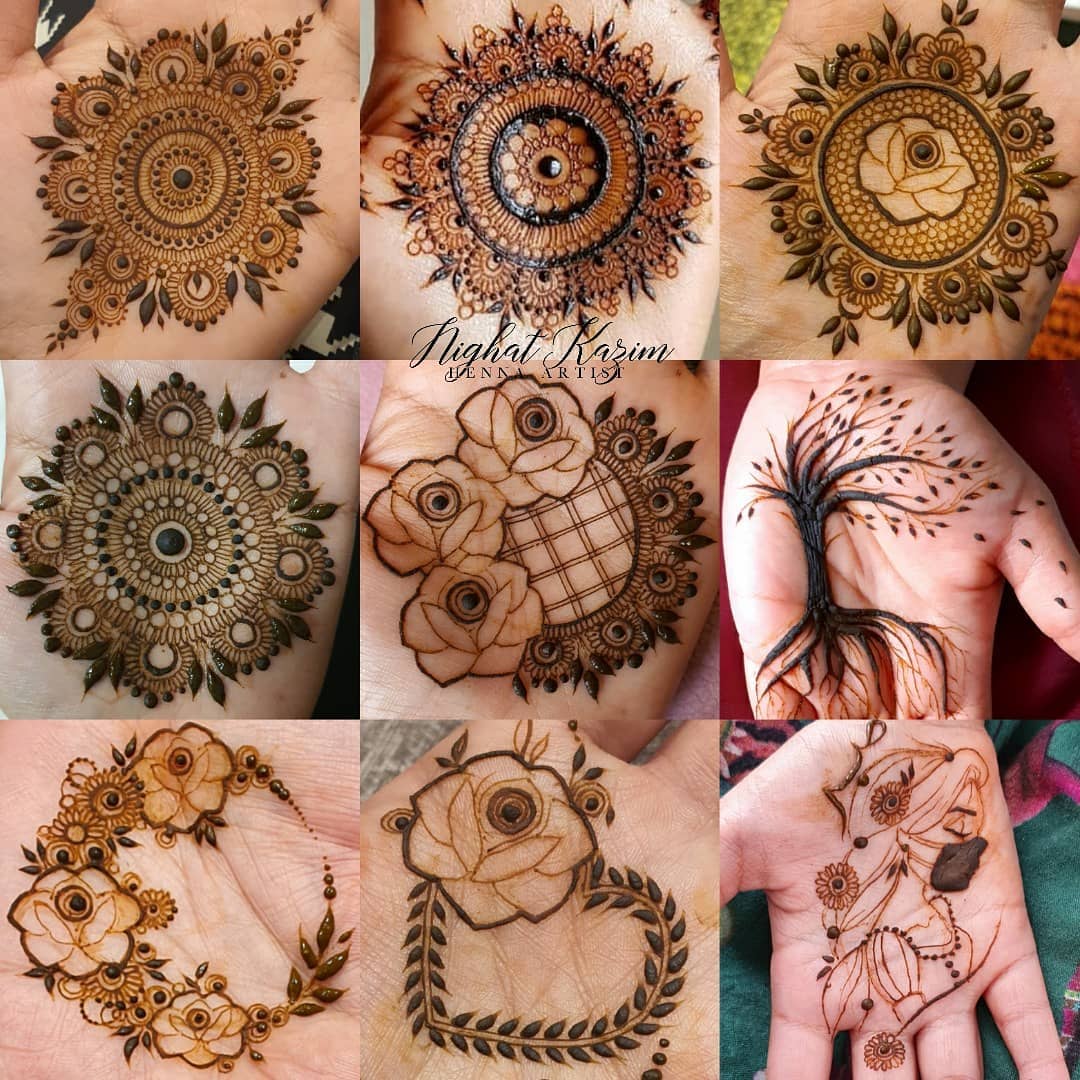

Time for a festive gathering or some traditional event but your hands are still missing the henna stain that would make you all set for the event. Don’t worry we have got you covered with these simple henna design inspirations which you can get in minutes. You can try experimenting with various design styles like circular mandalas or floral mandalas, the rose motif mandala or circular rose henna design, or design with a tree motif or a motif of a girl with hairs open or simply a heart design with a rose motif on top.
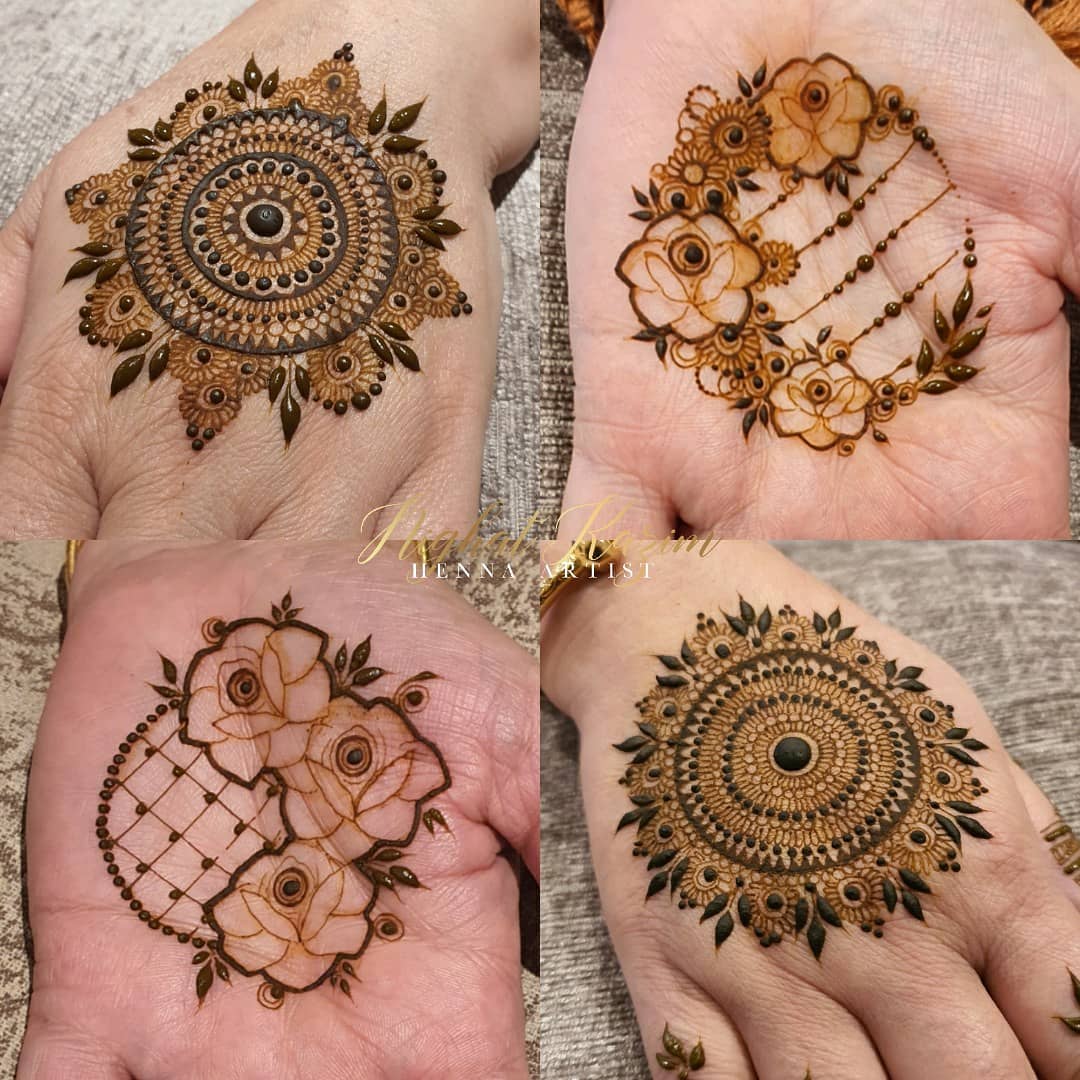
18. The Simple Mandala Henna Stain
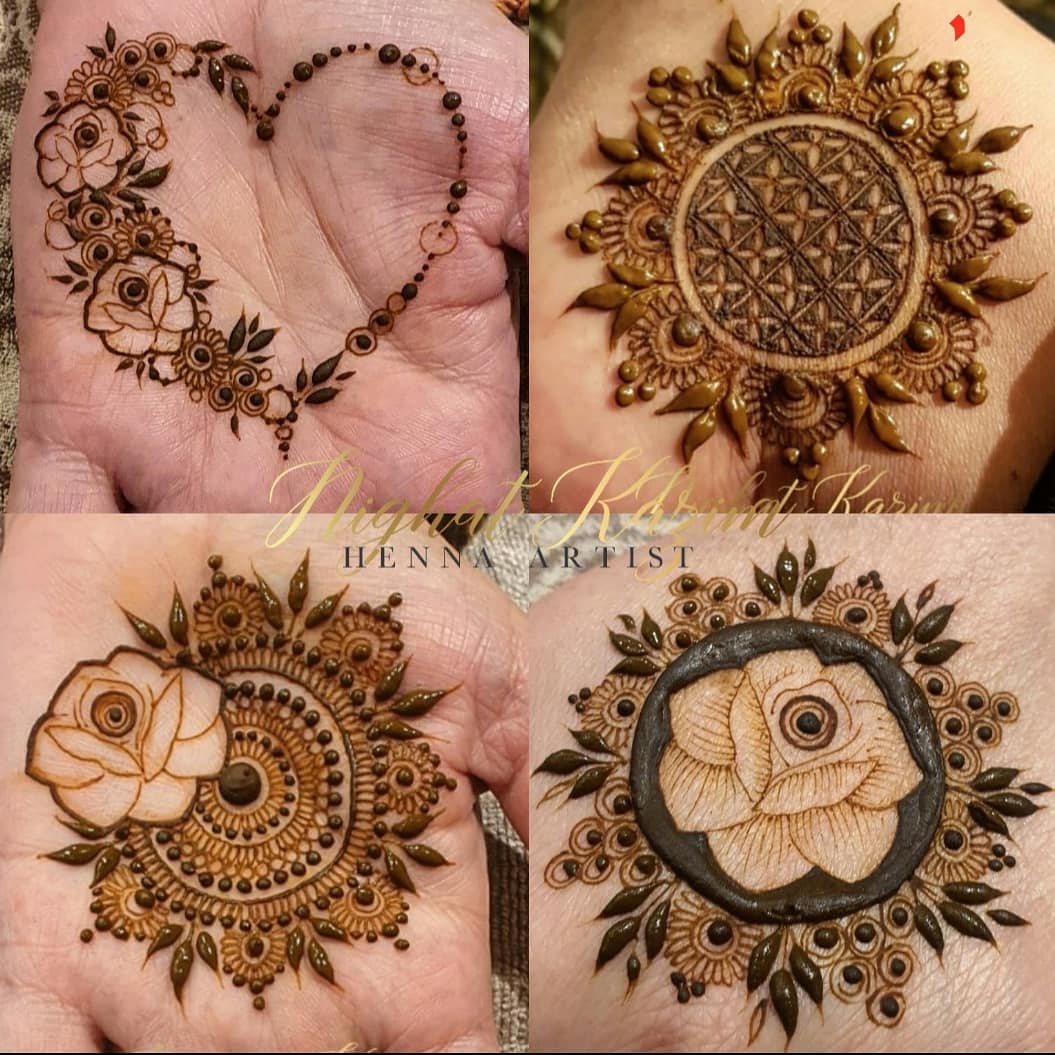
Mandala henna designs are not just appealing in their looks but also have a spiritual benefit, it is said that creating a mandala on our skin connects us spiritually with the universe to bring peace and balance to our lives. You can try on various attractive and beautiful mandala henna designs like the classic mandala with a circle filled with diagonal lines, inside four-petaled flowers covered with flowers and leaves around, or a circular mandala with a rose motif on the upper side, or a mandala style with rose motif inside the circle or you can experiment with heart shaped mandala with flowers on one side.
19. The Nature-Inspired Henna Design
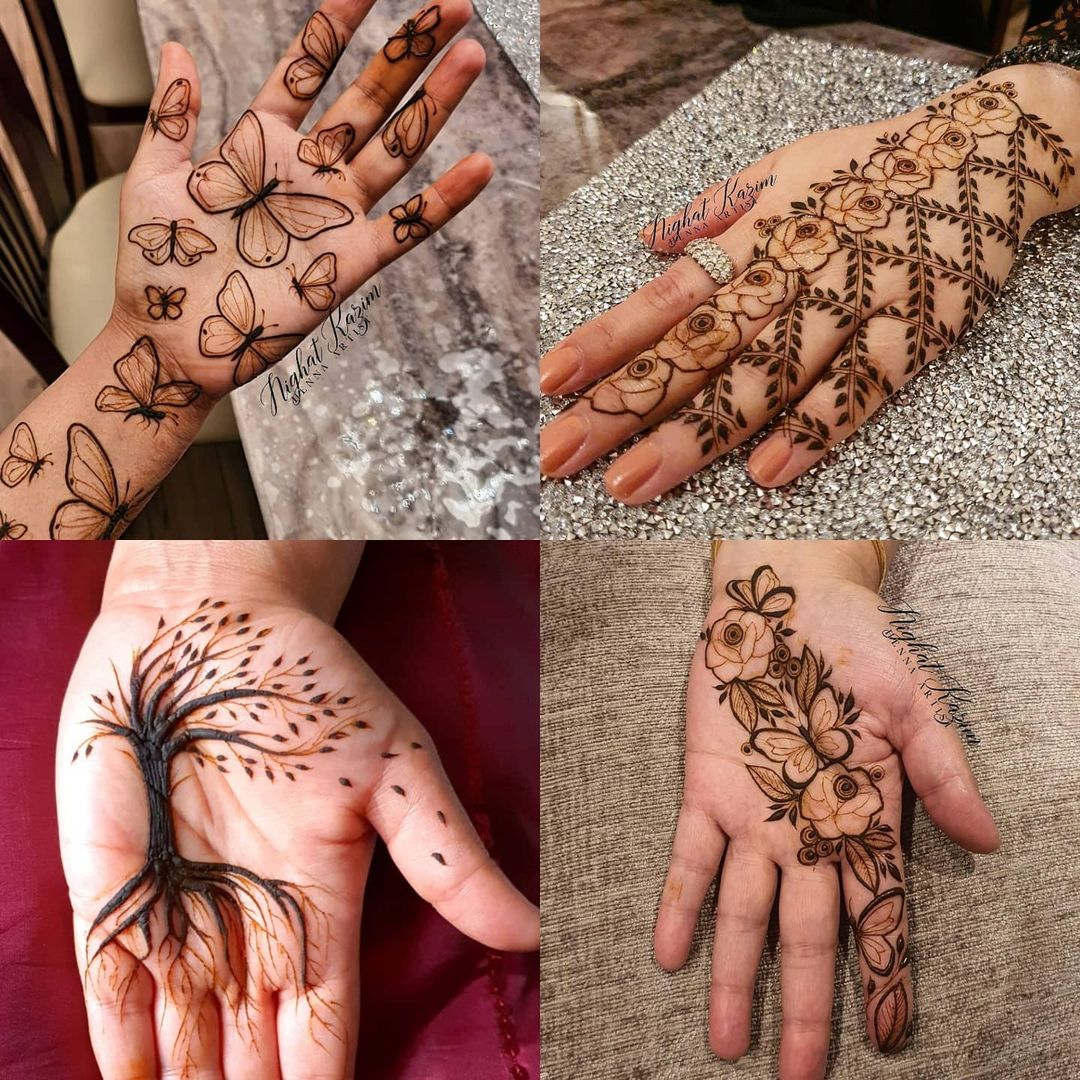
Who does not love the beauty and elegance of nature’s elements, be it flowers, trees, birds, or butterflies, all of them have a calming effect on the eyes. What if these designs were put into the henna stain just imagine how elegant it would look. You can try variations of nature-inspired henna designs like an autumn tree motif henna stain, a design with multiple rose motifs in the center of your backhand with little detailing and leaves around, or an Arabic style with butterfly, flower, and leaf motifs or simply the hand covered with different sized butterfly motifs.
20. The Chic & Simple Statement Henna Designs
We all love getting our hands on good henna designs, these designs when are chic and simple, and you can try them yourself within minutes and without putting in the extra effort. You can try various simple design variations like circular mandala styles with floral details, or mandalas with rose motifs or heart motif henna stains. All of these henna stains come with floral detailing and are very simple to get on but the little details of flowers and leaves make them the most elegant as well.
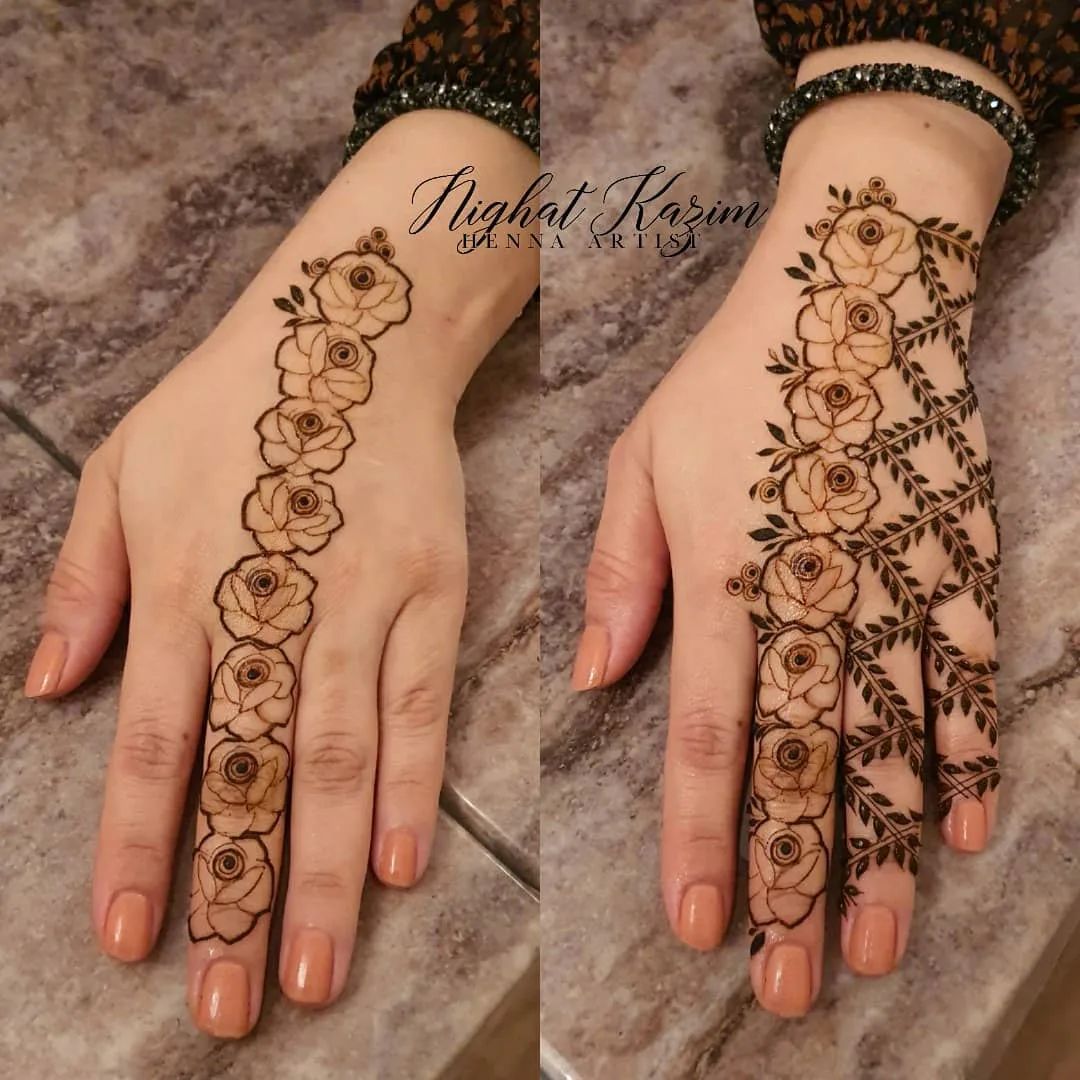
21. The Fusion of Floral & Leafy Henna Design
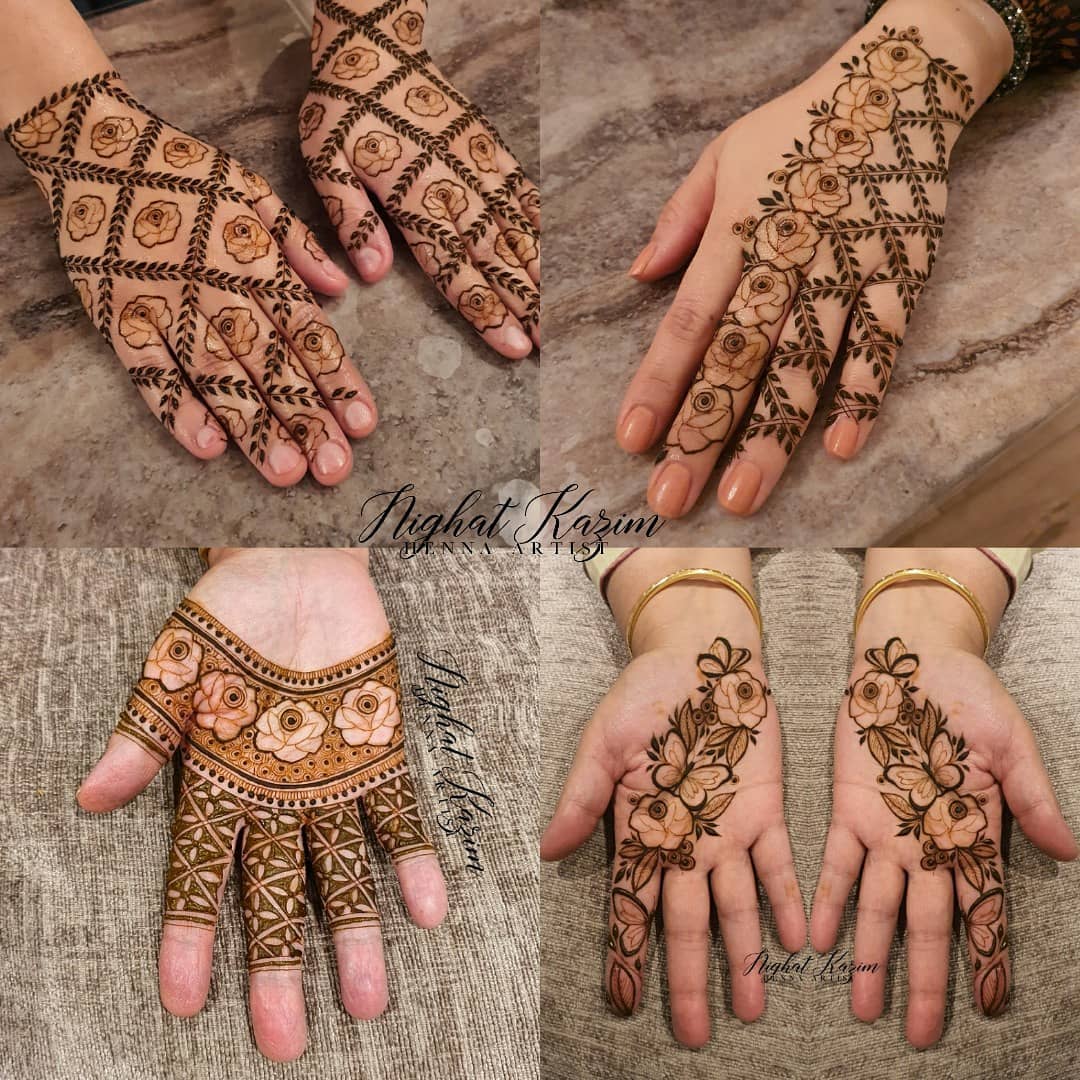
The floral motifs are almost everywhere you see, they are not just elegant but a statement choice for everyone, these designs are also very simple to put on, if you want a floral motif henna design then you should take inspiration from this fusion of floral and leafy henna designs. You can experiment with these designs in multiple ways, starting from multiple rose motifs in the center of your backhand with little detailing and leaves around, diagonally placed rose motifs covered with leafy veins all around your backhand. For the front, you may try an Arabic design with butterfly, flower, and leaf motifs, or you can try a half-palm-filled henna with rose motifs going in a semi-circle.
22. The Peacock Motif Henna Design Ideas
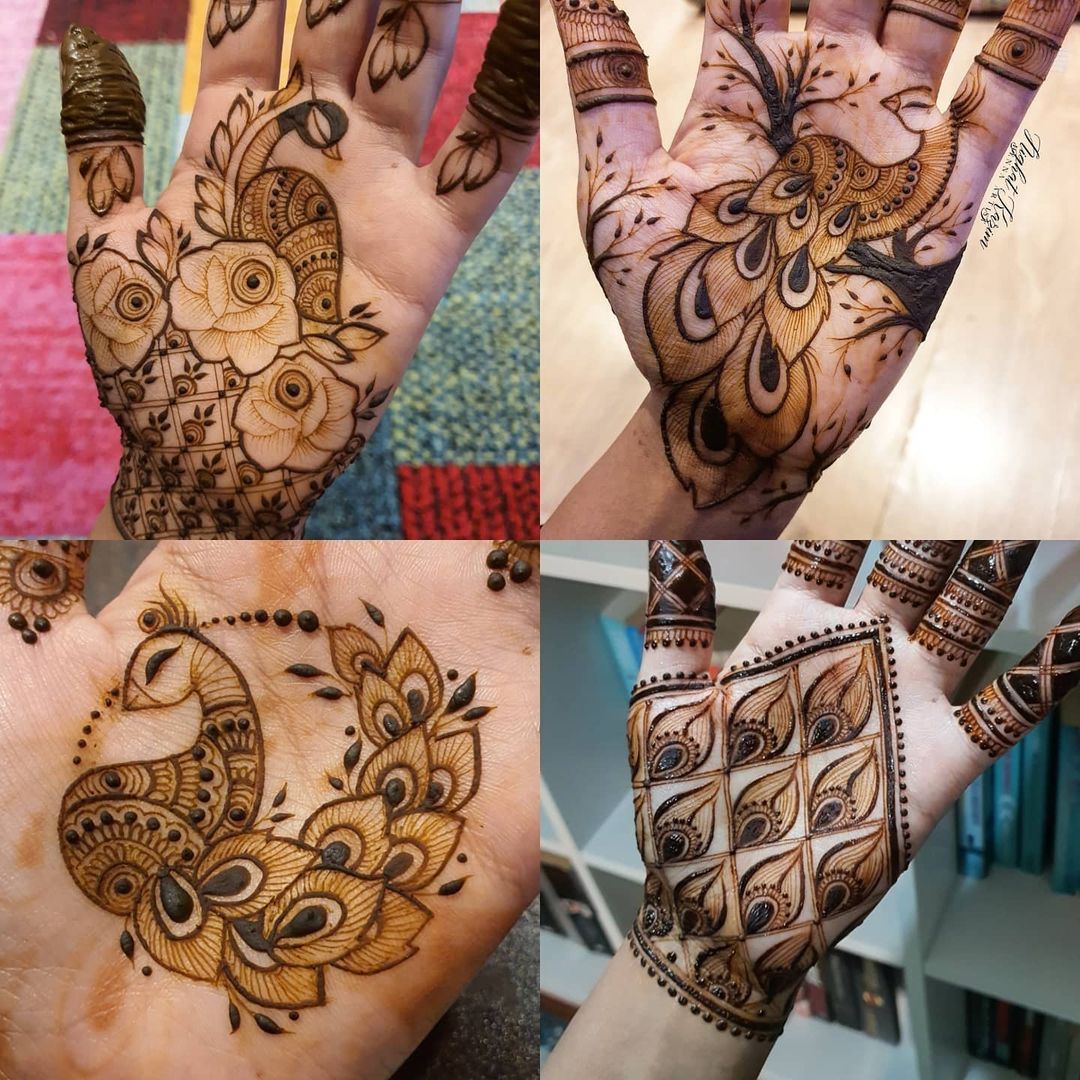
The peacock is a symbol of beauty, and the designs involving peacock motifs are so appealing to the eyes of the viewers. These pretty designs can be put beautifully in your henna designs as well, here are some peacock motif henna stains that you can try on your hands. You can experiment with a peacock mandala henna design with feathers going in a circle, mix up a peacock motif with some floral motifs, or a design where a peacock is sitting on a tree, or simply a design with peacock feathers placed in a triangular shape starting at the end of your palm. With a little detailing, these designs can be the most attractive ones.
23. The Front & Back Minimal Henna Inspiration
The minimal henna designs are a perfect fit for your intimate gatherings or festive events, these designs help you get a chic look without putting in extra effort and also are super easy to recreate in minutes. If you are also looking for a minimal henna design for both the front and back of your hand, then you must have a look at these designs. These designs come with a pretty circular mandala style for the back of your hand with little floral and leafy details around it, for the front of your hands you can go with a circular rose motif henna stain with leaves around it and details of multi-sized dots.
24. The Perfect Henna Rose Guide
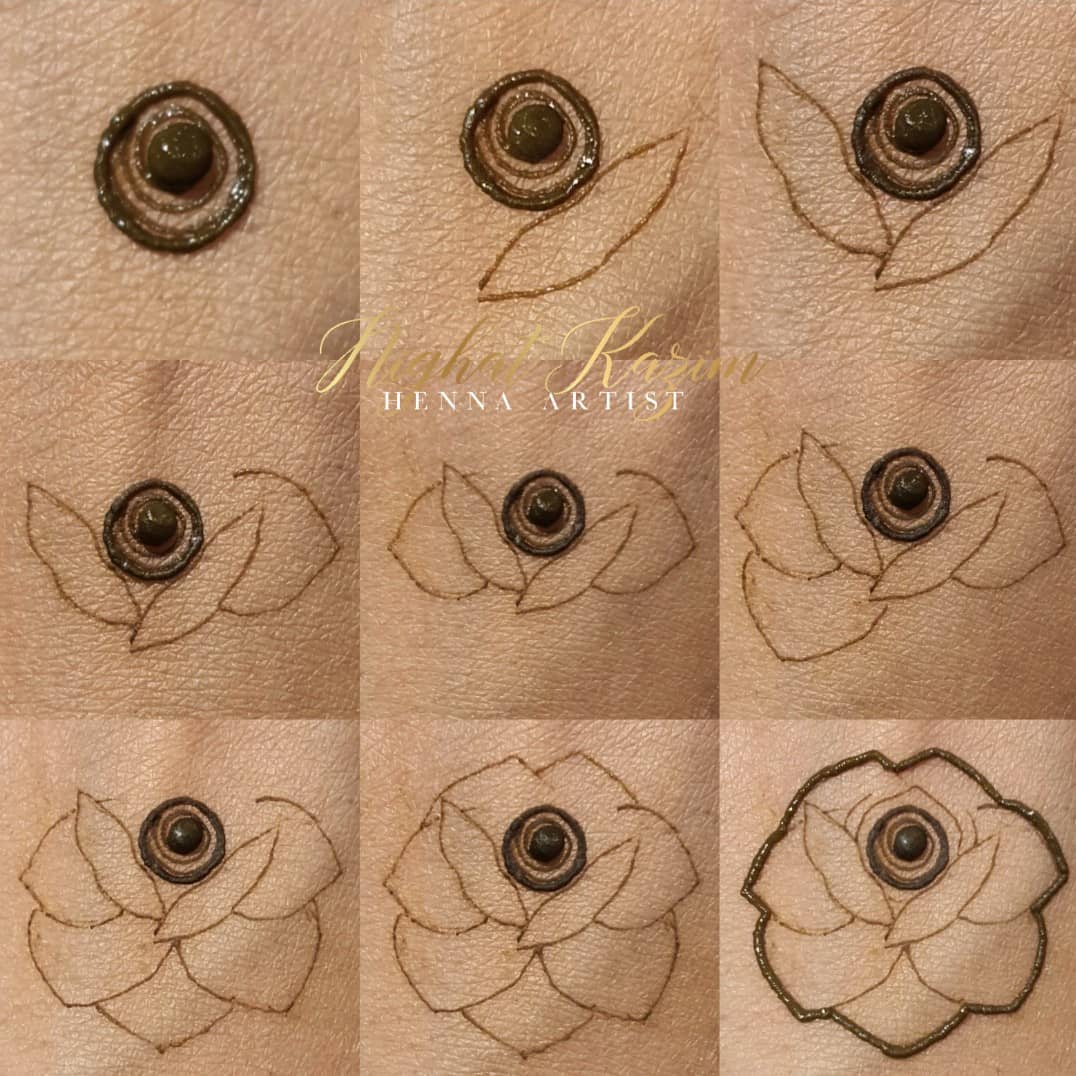
The rose motifs are what everyone loves to carry be it in jewelry, accessories, garments, or even the mehndi stain. If you too love these rose motifs then here is a step-by-step tutorial on the perfect rose motif which is not just attractive but simple as well. Firstly, you need to draw a mini circle in the middle of your palm and don’t forget to fill it in, now draw a two-layered spiral around it, later draw a leaf below it and a second one on the other side which should be placed a little above the first one, now start drawing petals which should be similar on both the sides and for a defined look outline the borders of it.
25. The Rosy Palm Henna Design
The rose designs are perfect and elegant for the henna stain, these designs give you a pretty and minimalistic look without putting in much effort. To get the perfect rosy palm henna design you just need to follow these simple steps. Firstly draw a mini circle in the middle of your palm and connect it with a two-layered spiral design, draw the closed petals around the spiral with random mehndi strokes, now outline the rose petals and fill them lightly with shaded strokes and darken the outlines of petals and finally draw some spiral and leaf motifs all around the rose petals.
26. The Circular Mandala Back Design
The mandala styles are simple and minimal designs that are the perfect chic, these designs when got into mehndi design will give you an elegant stain. If you are looking for an elegant mehndi design then you must have a look at this circular mandala back design. To make this design you can start your process by making a circle in the middle of your hand and then creating double overlapping diagonal lines, inside it the four-petaled flowers and filling the remaining gap with mehndi. Now create another circle around it and cover it with flowers and leaves all around.
27. The Step-By-Step Guide to Perfect Floral Mehndi
We all love the elegance of floral motifs be it in clothes, jewelry, accessories, or even mehndi art, floral mehndi art looks elegantly pretty and minimalistic. If you want to get a perfect floral full palm mehndi stain then just follow these simple steps and you are all set to go. Firstly draw a mini circle in the middle of your palm and connect it with a two-layered spiral design, draw the closed petals around the spiral with random mehndi strokes, now outline the rose petals and fill them lightly with shaded strokes and darken the outlines of petals and finally draw some spiral and leaf motifs all around the rose petals and for fingers, you can draw inverted leaves with the fingers filled.
28. The Floral Mandala Henna Design
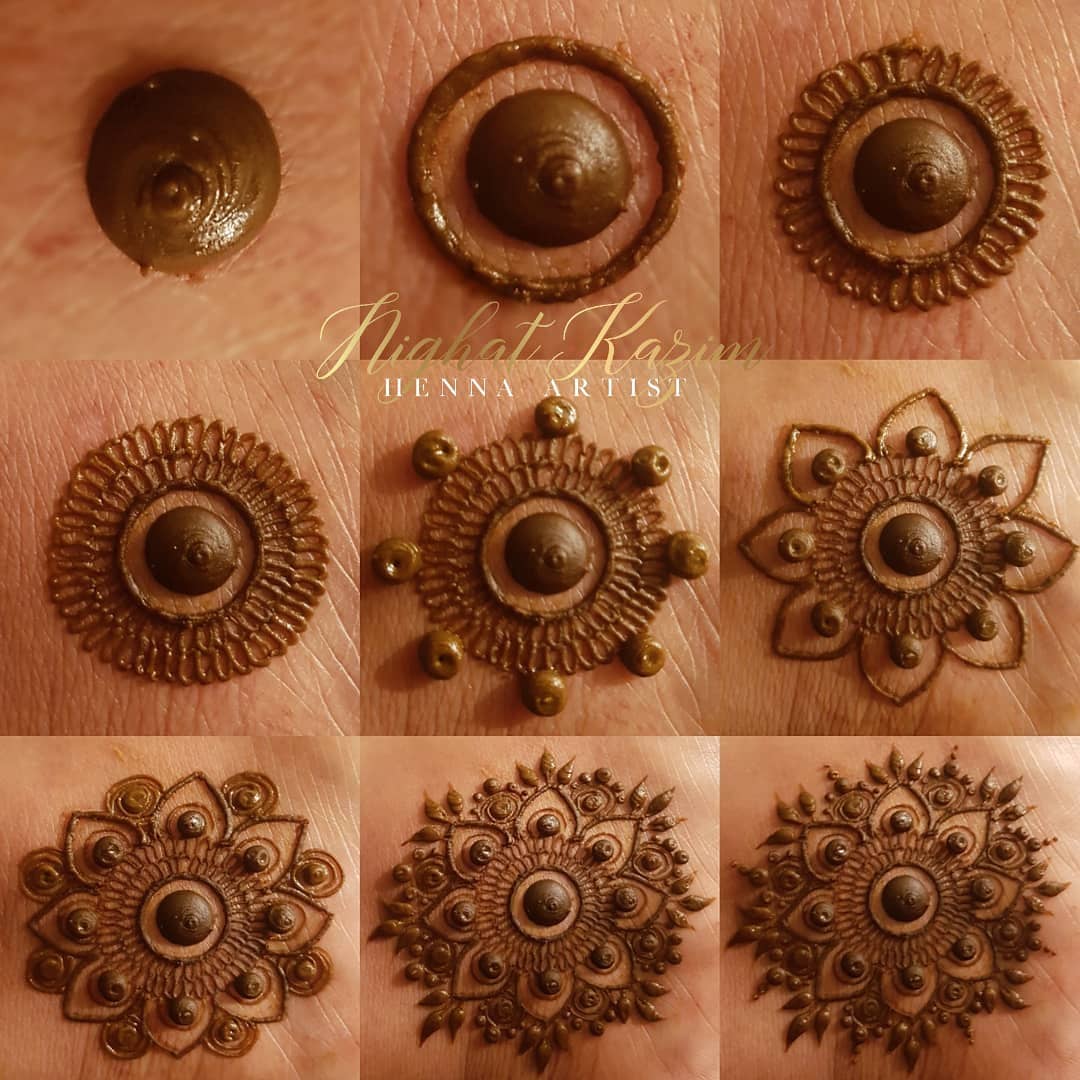
The floral motif mehndi art is the ruler of everyone’s heart, it is the go-to design for every girl’s henna art. Recently the mandala arts are also what most girls are preferring to, they are simple and chic designs, which are perfect for small functions and gatherings and also are easier to draw. If you are looking for a minimal floral mandala henna design, then you should have a look over this eight-petaled floral henna. It is such an easy design that you could draw yourself, you just need to follow the step-by-step guide to get the perfectly chic henna art.
29. The Rosy Back Henna Design
The elegance of the rose motif mehndi is what everyone loves, it not only looks good but also is easy to get stained. Everyone would have seen rose motif mehndi art as a front design but we have got a rosy back design for you which is so easy and elegant. To get this stain you just need to draw multiple rose motifs in the center of your backhand with little detailing and leaves around, then follow it with leafy veins at one side of your hand and you are all set to go with beautiful mehndi art.
30. The Geometric Henna Stain
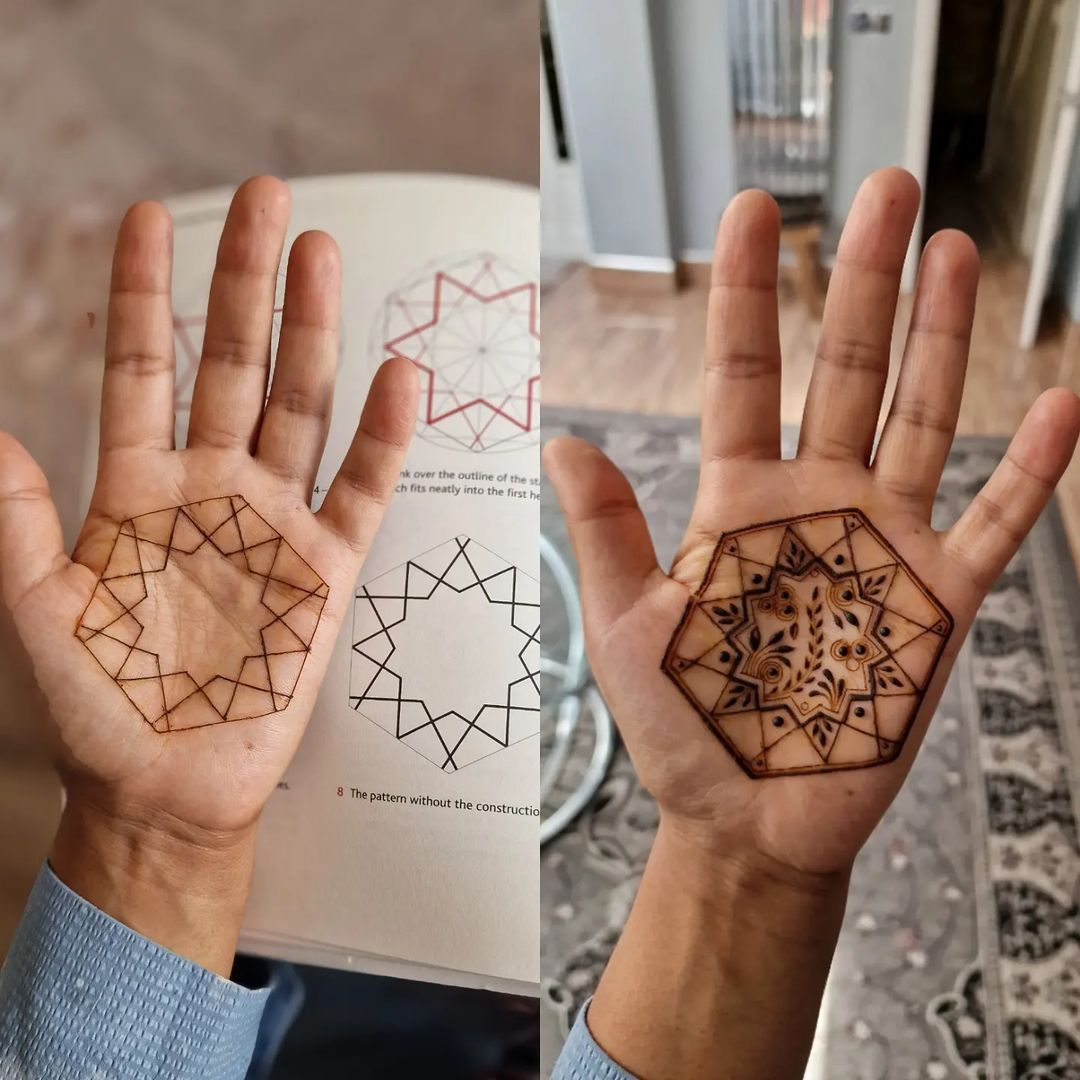
The Islamic geometric designs are so intricate and appealing to the eyes, these designs have an elegance in their simplicity. What if there was a geometric henna art with this simple and elegant detailing, well you indeed can get one for yourself and it will give you a perfect western touch. To create this design, you just need to draw a simple hexagon in the middle of your palm and inside it you can draw multiple overlapping triangles at the edges, giving a starry effect inside. You can either carry the design like this or if you want you can add some floral detailing inside the triangles and the middle of the hexagon for a more defined look.
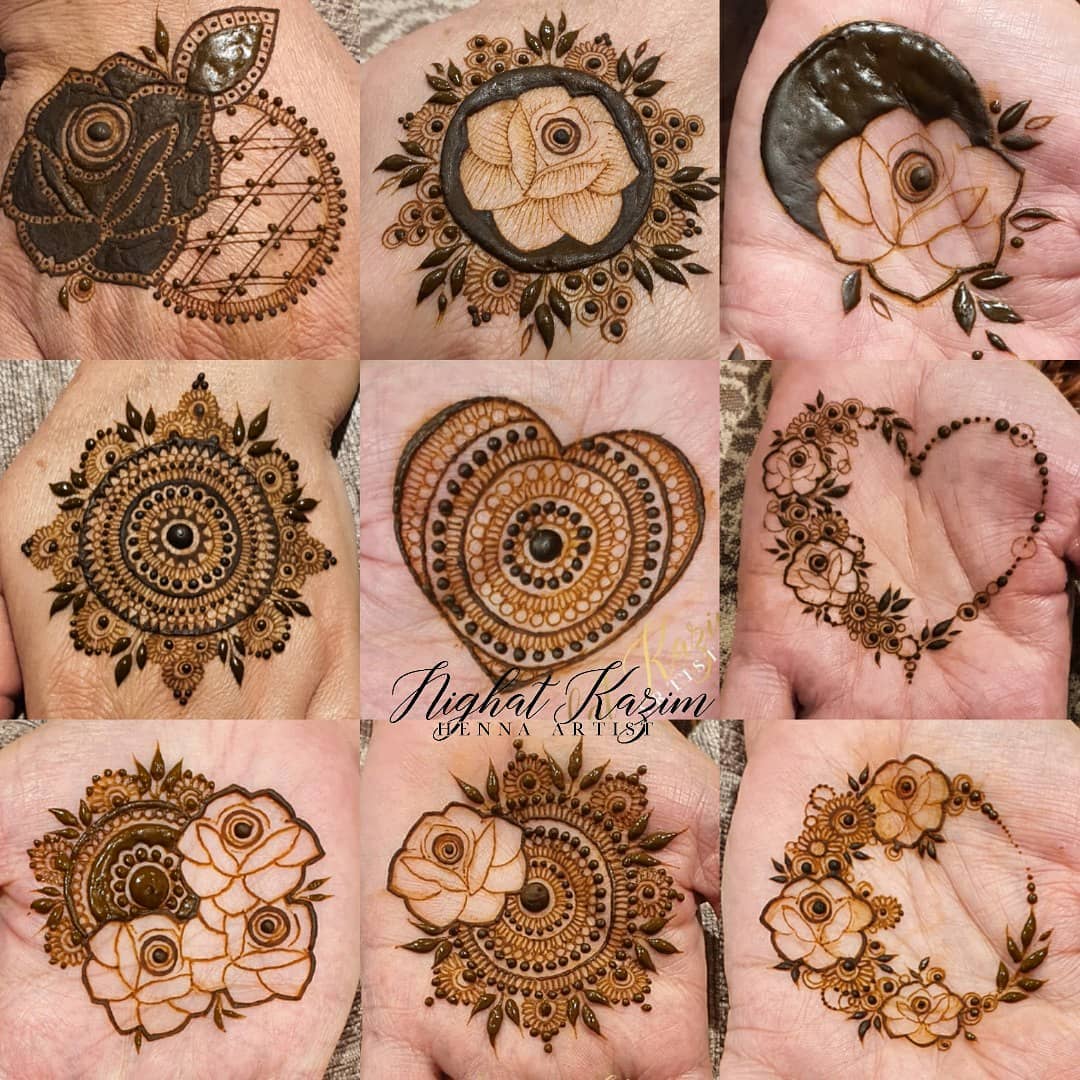
31. The Blooming Rose Henna Design Inspirations
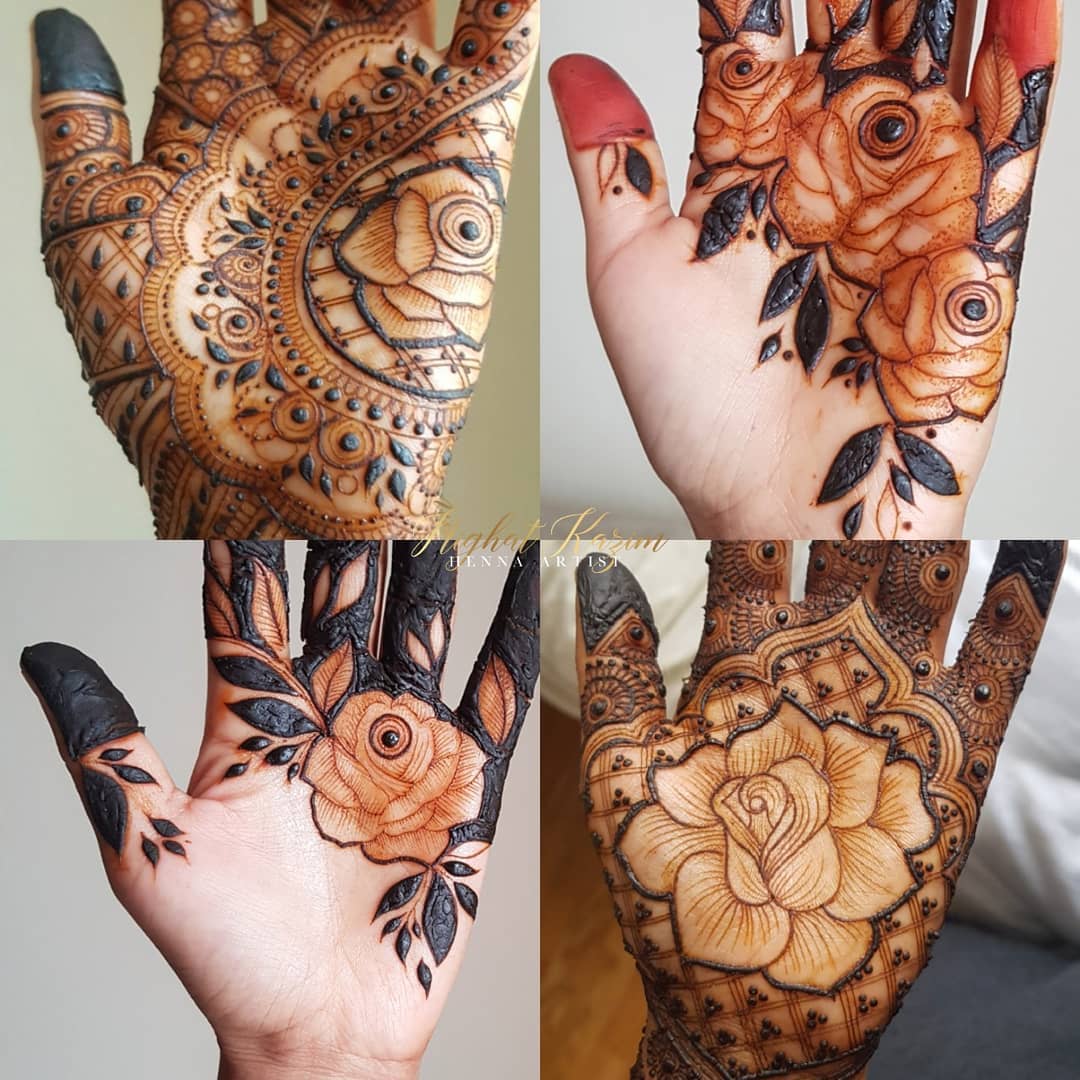
The beauty and attraction of blooming roses are what we all love to look at, these are a perfect treat for the eyes of the viewers. These blooming rose motifs can be put beautifully on your palm as well with henna stains. You can try experimenting with various design styles for your palms like full palm stains with the rose motif on the upper side of your palm covered with a semi-circular mandala around and simple detailing for the rest of your hand, or you can try a style with rose motifs in middle of your palm covered with floral details. Whereas for semi-palm styles you can try three different-sized roses just below your fingers with leaves around them, or the same style but with a single rose motif.
We hope you liked all these simple mehndi designs step by step tutorials. We have curated this list with great pains. Hope it helps to brig a smile to your face. Give us your valuable feedback in the comments section below. Do check out other henna related articles at K4 Fashion. We will come back with more such useful articles soon.
Glitter Mehndi Designs for Hands by Hiffyraja