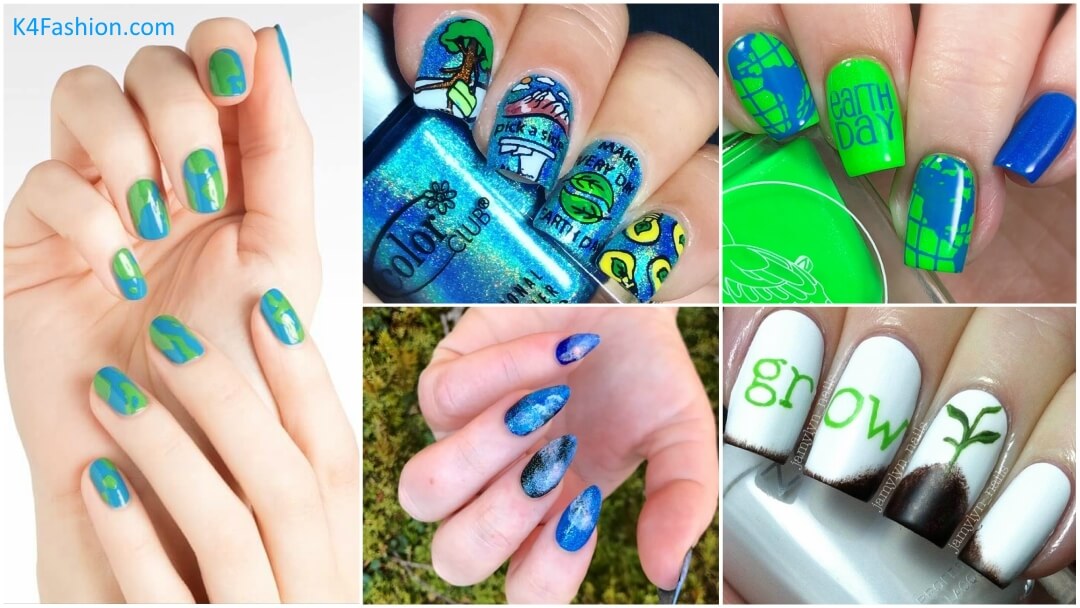
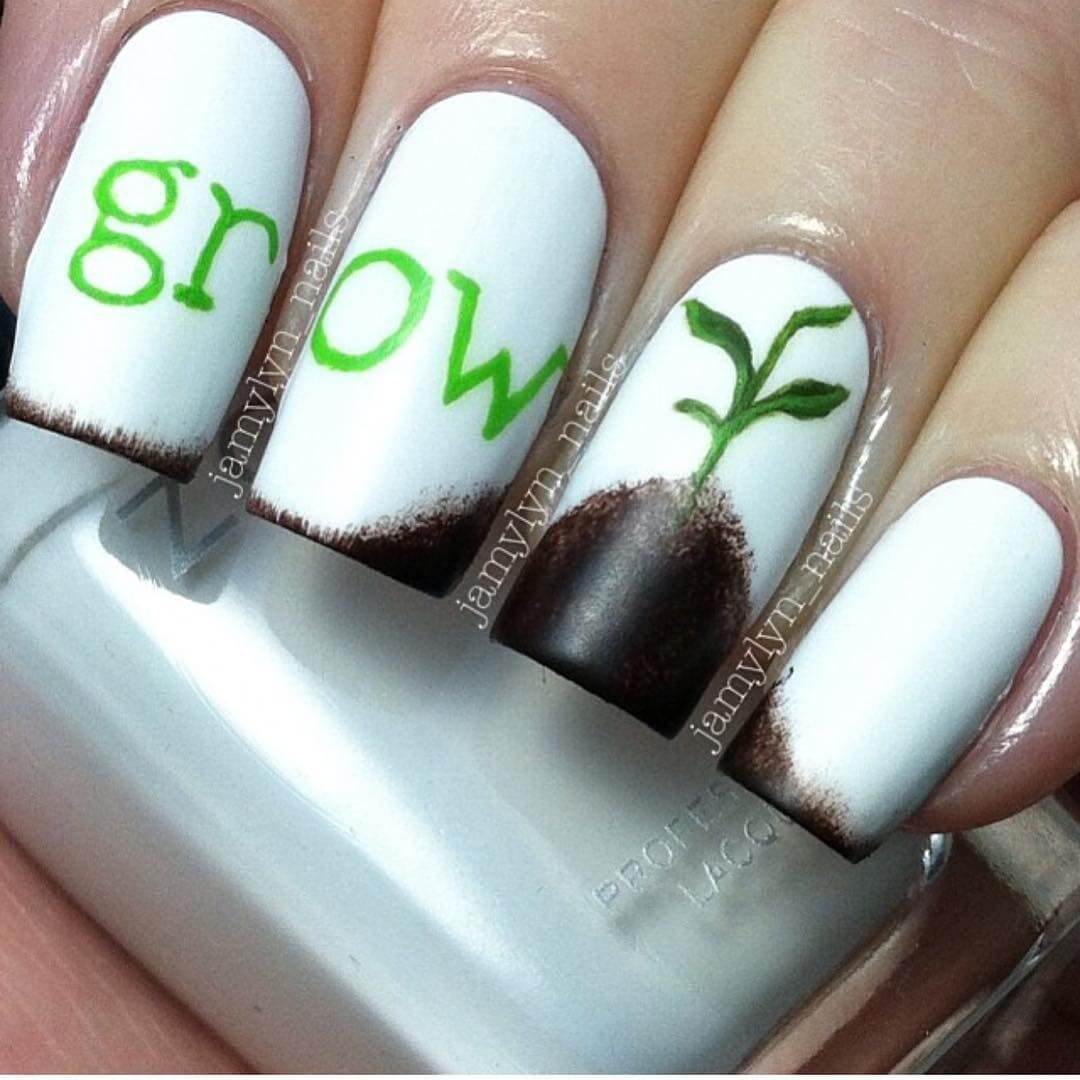
Nail art always works a miracle on your nails by not just making it look appealing but also elegant and chic. These special designs will pep up your nails with a type of exclusiveness and these are also the new trendy designs below. There are different techniques of nail art such as painting with a brush, sponge bobbing, stamping and many more interesting techniques. Sometimes, you might find it hard and difficult to get the exact design that you were expecting to complete. Especially for the beginners, they might find it really difficult and sometimes it becomes a mess but girls just chill because it is all a part of learning to do nail art. Nair art designs seems so simple when you see it but it is also an art that requires time to learn. Anyway, this article has simple as well as easy nail art designs for you to do along with the steps clearly. There are also few nail art designs for professionals too. So, don’t worry and try these special designs. One way to pass time while you are bored is try some new and unique nail art designs.
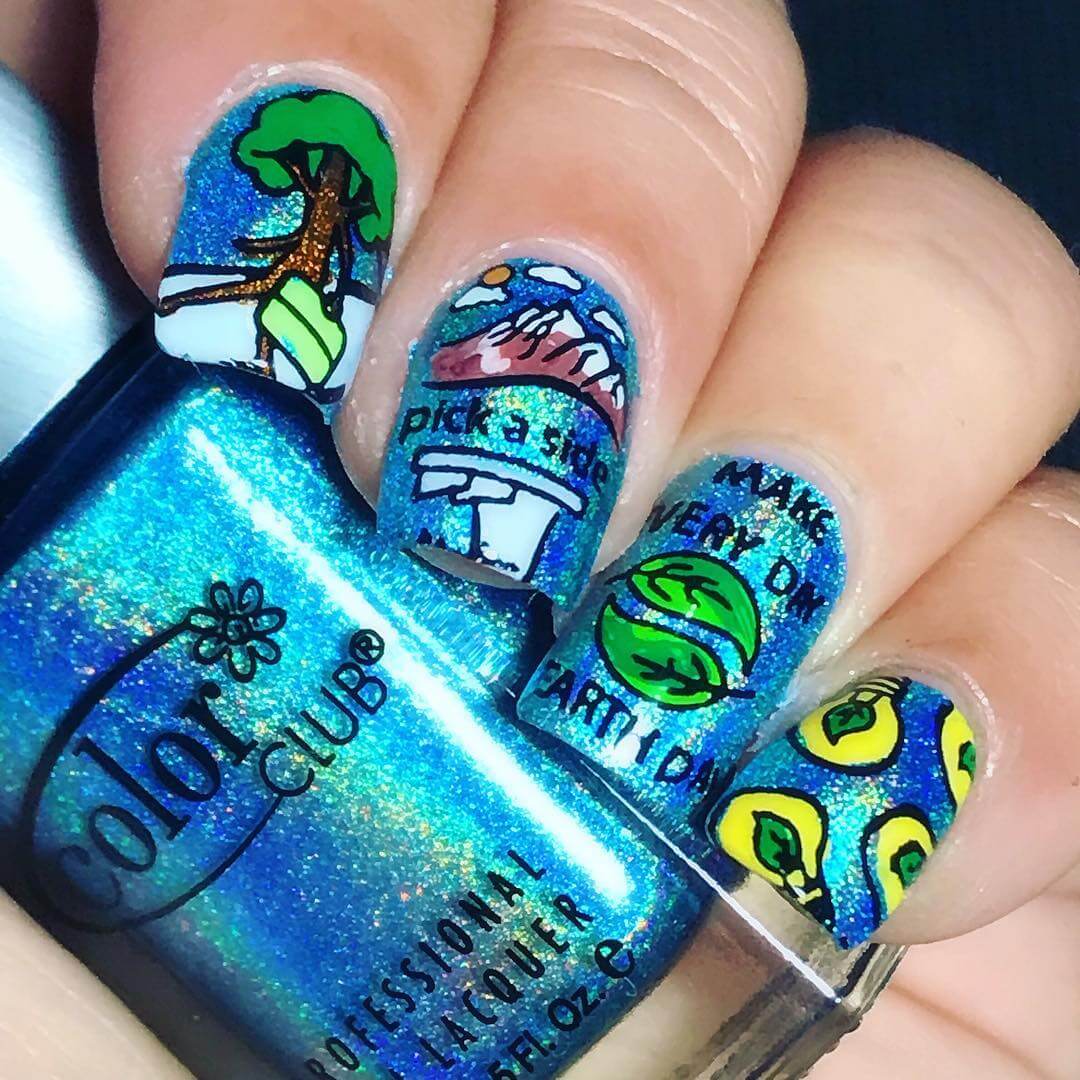
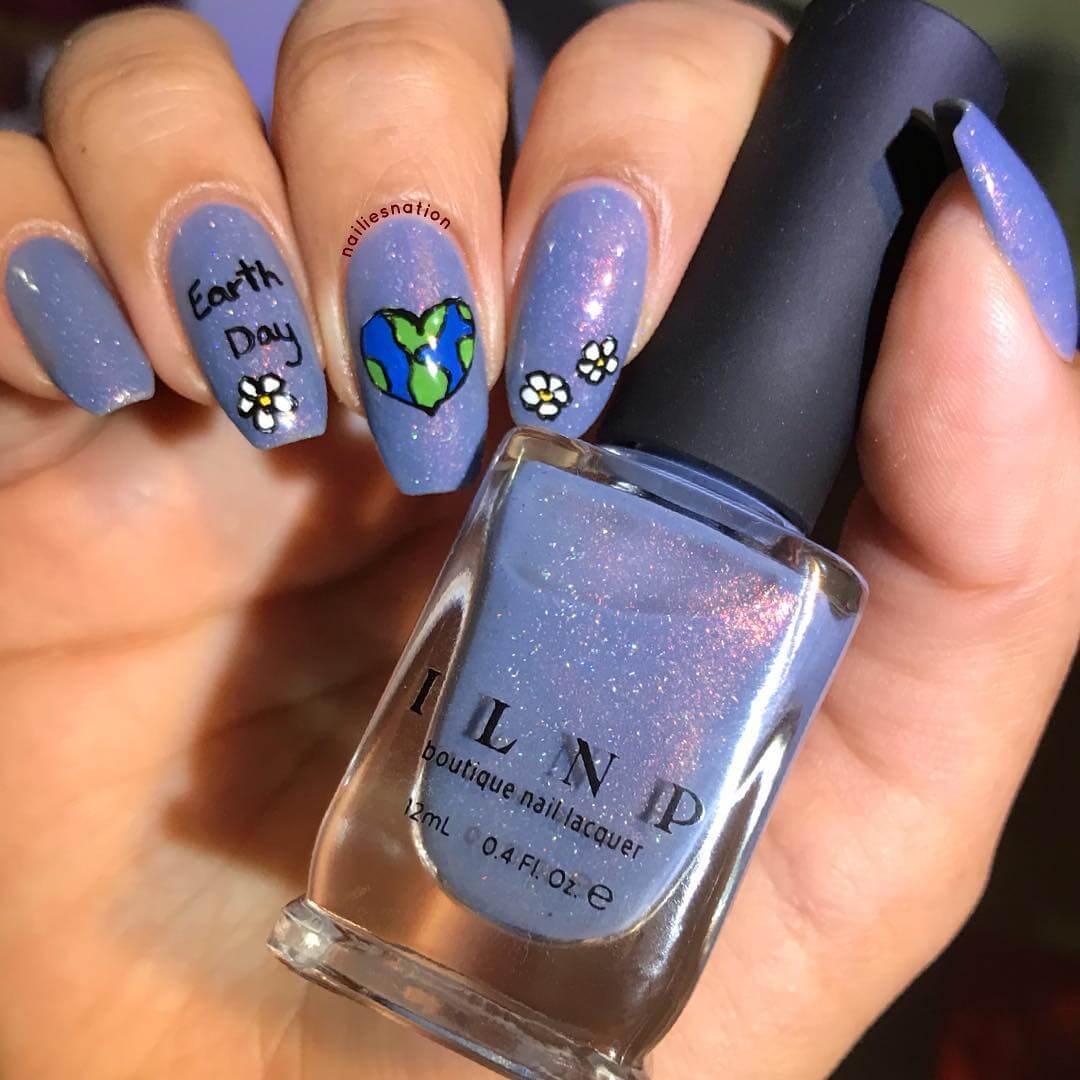
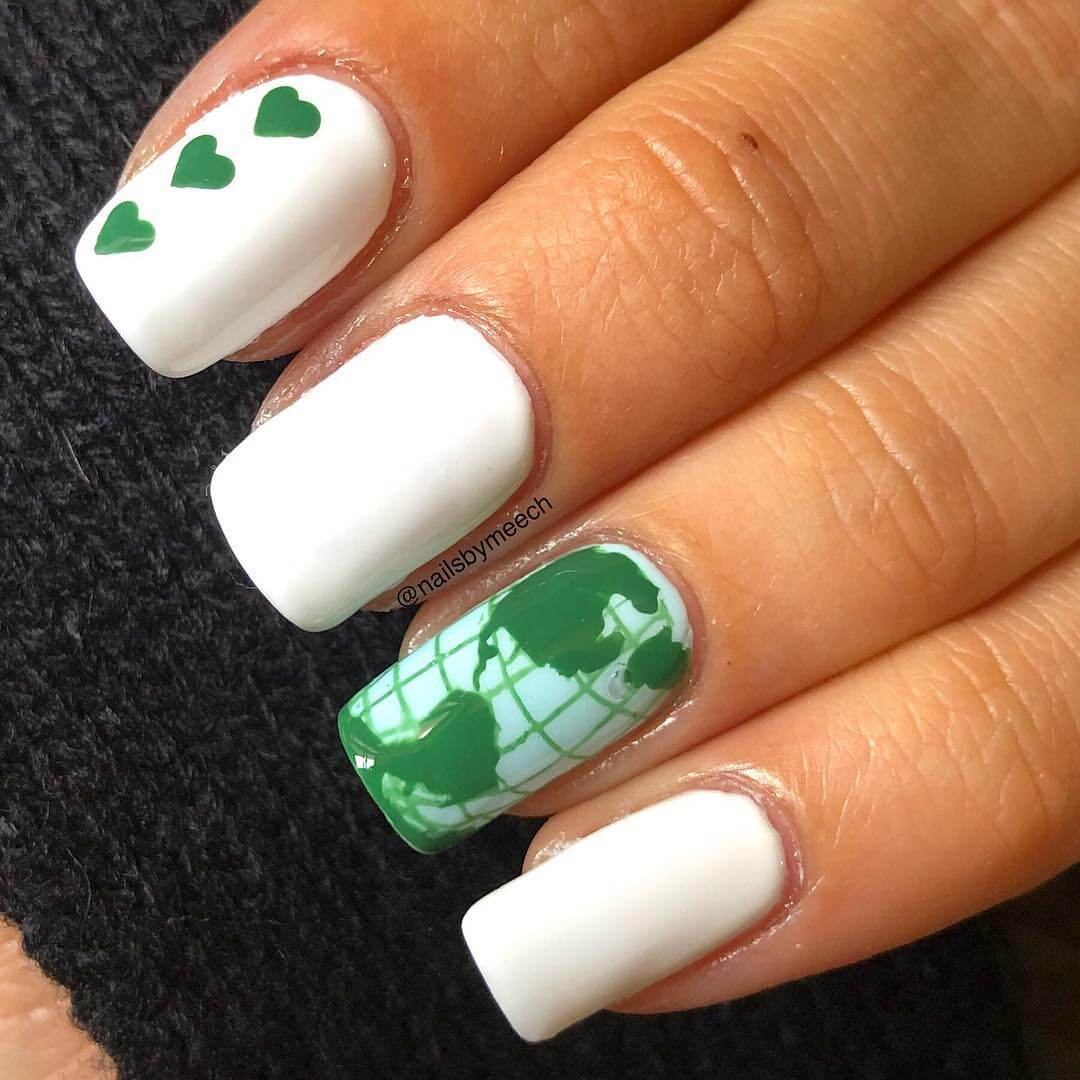
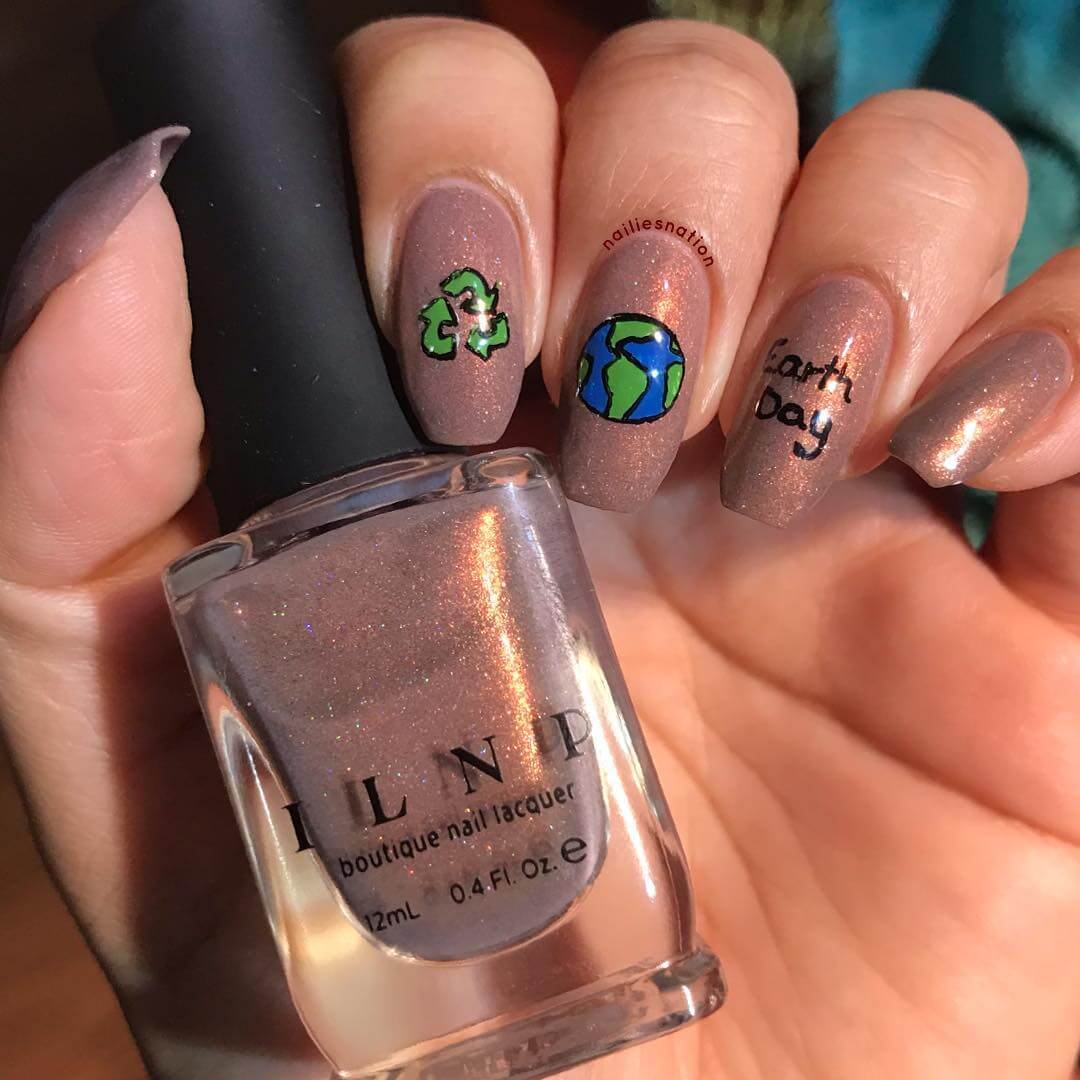
However, these special nail art designs are based on the theme of earth and it is a specially created nail art design based on earth day. Earth Day is celebrated to show and support environmental protection. Hence if you are person who loves nature. You should check these designs out and you can also show your support through some nail art designs. The earth day special nail art designs are waiting for you in this article.
Earth Day Special Nail Art Designs
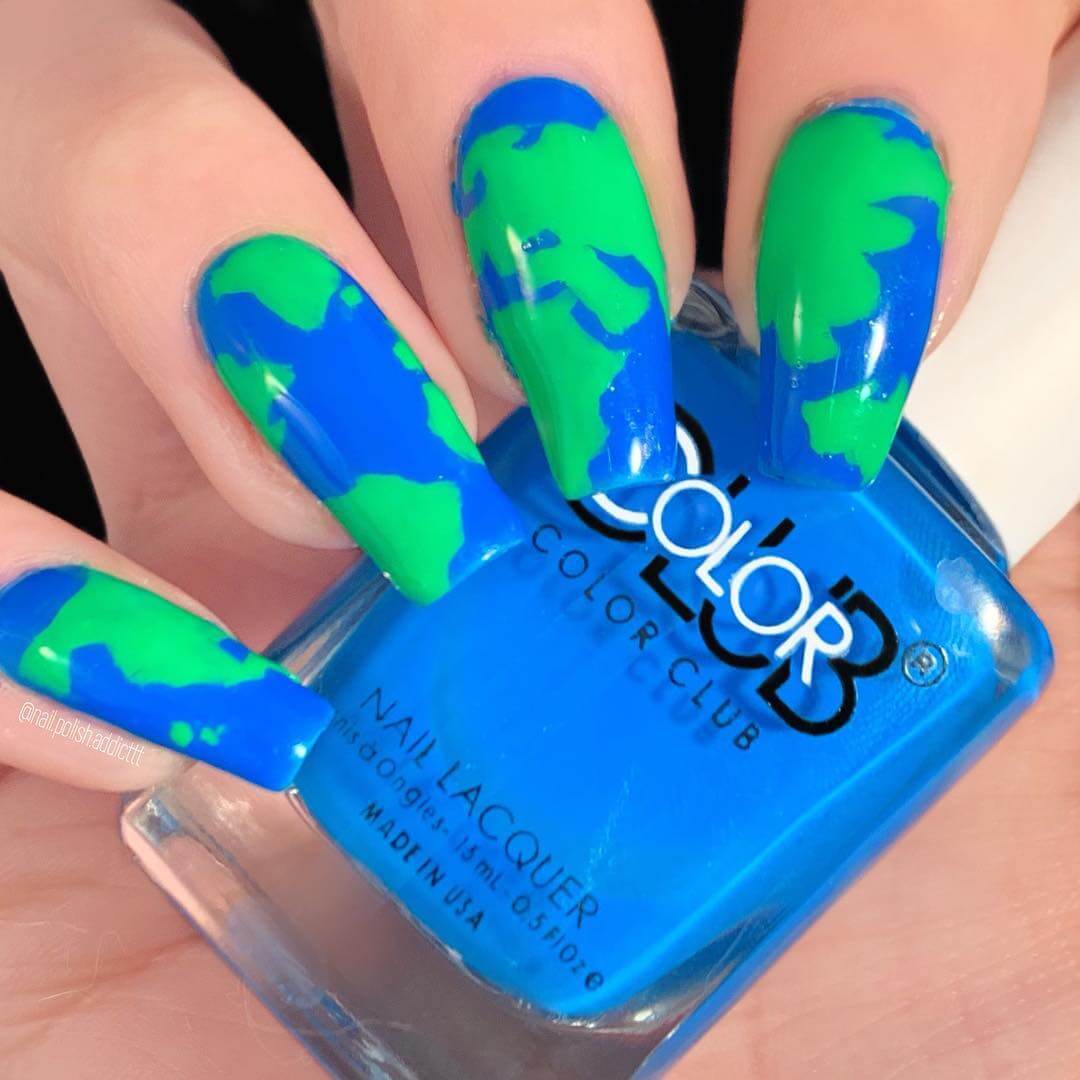
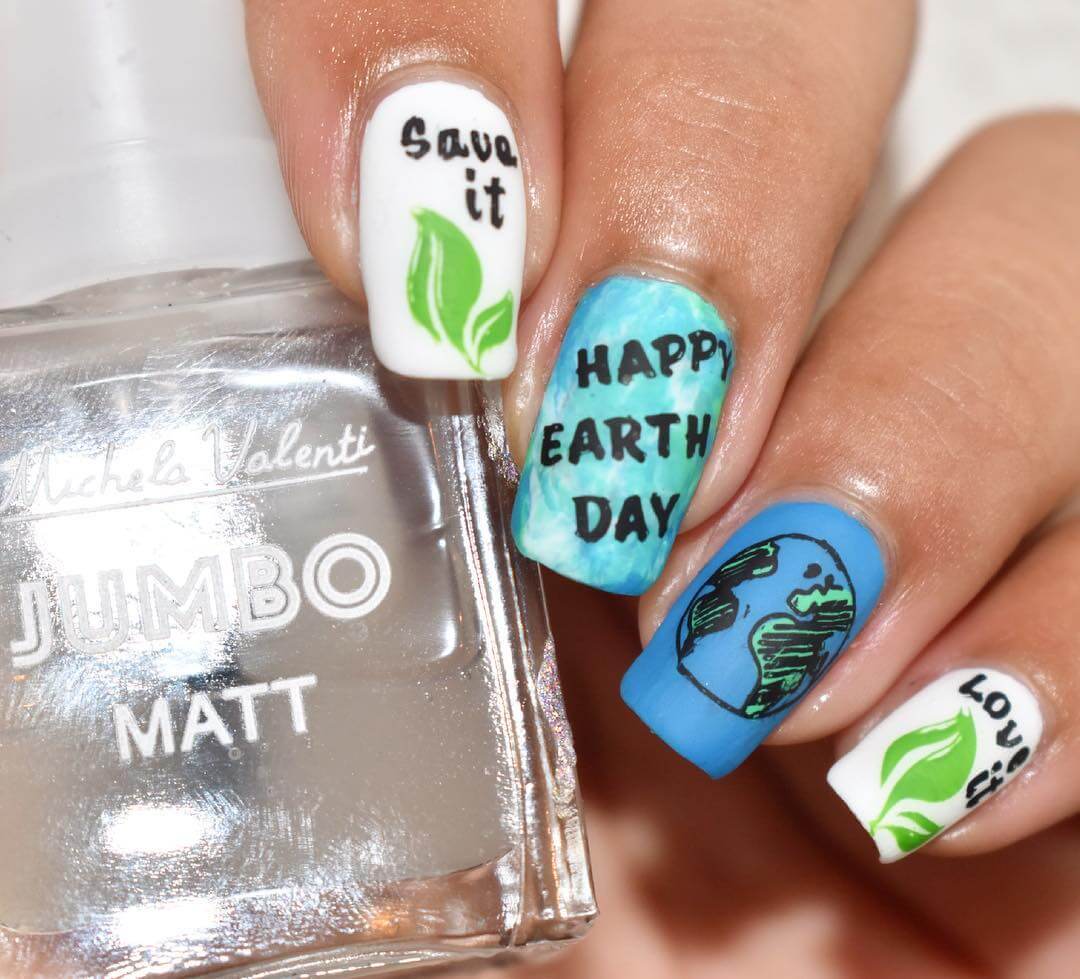
1. Map Design Nail Art
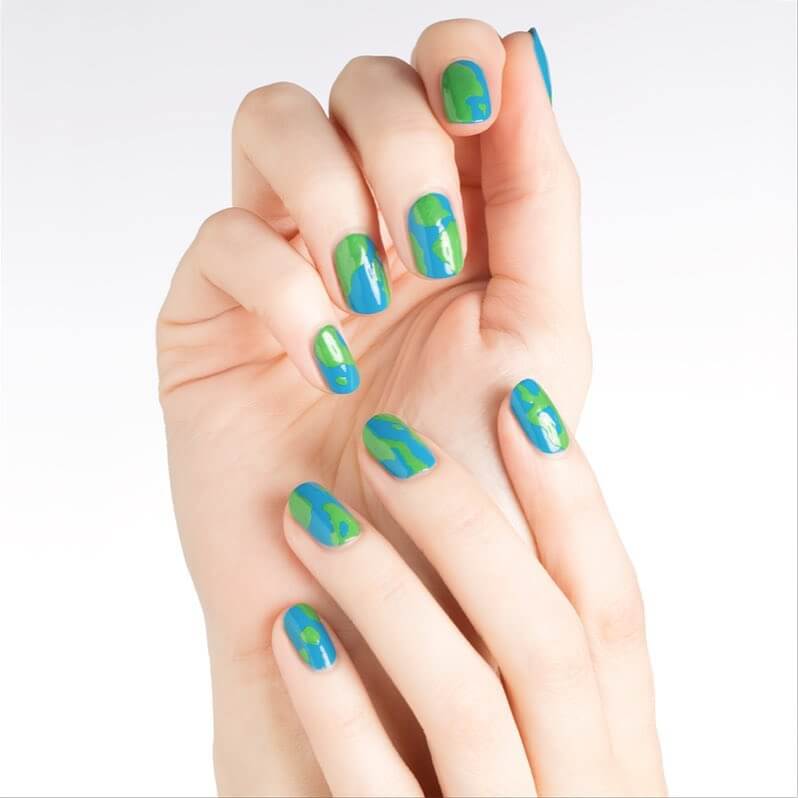
This nail art is loved by kids as well as few adults. It is a simple and it is the best choice for a person who is trying nail art design for the first time. It is not a difficult nail art design. It is quite easy to do. Just follow the steps below:
What you will need:
- Base Coat – You can get this online in websites like Nykka or you can buy it in the store you usually purchase in.
- Top Coat – you can get this also online or in the store you usually visit.
If you can’t find these specific coats then you can always buy or opt for simple transparent nail polish which is available in almost every store.
- Pearl Dark Green Nail Polish . If you can’t find this color, then you can buy any green color nail polish.
- Blue Color Nail Polish
- Nail Polish Remover
- Stamper and Scraper
- A Thin Nail Art Brush
- A Silicone Stamping Mat
- Transparent Slow Drying Stamping Polish or Qtica Extending Top Coat
- A Nail Art Orange Stick
- A Stamping Plate that includes the map designs. If you don’t get this then you can just go with the stamping plate of your preference.
Steps To Apply:
- Paint a coat of the slow drying stamping polish onto the sections of nails on the mat and allow it to dry. This a slow drying polish.
- Now using your stamper and scraper and the floral stamp image from the stamping plate, roll the stamp design onto the finger sections of the mat when the top coat has dried.
- After this is the fun part, take your nail art brush and the respective colors to fill the map designs. After it is done, allow it to dry.
- In the mean time you can apply the base coat onto your every nail and then paint your nails evenly with one coat of the blue nail polish.
- Now using a orange nail stick and sliding it under the brinks of the decal, slowly peel off the decal from the mat.
- After this you will paint the second coat of the blue nail polish and wait for it to become a little sticky that is in a state that is not too wet nor too dry. Then take the decal and slowly press it against your nails and you can use small scissors or the cuticle nippers to remove the excess decal on the sides of your nails.
- Then you can finish it off by applying the top coat.
2. Nature Based Nail Art Design
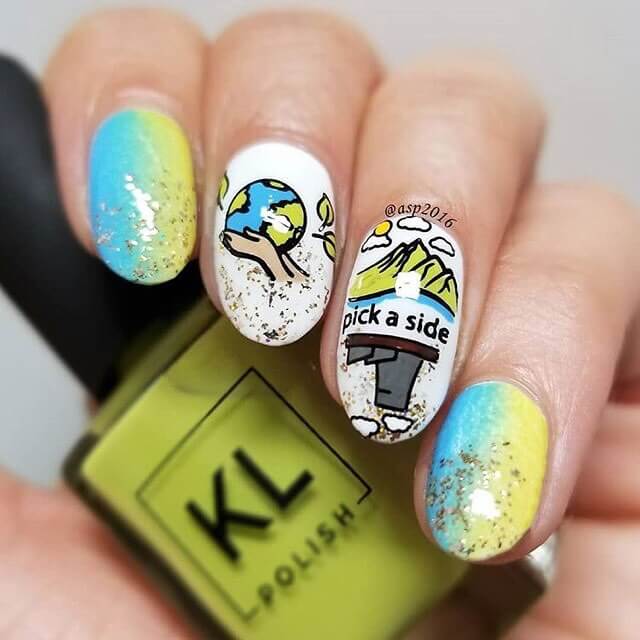
This nail art design which is unique as well as well loved by everyone is new in trend and one of the latest designs. It involves sponging technique and using nail polish pen.
What you will need:
- Matte Sky Blue Nail Polish – you can either by Maybelline or go with the brand Look Nail Color. If you get the same color in a different brand also you can opt for it.
- Smudge resistant glitter top coat and base coat
- Pastel Yellow Color Nail Polish – Try getting a nail polish pen in this color as this well make the work more easy.
- White Color Nail Polish
- Plain Grey Nail, Plain Brown and Black Polish Pen
- Nail Polish remover
- Sponge and Plastic sheet and a toothpick
Steps to Apply:
- Apply base coat or a transparent nail polish on every nail evenly and as a thin layer.
- Paint white color nail polish on your middle finger and ring finger as the base color for the nail art.
- Then use black nail polish pen to draw as shown in the picture and then fill the color with nail posh pen accordingly.
- Paint the pastel yellow color nail polish on your other fingers.
- On a flat surface, paint a generous amount of the pastel yellow and sky blue colors right next to each other on to the plastic. Make sure they’re just about touching at the brinks.
- Use a toothpick to swirl the two colors together in where they meet. So if you are thinking of a lengthy graduation, mix a bigger section of the colors, if you are thinking less of a fade, then just mix them together a teeny bit.
- Dab the sponge on the nail polish on the plastic for a few times. Then dab it directly on your nail.
- Then apply the Smudge resistant glitter top coat on your nails.
- Clean up the sides of your nails with the remover.
3. Aesthetic Leaf Nail Art
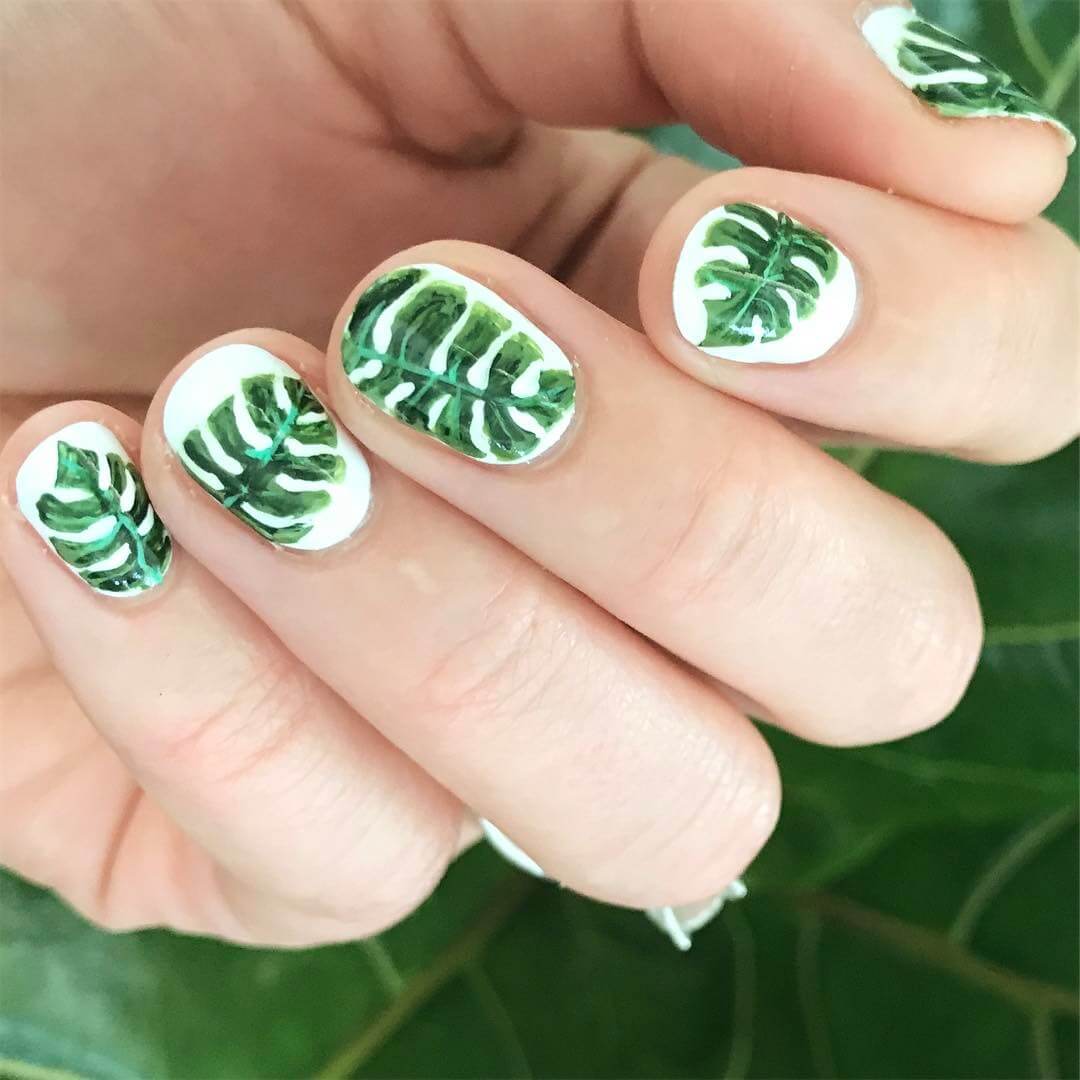
This is an aesthetic nail art design which is a really attractive earth day nail art design of all. This might look quite difficult but it is quite easy if you try it.
Things you will need:
- Leaf Nail Art stickers. If you don’t get the exact one like in the image, feel free to buy your favorite nail art sticker either online or a store you visit often.
- White Nail Polish
- Top coat and Base coat or Transparent Nail Polish
- Tweezers
- Blow dryer
Steps to Apply:
- First, apply the base coat or the transparent nail polish on every nail evenly in a thin layer.
- After it dries, paint your nails with the white color nail polish.
- Then, again apply the base coat on every nail after the already applied nail polish dries.
- Cut the stickers in such a way that they fit your nail.
- Now use tweezers to lift the nail sticker you want to apply. While doing it, ensure that you don’t touch the sticky side of the sticker after removing the plastic sheet from the tattoo
- Then place the sticker on you nail and smooth it down from your nail bed to the tip.
- Do this on every nail and blow dry your nails for several seconds. Make sure that you hold blow dryer not too close to your nails.
- Apply the top coat or the transparent nail polish on every nail.
4. The Snowy Nail Art Design

This nail art design is just perfect if you are looking for a snowy nature nail art design. This nail art is an epic earth day nail art design. Here is the step by step way to do the nail art.
Things you will need:
- Clear Base coat and Top coat or transparent nail polish
- White Nail Polish
- Black Nail Polish Striper Nail Brush
- Lime Green Nail Polish or Essie Mojito Madness Nail Polish
- Deep Green Nail Polish or OPI Stay Off the Lawn Nail Polish
- Sponge and Toothpick
- Nail Polish Remover
Steps To Apply:
- Begin by applying the base coat or the transparent nail polish on every nail evenly in a thin layer.
- Paint white color nail polish on every Nail as a single coating.
- On a even surface, paint a generous amount of the deep green, lime green and white colors respectively right next to each other on to the plastic. Make sure they’re just about touching each other at the brinks.
- Now use a toothpick to swirl the each of the two colors together in where they meet. So if you are thinking of a lengthy graduation, mix a bigger section of the colors, if you are thinking less of a fade, then just mix them together a teeny bit.
- Dab the sponge on the nail polish on the plastic for a few times. Then dab it directly on your nail. After a few times you will get the graduation as shown in the picture.
- Then apply the top coat or transparent nail polish on your nails.
- Clean up the sides of your nails with the remover.
- Then use the black nail polish striper brush to draw the pine trees and birds. After this, apply another layer of top coat thinly on your nails.
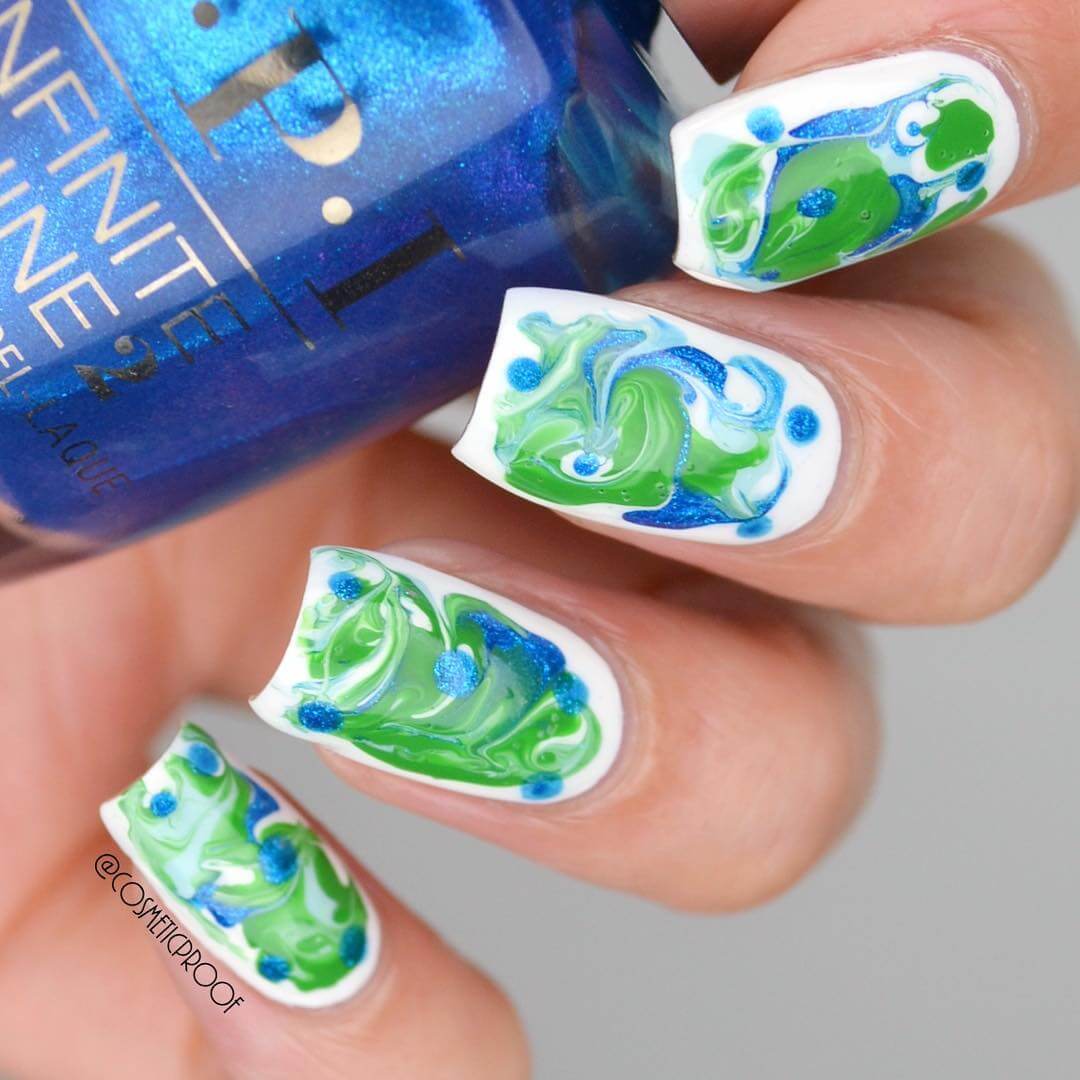
5. Water Marble Nail Art
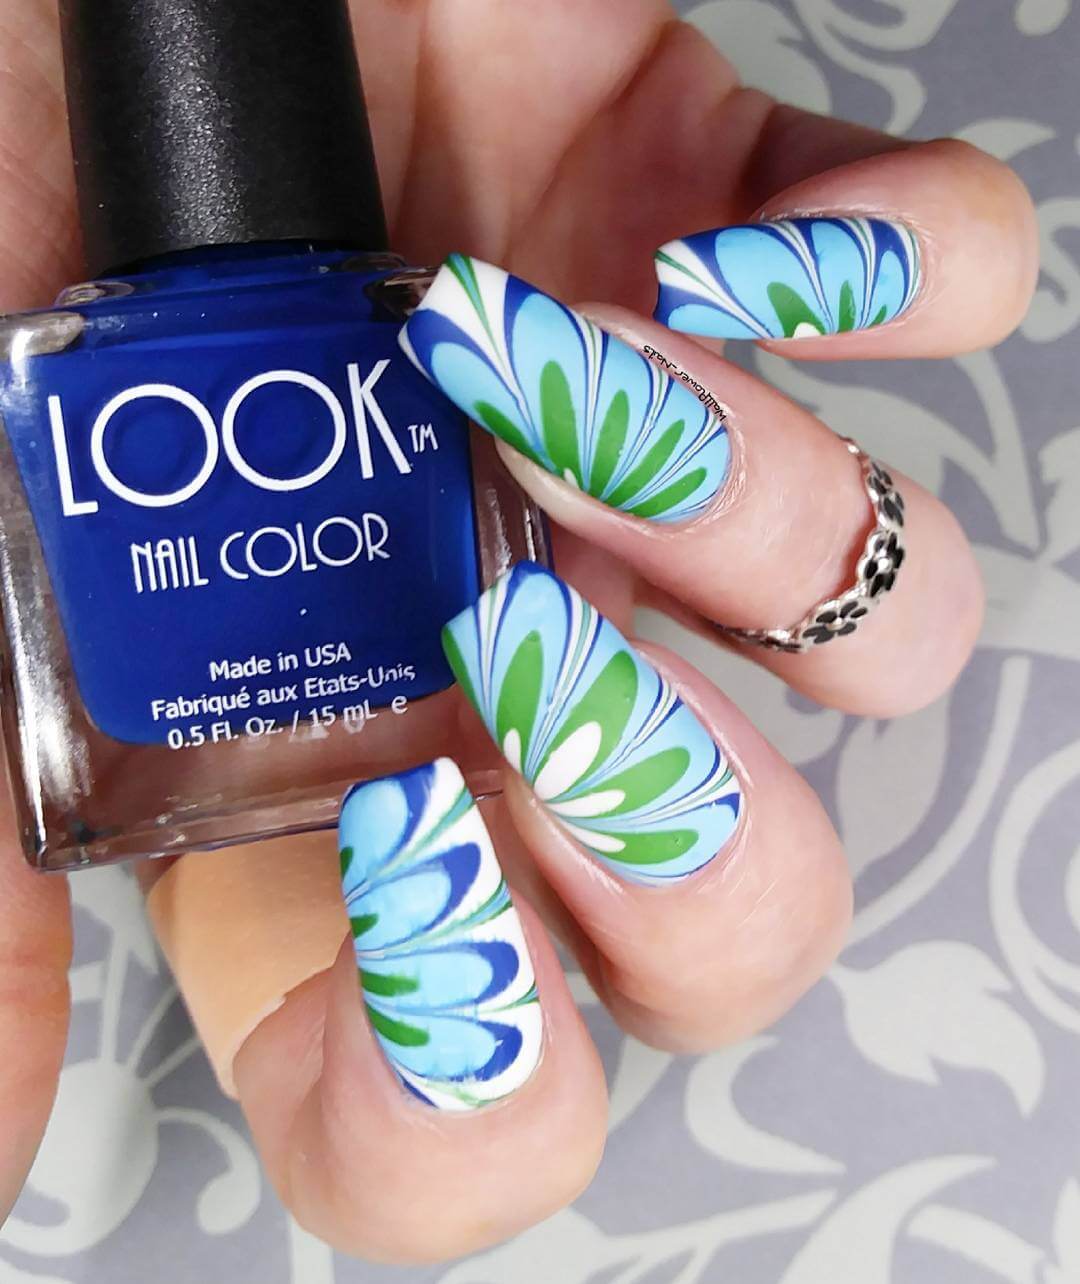
This is a water marble nail art design with a flower moto. It is quite common and some might find it to be difficult to do this nail art but it is pretty easy if you follow the steps correctly. You might find it flustering and hard if you are trying it for that’s first time but don’t give up yet, it will get much better over time and practice. First time for a beginner is jus going to be a phase for the person to understand the steps to do the nail art.
Things you will Need:
- Royal Blue, Sky Blue, White and Light Green Nail Polishes
- Clear Top Coat and Base Coat or Transparent Nail Polish
- White Nail Polish
- Nail Polish Remover
- Toothpicks and Cotton Swabs
- Tissues
- A Bowl or Cup of water
- Scissors and Sticky Tape
Steps To Apply:
- Start by applying the clear base coat or the transparent nail polish on every nail evenly in a thin layer.
- Now paint your nails with the white nail varnish by at least two coats.
- Wrap and paste the sticky tape around your cuticles and skin and also ensure that the tape doesn’t cover any part of your nail as it will spoil the effect.
- Add the Royal blue nail polish to the bowl of water by holding it one cm above the center of the waters brink.
- Slowly tap the handle of the brush till the nail polish drips into the water. Add sky blue colour in the same way into true middle of fat colour. Carry on the pattern in this way and add the colors.
- Now use a tooth pick to stir the clear water encircling the circle of nail varnish polish. This will make the nail polish’s circle or ring expand. Be sure the toothpick does not touch the nail polish itself but only the clear water.
- Position the toothpick on the water, from about the third last ring out. Drag the toothpick inwards, in the direction of the centre of the nail polish. If you continue in this way, you can make a flower pattern.
- Dip your finger into the water along with tape at a forty-five degree angle.
- Put your finger in the water and use a new unused toothpick to roll around the leftover nail polish. Then, slowly remove your finger out of the water.
- After it dries, peel of the tape that wrapped around the finger.
- Now carefully clean the sides of your nail and cuticles using a nail polish remover and cotton swab.
- Finally the last step, apply the top coat or the transparent nail polish on your nails.
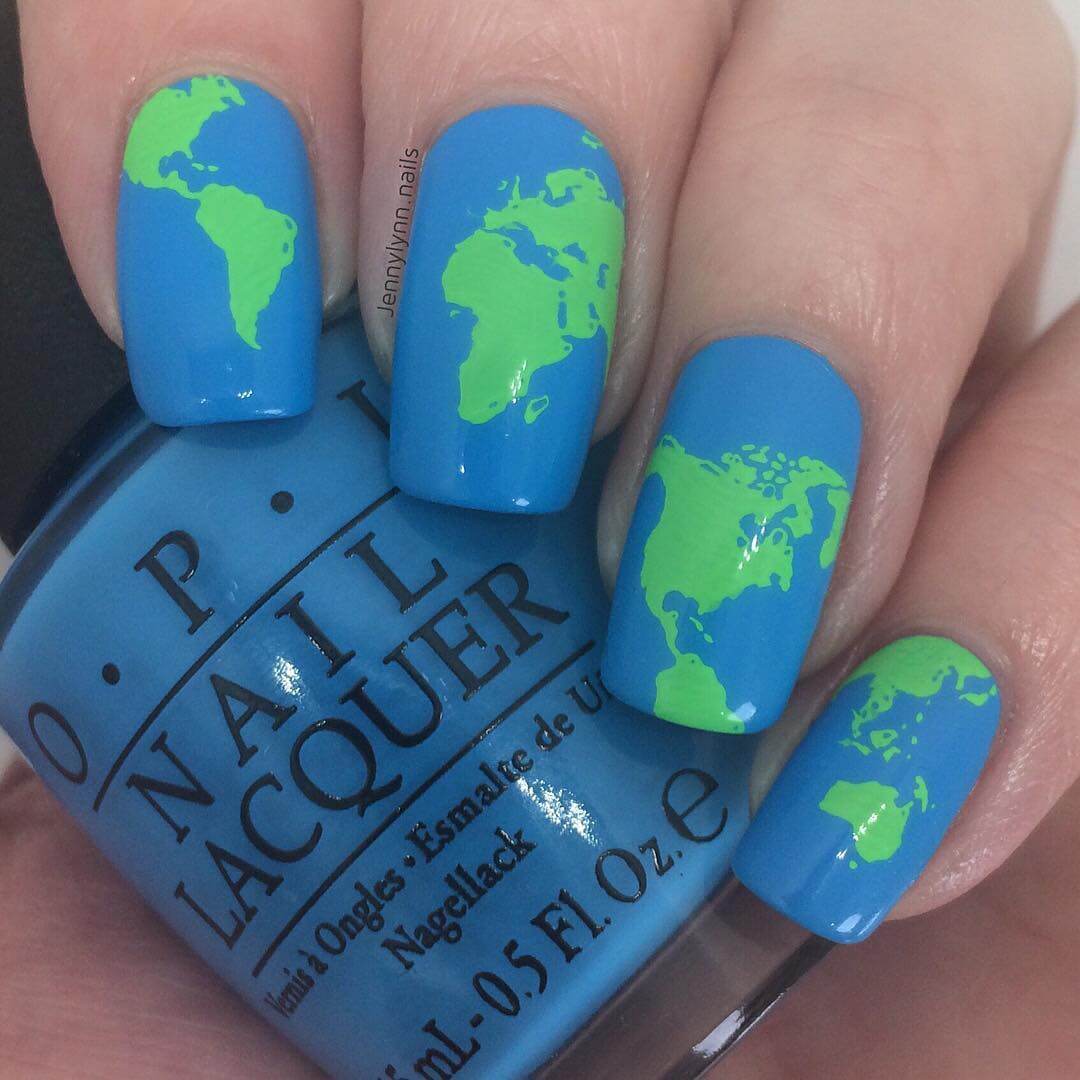
6. The Vibrant Earth Nail Art
This nail art is similar to the one in the beginning but the colors are neon which makes it vibrant and bright. This is done by the normal stamping technique. The colors of this nail art is what makes this a vibrant and a brilliant nail art. The steps to do this nail art is given below.
Things you will need:
- Color Club Chelsea Girl or Neon Blue Nail Polish
- Color Club Trees Please or Neon Green Nail Polish
- Clear Top Coat and Base Coat or Transparent Nail Polish
- Nail Polish Remover
- Stamper and Scraper
- A Thin Nail Art Brush
- A Silicone Stamping Mat
- Transparent Slow Drying Stamping Polish or Qtica Extending Top Coat
- A Nail Art Orange Stick
- A Stamping Plate that includes the map designs. If you don’t get this then you can just go with the stamping plate of your preference.
Steps To Apply:
- Paint a coat of the slow drying stamping polish onto the sections of nails on the mat and allow it to dry. This a slow drying polish.
- Now using your stamper and scraper and the floral stamp image from the stamping plate, roll the stamp design onto the finger sections of the mat when the top coat has dried.
- After this is the fun part, take your nail art brush and the respective colors to fill the map designs. After it is done, allow it to dry.
- In the mean time you can apply the base coat onto your every nail and then paint your nails evenly with one coat of the blue nail polish.
- Now using a orange nail stick and sliding it under the brinks of the decal, slowly peel off the decal from the mat.
- After this you will paint the second coat of the blue nail polish and wait for it to become a little sticky that is in a state that is not too wet nor too dry. Then take the decal and slowly press it against your nails and you can use small scissors or the cuticle nippers to remove the excess decal on the sides of your nails.
- Then you can finish it off by applying the top coat.
7. The Day and Night Nail Art

This nail art is a day and night design based nail art. It is one of the special earth day nail arts.
Things you will Need:
- Clear Coat and Base Coat or Transparent Nail Polish
- Royal Blue Nail Polish with Striper Brush
- Black Glitter Nail Polish
- Sky Blue and White Nail Polish
- Sponge and Toothpick
- Nail Polish Remover
Steps To Apply:
- Begin by applying a transparent nail polish or the base coat on every nail evenly and as a thin layer.
- Paint your nail near cuticle with black glitter nail polish and line it with the Royal Blue Nail Polish with a Striper Brush.
- On a flat surface, paint a generous amount of the sky blue and white colors respectively right next to each other on to the plastic. Ensure they’re just about touching each other at the brinks.
- Now use a toothpick to swirl the two colors together in where they meet. So if you are thinking of a lengthy graduation, mix a bigger section of the colors, if you are thinking less of a fade, then just mix them together a teeny bit.
- Dab the sponge on the nail polish on the plastic for a few times. Then dab it directly on your nail. After a few times you will get the graduation as shown in the picture.
- Then apply the top coat or transparent nail polish on your nails.
- Clean up the sides of your nails with the nail polish remover.
8. Poster Nail Polish
This nail art is also one of the ones similar to the others in the beginning but in this nail art, we use glossy nail polish instead of matte.
Things you will Need:
- Glossy Royal Blue Nail Polish
- Matte Yellow Nail Polish
- Black Nail Polish with a Striper Brush
- Matte Green and White Nail Polish with a Striper Brush
- Clear Coat and Base Coat or Transparent Nail Polish
- Stamper and Scraper
- A Thin Nail Art Brush
- A Silicone Stamping Mat
- Transparent Slow Drying Stamping Polish or Qtica Extending Top Coat
- A Nail Art Orange Stick
- A Stamping Plate that includes the above designs. If you don’t get this then you can just go with the stamping plate of your preference.
Steps To Apply:
- Paint a coat of the slow drying stamping polish onto the sections of nails on the mat and allow it to dry. This a slow drying polish.
- Now using your stamper and scraper and the floral stamp image from the stamping plate, roll the stamp design onto the finger sections of the mat when the top coat has dried.
- After this is the fun part, take your nail art brush and the respective colors to fill the designs. Outline the design with the black nail polish and you might need to overlap the outline also. After it is done, allow it to dry.
- In the mean time you can apply the base coat onto your every nail and then paint your nails evenly with one coat of the blue nail polish.
- Now using a orange nail stick and sliding it under the brinks of the decal, slowly peel off the decal from the mat.
- After this you will paint the second coat of the blue nail polish and wait for it to become a little sticky that is in a state that is not too wet nor too dry. Then take the decal and slowly press it against your nails and you can use small scissors or the cuticle nippers to remove the excess decal on the sides of your nails.
- Then you can finish it off by applying the top coat.
9. Stamping Technique Nail Art
This nail art is done by stamping nail techniques. It makes the nail art look more impeccable and also tidy.
Things you will Need:
- Nail Stamping Kit with a disc of these designs etched into it, a stamp that will allow you to roll the design onto your nails and a scraper to take out the extra nail polish.
- Royal Blue Matte Nail Polish
- White color Stamping Polish
- Clear Base coat and Top Coat or a Transparent Nail Polish
Steps to Apply:
- Apply base coat or a transparent nail polish on every nail evenly and as a thin layer.
- Now paint royal blue color nail polish as the base color for every nail.
- Make sure that your nails dry completely by placing your nails in front of fans to make it dry faster also.
- Now, take the disc with the designs and paint the design you want with white nail polish.
- Hold the scrapper slightly slanting almost at forty-five degrees and scrape of the excess nail polish on sides of the etched design on the disc.
- Now, use the stamper to imprint the design. Roll the stamper over on the design and you can see the design clearly on the stamper.
- After this, roll the stamper over your nail moving from one side to another. You can do this to every nail according to the designs and then apply top coat on your every nail.
10. Galaxy Nail Art
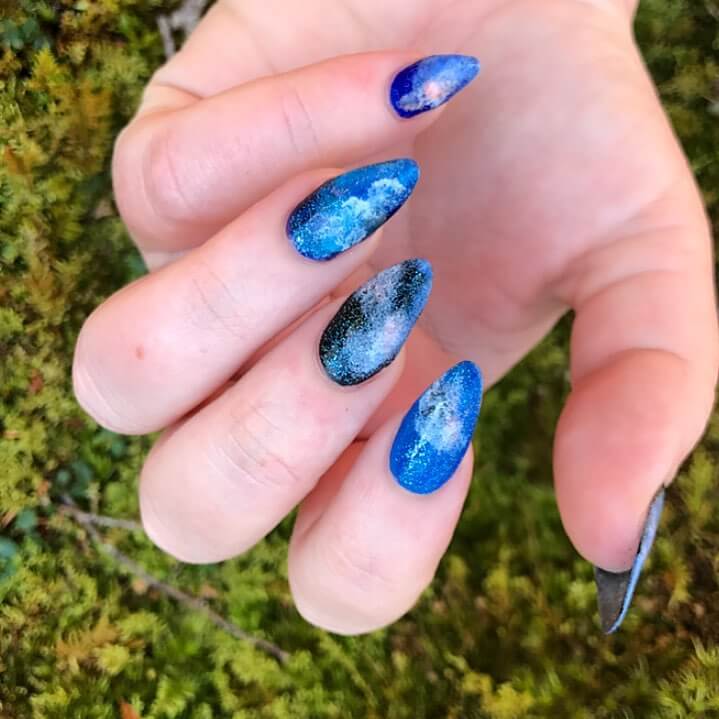
This is a galaxy nail art design which is impeccable as well as pristine in its own way. The galaxy nail art above is done by a digital nail art designer but this is a simple guise that tells you how to diy these nails. You will need a few different nail color polishes for this nail art.
Things you will Need:
- Matte Black Nail Polish
- Purple Nail Polish
- Matte White Nail Polish
- Royal Blue Nail Polish
- Clear Glitter Nail Polish
- Clear Base coat and Top Coat or a Transparent Nail Polish
- A Sponge and Some Toothpicks
- A Plastic Sheet
Steps to Apply:
- Start by applying base coat or a transparent nail polish on every nail evenly and as a thin layer.
- After it dries thoroughly, paint matte black color nail polish on your every nail and let it dry for some time.
- Paint the royal blue nail polish on a plastic sheet. Now, first dab the a small part of the sponge on the nail polish on the plastic surface slightly.
- Then dab it onto the nails slowly and ensure that when you dab it on your nails in a corner, it does not hide the black nail polish.
- After this do the same with purple nail polish and dab it onto your nails.
- Now, use toothpick and dip it lightly in the white nail polish and make different types of dots on your nail.
- The last step, finish it off by applying a clear glitter nail polish on every nail and ensure that when you apply, you don’t apply with too much glitter. This may rob the galaxy look of your nails.
11. The Green Alcohol Ink Nail Art
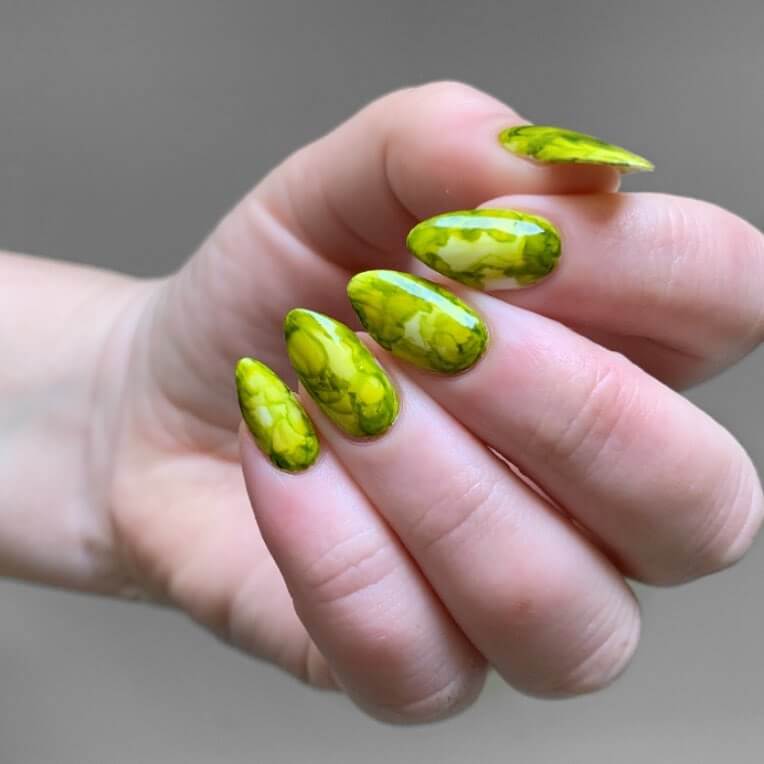
This green alcohol ink nail art is just perfect if you are looking for a simple earth day nail design which is also elegant in its own way. This might look difficult to achieve but its easy once you get hang of it and follow the steps properly without skipping any.
Things You Will Need:
- White Gel Nail Polish
- A small container with Rubbing Alcohol
- Light Green Gel Nail Polish
- Olive Green Gel Nail Polish
- Paper Towels and a Clean Brush like Makeup Brush or a Paint Brush
- Crystal Top Coat
- A Plastic Sheet
Steps To Apply:
- Start by painting white gel nail polish on every nail evenly and let it dry thoroughly using LED dryer for 30 seconds. Give two coats of the white gel nail polish on your nails.
- Then, set aside a small container with the rubbing alcohol and a clean brush.
- Now, paint the light green gel nail polish on a plastic surface. Then, Use the clean brush to dissolve the gel polish with the rubbing alcohol. Ensure that you don’t use too much of alcohol to dissolve the gel.
- When the dissolved light green gel polish almost looks translucent, use the brush to apply this dissolved gel to some parts of your nail.
- After this let the nail dry for that you can use LED dryer, follow the same procedure to dissolve the olive green nail polish and then apply it to your nails at parts to get the look but use a pointed brush this time.
- Now use the brush again to merge the colors a little using the rubbing alcohol.
- Keep repeating the process till you are satisfied.
- Finally apply the top crystal clear coat for finishing it off after drying the nails for one last time using LED dryer for 30 seconds.
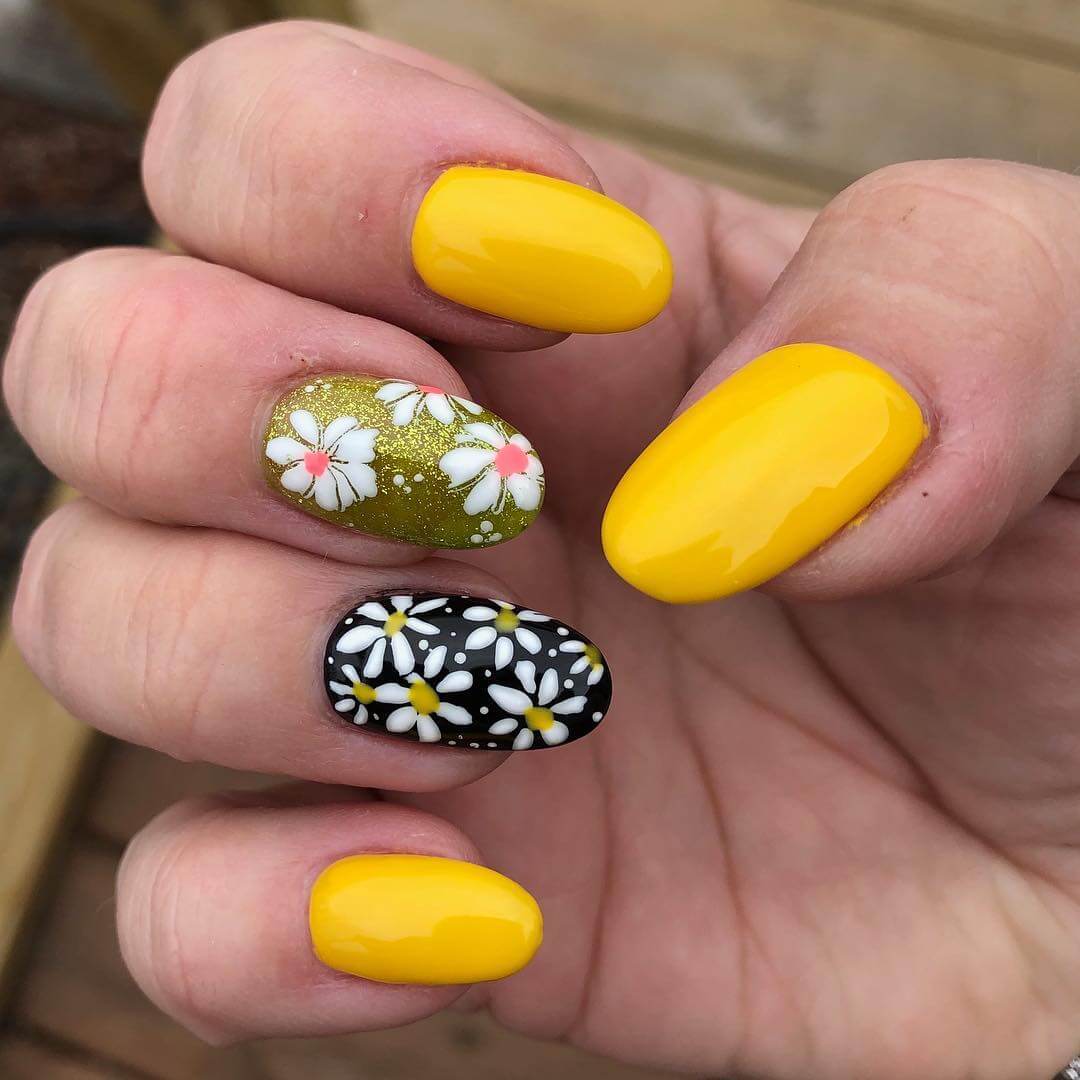
12. The Earthy Green and Yellow Nail Art
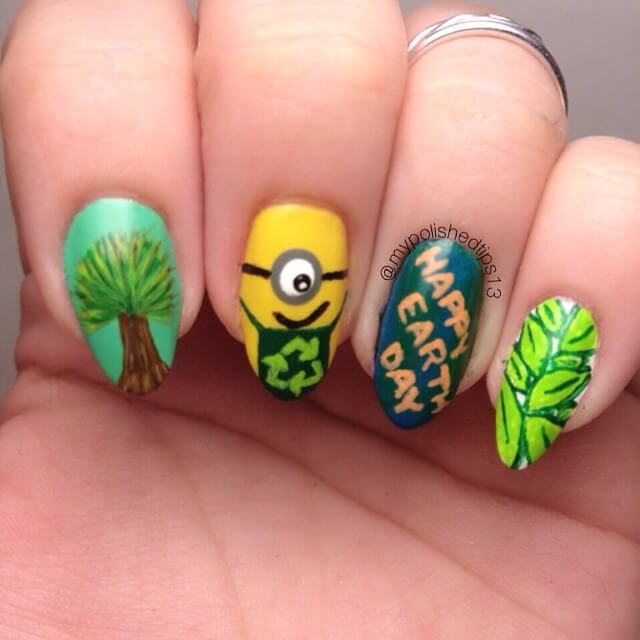
This is a do it yourself nail art. It is quite simple and easy for people who are really good at using a nail striper brush. The beginners do not need to be afraid of this. You can give it a try and it usually takes time and practice to get hold of it.
Things You Will Need:
- Mint Green Nail Polish
- Brown Matte Nail Polish, Light Green Nail Polish, Gray, White, Orange and Emerald Green Nail Polish with a striper brush
- Yellow and Blue Nail Polish
- Clear Base coat and Top Coat or a Transparent Nail Polish
Steps To Apply:
- First, apply the base coat or a transparent nail polish on every nail evenly and as a thin layer.
- Paint your pinky finger nail with white nail polish and then draw leaves and paint it with a striper brush using light green and emerald green nail polish.
- Then, Paint your ring finger nail with yellow and blue nail polish in the forms of stripes using a striper brush. After it dries completely, use orange nail polish with striper brush to write ” Happy Earth Day” or any other quote that you like and which is also small enough to fit your nails.
- Now moving on to the next finger, paint your middle finger with yellow nail polish. After it has dried, draw the minion using the respective nail polish colors using a striper brush.
- After this, paint your index finger with mint green nail polish as a base color for your nail and after it has dried, use the brown , light green and emerald green nail polish with a striper brush for the tree motif on your hands.
- Finish it off by applying the clear top coat and transparent nail polish.
13. Elegant White Earth Day Nail Art
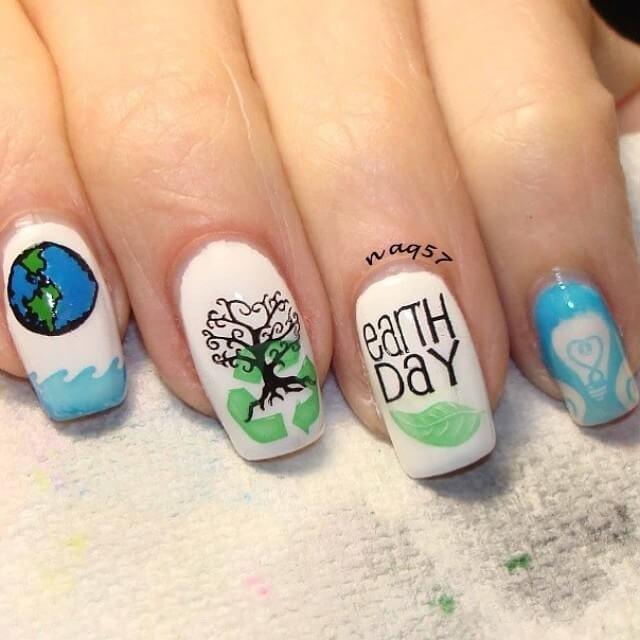
This is an unique as well as elegant nail art. It is a perfect nail art if you love white color and also the simple as well as the different look that the nail art carries.
Things You Will Need:
- White Color Matte Nail Polish
- Sky Blue Color Nail Polish
- Green Color Gel Nail Polish
- Black Color Nail Polish With a Striper Brush
- Clear Base coat and Top Coat or a Transparent Nail Polish
- A Stamping Plate that includes the above designs. If you don’t get this then you can just go with the stamping plate of your preference.
- Stamper and Scraper
- A Thin Nail Art Brush
- A Silicone Stamping Mat
- Transparent Slow Drying Stamping Polish or Qtica Extending Top Coat
- A Nail Art Orange Stick
Steps To Apply:
- Paint a coat of the slow drying stamping polish onto the sections of nails on the mat and allow it to dry. This a slow drying polish.
- Now using your stamper and scraper and the floral stamp image from the stamping plate, roll the stamp design onto the finger sections of the mat when the top coat has dried.
- After this is the fun part, take your nail art brush and the respective colors to fill the designs. Outline the design with the black nail polish and you might need to overlap the outline also. After it is done, allow it to dry.
- In the mean time you can apply the base coat onto your every nail and then paint your nails evenly with one coat of the White nail polish.
- Now using a orange nail stick and sliding it under the brinks of the decal, slowly peel off the decal from the mat.
- After this you will paint the second coat of the white nail polish and wait for it to become a little sticky that is in a state that is not too wet nor too dry. Then take the decal and slowly press it against your nails and you can use small scissors or the cuticle nippers to remove the excess decal on the sides of your nails.
- Then you can finish it off by applying the top coat.
14. Flower Motif Nail Art
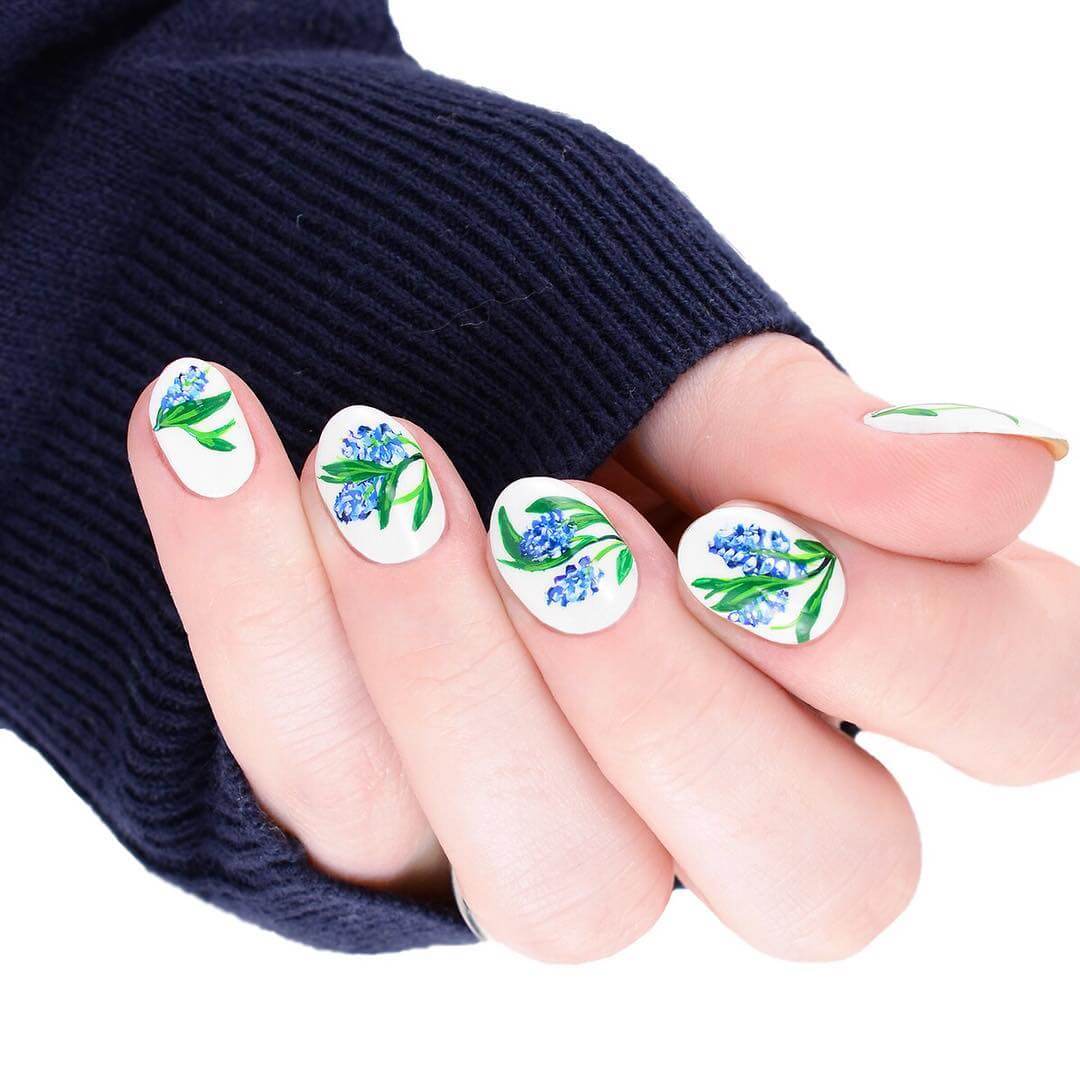
This flower motif nail art is just absolutely stunning and loved by everyone. It is an aesthetic design which is in trend these days. If you are looking for a simple as well as a trendy nail art for wearing on earth day, then just go for this as it will be a perfect choice for your style.
Things you will need:
- Flower Nail Art stickers. If you don’t get the exact one like in the image, feel free to buy your favorite nail art sticker either online or a store you visit often.
- White Nail Polish
- Top coat and Base coat or Transparent Nail Polish
- Tweezers
- Blow dryer
Steps to Apply:
- Begin by applying the base coat or the transparent nail polish on every nail evenly in a thin layer.
- After it has dried thoroughly, paint your nails with the white color nail polish.
- Then, again apply the base coat on every nail after the already applied nail polish dries.
- Cut the stickers in such a way that they fit your nail.
- Now use tweezers to lift the nail sticker you want to apply. While doing it, ensure that you don’t touch the sticky side of the sticker after removing the plastic sheet from the tattoo
- Then place the sticker on you nail and smooth it down from your nail bed to the tip.
- Do this on every nail and blow dry your nails for several seconds. Make sure that you hold blow dryer not too close to your nails.
- Apply the top coat or the transparent nail polish on every nail.
15. Shimmery Nail Art
This is a shimmery nail art which is done by decal nail art technique. This is quite tricky to do for beginners and first timers. Hence it can get messy for beginners but if you keep trying it, you can master this technique.
Things You Will Need:
- A Stamping Plate that includes the flower designs and also the heart design. If you don’t get this then you can just go with the stamping plate of your preference.
- Stamper and Scraper
- A Thin Nail Art Brush
- A Silicone Stamping Mat
- Transparent Slow Drying Stamping Polish or Qtica Extending Top Coat
- A Base Coat and Fast Drying Top Coat
- Lavender Shimmer Nail Polish
- White, Yellow, Royal Blue, Green and Black Nail Polish
- A Nail Art Orange Stick
Steps To Apply:
- Paint a coat of the slow drying stamping polish onto the sections of nails on the mat and allow it to dry. This a slow drying polish.
- Now using your stamper and scraper and the floral stamp image from the stamping plate, roll the stamp design onto the finger sections of the mat when the top coat has dried.
- After this is the fun part, take your nail art brush and the respective colors to fill the flowers. Outline the design with the black nail polish and you might need to overlap the outline also. After it is done, allow it to dry.
- In the mean time you can apply the base coat onto your every nail and then paint your nails evenly with one coat of the lavender shimmer nail polish.
- Now using a orange nail stick and sliding it under the brinks of the decal, slowly peel off the decal from the mat.
- After this you will paint the second coat of the lavender nail polish and wait for it to become a little sticky that is in a state that is not too wet nor too dry. Then take the decal and slowly press it against your nails and you can use small scissors or the cuticle nippers to remove the excess decal on the sides of your nails.
- Then you can finish it off by applying the top coat.
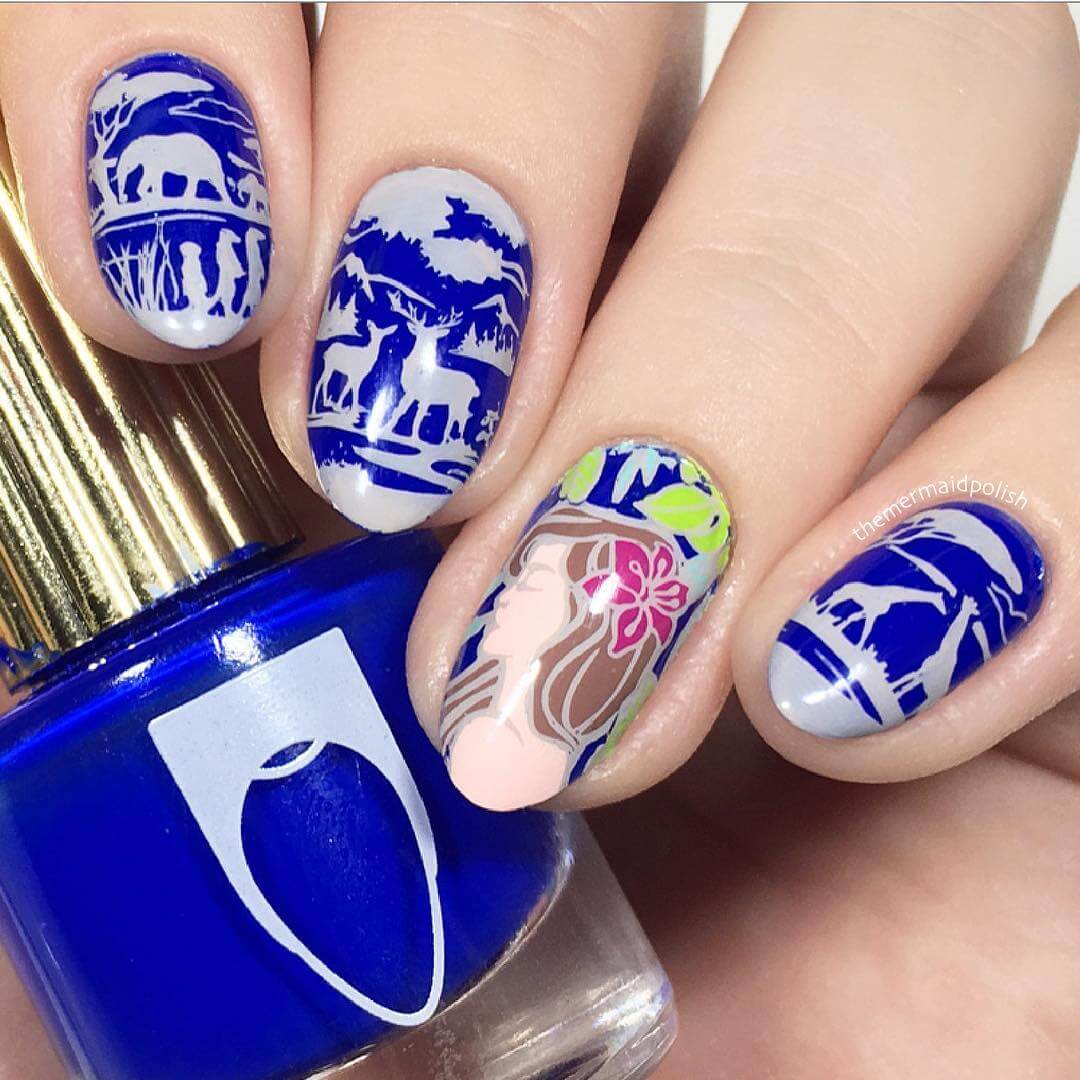
16. The Animal Stamp Nail Art
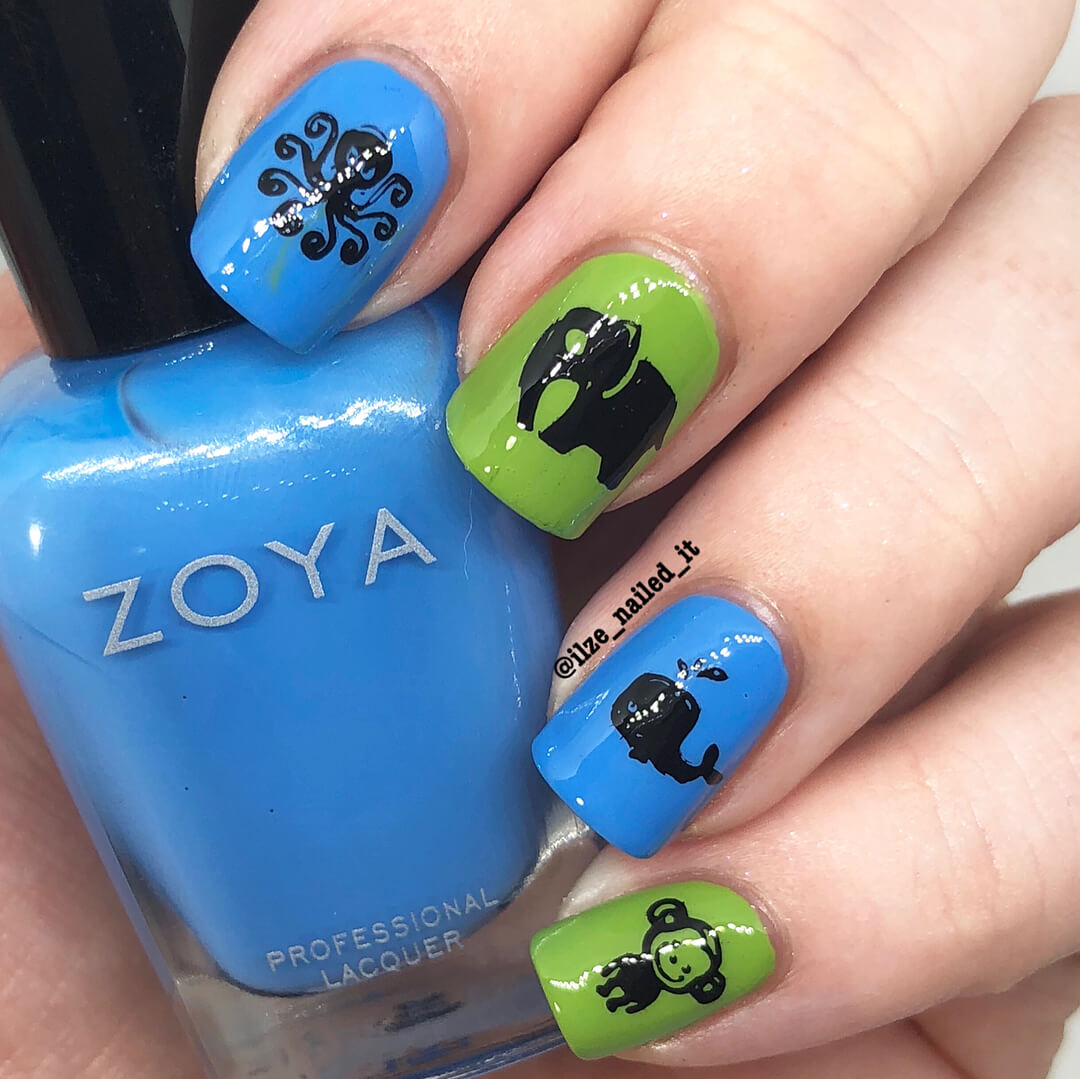
Things you will Need:
- Nail Stamping Kit with a disc of the animal designs etched into it, a stamp that will allow you to roll the design onto your nails and a scraper to take out the extra nail polish.
- Sky Blue and Olive Army Green Matte Nail Polish
- Black color Stamping Polish
- Clear Base coat and Top Coat or a Transparent Nail Polish
Steps to Apply:
- Apply base coat or a transparent nail polish on every nail evenly and as a thin layer.
- Now paint royal blue color nail polish as the base color for the index finger and ring finger nails. Then apply the sky blue nail polish for the middle finger and pinky finger nails as the base color. Ensure that you give atleast two coats of the nail polish for each nail.
- Make sure that your nails dry completely by placing your nails in front of fans to make it dry faster also.
- Now, take the disc with the animal designs and paint the design you want with black nail polish.
- Hold the scrapper slightly slanting almost at forty-five degrees and scrape of the excess nail polish on sides of the etched design on the disc.
- Now, use the stamper to imprint the design. Roll the stamper over on the design and you can see the design clearly on the stamper.
- After this, roll the stamper over your nail moving from one side to another. You can do this to every nail according to the designs and then apply top coat on your every nail.
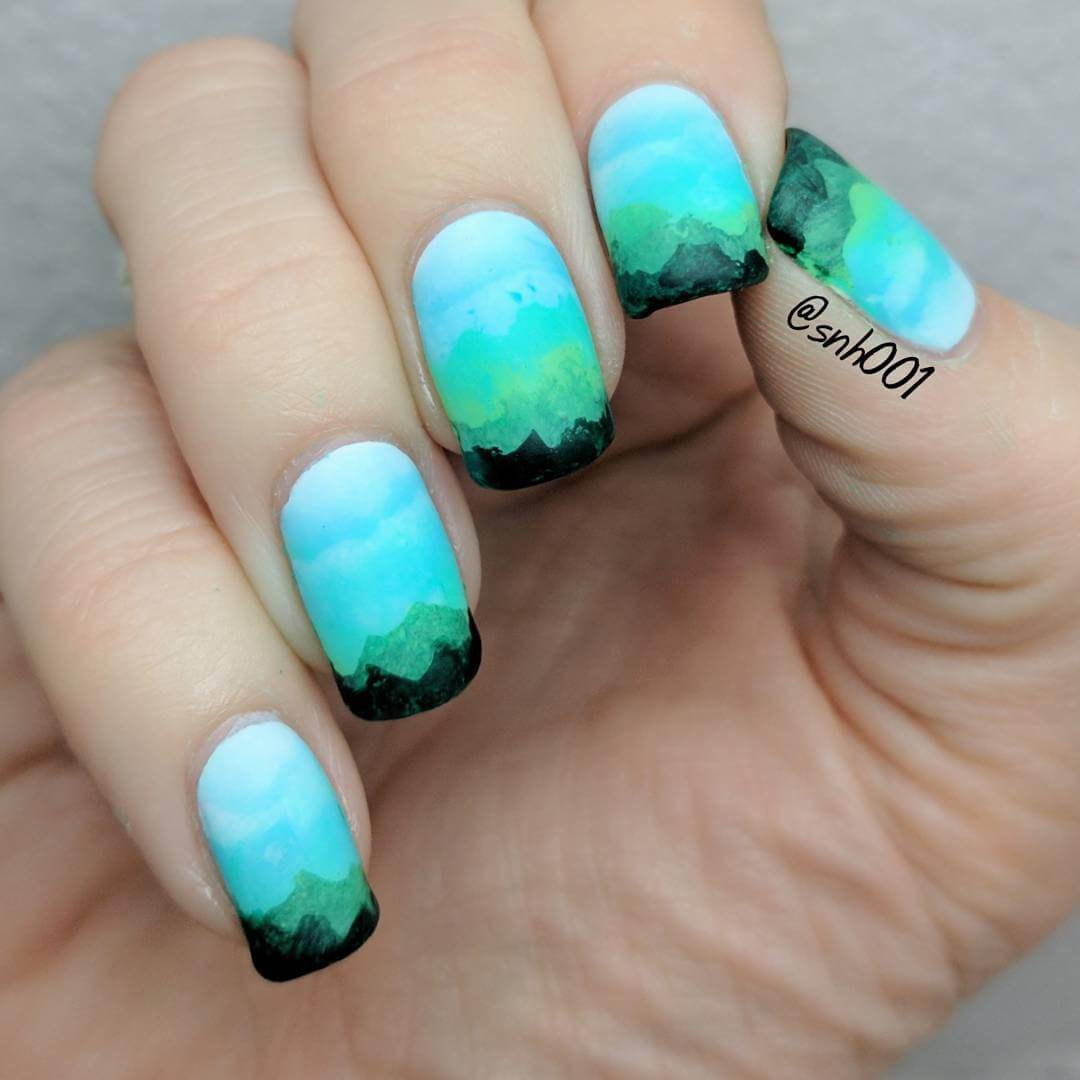
17. The Ocean Gradient Nail Art
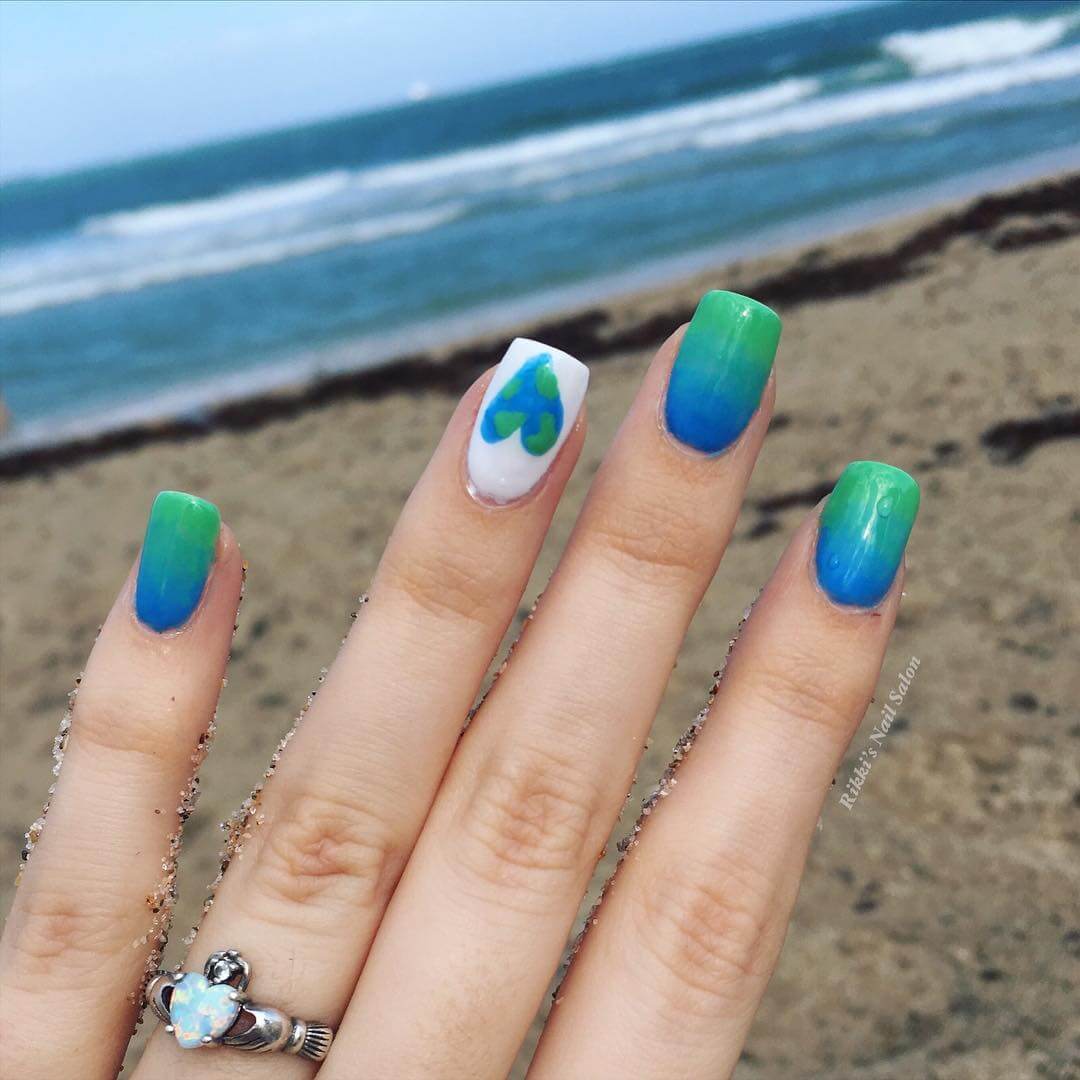
This ocean gradient nail art is just absolutely mind blowing and impeccable. It is one of the best earth day nail art designs. People often love the ocean color gradient nail art. Here is how you do it:
What you will need:
- Matte Sky Blue Nail Polish – you can either by Maybelline or go with the brand Look Nail Color. If you get the same color in a different brand also you can opt for it.
- Clear top coat and base coat or transparent nail polish
- Turquoise Green and Blue Color Nail Polish – Try getting a nail polish pen in this color as this well make the work more easy.
- White Color Nail Polish
- A Nail Striper Brush
- Nail Polish remover
- Sponge and Plastic sheet and a toothpick
Steps to Apply:
- Apply base coat or a transparent nail polish on every nail evenly and as a thin layer.
- Paint white color nail polish on your ring finger as the base color for the nail art.
- Then use the striper brush to draw as shown in the picture and then fill the color with the respective nail polish color accordingly.
- Paint the sky blue color nail polish on your other fingers.
- On a flat surface, paint a generous amount of the turquoise green and blue and sky blue color right next to each other on to the plastic. Make sure they’re just about touching at the brinks.
- Use a toothpick to swirl the each of the colors in where they meet. So if you are thinking of a lengthy graduation, mix a bigger section of the colors, if you are thinking less of a fade, then just mix them together a teeny bit.
- Dab the sponge on the nail polish on the plastic for a few times. Then dab it directly on your nail.
- Then apply the top coat or the transparent nail polish on your nails.
- Clean up the sides of your nails with the remover.
18. Pleasant Combination of Blue and White Nail Art
This is an amazing combination of color Nail Art. This color combo is almost the fav for many girls around the globe.
Things you will Need:
- Nail Stamping Kit with a disc of these designs etched into it, a stamp that will allow you to roll the design onto your nails and a scraper to take out the extra nail polish.
- Royal and Turquoise Blue Matte Nail Polish with Striper Brush
- White color Matte Nail Polish
- Green Stamping Polish
- Black Color Nail Polish with Striper Brush
- Clear Base coat and Top Coat or a Transparent Nail Polish
Steps to Apply:
- Apply base coat or a transparent nail polish on every nail evenly and as a thin layer.
- Now paint royal blue and turquoise blue color nail polish as the base color for the ring finger and middle finger nails respectively. Draw the motifs using the nail striper brush of the black color nail polish.
- Apply white color nail polish on the other finger nails.
- Make sure that your nails dry completely by placing your nails in front of fans to make it dry faster also.
- Now, take the disc with the designs and paint the design you want with white and green nail polish.
- Hold the scrapper slightly slanting almost at forty-five degrees and scrape of the excess nail polish on sides of the etched design on the disc.
- Now, use the stamper to imprint the design. Roll the stamper over on the design and you can see the design clearly on the stamper.
- After this, roll the stamper over your nail moving from one side to another. You can do this to every nail according to the designs and then write the quotes using the black nail polish striper brush. Then apply top coat on your every nail.
19. The Water and Motif Nail Art
This is also a decal technique nail art. The color gradient is what makes the nail art look really appealing and trendy too in a way.
Things You Will Need:
- A Stamping Plate that includes the flower designs and also the heart design. If you don’t get this then you can just go with the stamping plate of your preference.
- Stamper and Scraper
- A Thin Nail Art Brush
- A Silicone Stamping Mat
- Transparent Slow Drying Stamping Polish or Qtica Extending Top Coat
- A Base Coat and Fast Drying Top Coat
- Sky Blue and Turquoise Blue Nail Polish
- Pastel Pink, Yellow, Royal Blue, Green and Black Nail Polish
- A Nail Art Orange Stick
Steps To Apply:
- Paint a coat of the slow drying stamping polish onto the sections of nails on the mat and allow it to dry. This a slow drying polish.
- Now using your stamper and scraper and the stamp image from the stamping plate, roll the stamp design onto the finger sections of the mat when the top coat has dried.
- After this is the fun part, take your nail art brush and the respective colors to fill the image. Outline the design with the black nail polish and you might need to overlap the outline also. After it is done, allow it to dry.
- In the mean time you can apply the base coat onto your every nail and then paint your nails evenly with a gradient using sponge as instructed in the other gradient images .
- Now using a orange nail stick and sliding it under the brinks of the decal, slowly peel off the decal from the mat.
- After this you will paint a top coat and wait for it to become a little sticky that is in a state that is not too wet nor too dry. Then take the decal and slowly press it against your nails and you can use small scissors or the cuticle nippers to remove the excess decal on the sides of your nails.
- Then you can finish it off by applying the fast drying top coat.
20. Blue Glitter Nail Art
This is a blue glitter nail art which is absolutely attention grabbing and stunning. This might look a little difficult to obtain but it is quite simple.
Things You Will Need:
- Base Coat
- Different Shades of Blue Glitter Transparent Polish – Go with a really good loose glitter other wise it might not work.
- Top Coat
Steps To Apply:
- First start by applying the base coat onto your every nail.
- After it dries, Apply the blue glitter nail polish from the lightest shade to the darkest shade and use a striper brush to place the glitter as shown in the picture.
- After this allow it to dry and in the thumb finger use the striper brush to draw the earth design on the top of the nail.
- Finally apply the top coat to finish off the look.
21. Gradient Floral Nail Art
This is a vibrant nail art that looks amazing and it is one of the best designs of the earth day nail art.
What you will need:
- Clear top coat and base coat or transparent nail polish
- Turquoise Green and Blue Color Nail Polish – Try getting a nail polish pen in this color as this well make the work more easy.
- White Color Nail Polish
- A Nail Striper Brush
- Nail Polish remover
- Sponge and Plastic sheet and a toothpick
- A Stamping Plate that includes the flower designs and also the heart design. If you don’t get this then you can just go with the stamping plate of your preference.
- Stamper and Scraper
- A Thin Nail Art Brush and A Silicone Stamping Mat
- Transparent Slow Drying Stamping Polish or Qtica Extending Top Coat
- A Base Coat and Fast Drying Top Coat
- Pastel Pink and Pink that is slightly darker than pastel, Yellow, Dark and Light Green and Black Nail Polish
- A Nail Art Orange Stick
Steps to Apply:
- Apply base coat or a transparent nail polish on every nail evenly and as a thin layer.
- Paint black color nail polish on your index finger as the base color for the nail art.
- Then use the decal nail art technique to get the look. If you are not familiar with this technique, you can look above as some of them are mainly done by this technique.
- Paint the pastel pink color nail polish on your pinky finger, light green on middle and ring finger and also the dark finger.
- On a flat surface, paint a generous amount of the light green and dark green color right next to each other on to the plastic. Make sure they’re just about touching at the brinks.
- Use a toothpick to swirl the two of the colors in where they meet. So if you are thinking of a lengthy graduation, mix a bigger section of the colors, if you are thinking less of a fade, then just mix them together a teeny bit.
- Dab the sponge on the nail polish on the plastic for a few times. Then dab it directly on your nail.
- Then apply the top coat or the transparent nail polish on your nails.
- Clean up the sides of your nails with the remover.
22. The Vibrant Floral Nail Art
This is a very appealing as well as a vibrant nail art which is admired and loved by everyone. It is one of the must try nail arts.
Things You Will Need:
- A Stamping Plate that includes the flower designs. If you don’t get this then you can just go with the stamping plate of your preference.
- Stamper and Scraper
- A Thin Nail Art Brush
- A Silicone Stamping Mat
- Transparent Slow Drying Stamping Polish or Qtica Extending Top Coat
- A Base Coat and Fast Drying Top Coat
- Canary Yellow, Sparkly Gold and Black Nail Polish
- Coral Pink, Yellow and White Nail Polish
- A Nail Art Orange Stick
Steps To Apply:
- Paint a coat of the slow drying stamping polish onto the sections of nails on the mat and allow it to dry. This a slow drying polish.
- Now using your stamper and scraper and the stamp image from the stamping plate, roll the stamp design onto the finger sections of the mat when the top coat has dried.
- After this is the fun part, take your nail art brush and the respective colors to fill the flowers. Outline the design with the white nail polish and you might need to overlap the outline also. After it is done, allow it to dry.
- In the mean time you can apply the base coat onto your every nail with the respective nail polish colors.
- Now using a orange nail stick and sliding it under the brinks of the decal, slowly peel off the decal from the mat.
- After this you will paint a second coat of the nail polish colors respectively and wait for it to become a little sticky that is in a state that is not too wet nor too dry. Then take the decal and slowly press it against your nails and you can use small scissors or the cuticle nippers to remove the excess decal on the sides of your nails.
- Then you can finish it off by applying the fast drying top coat.
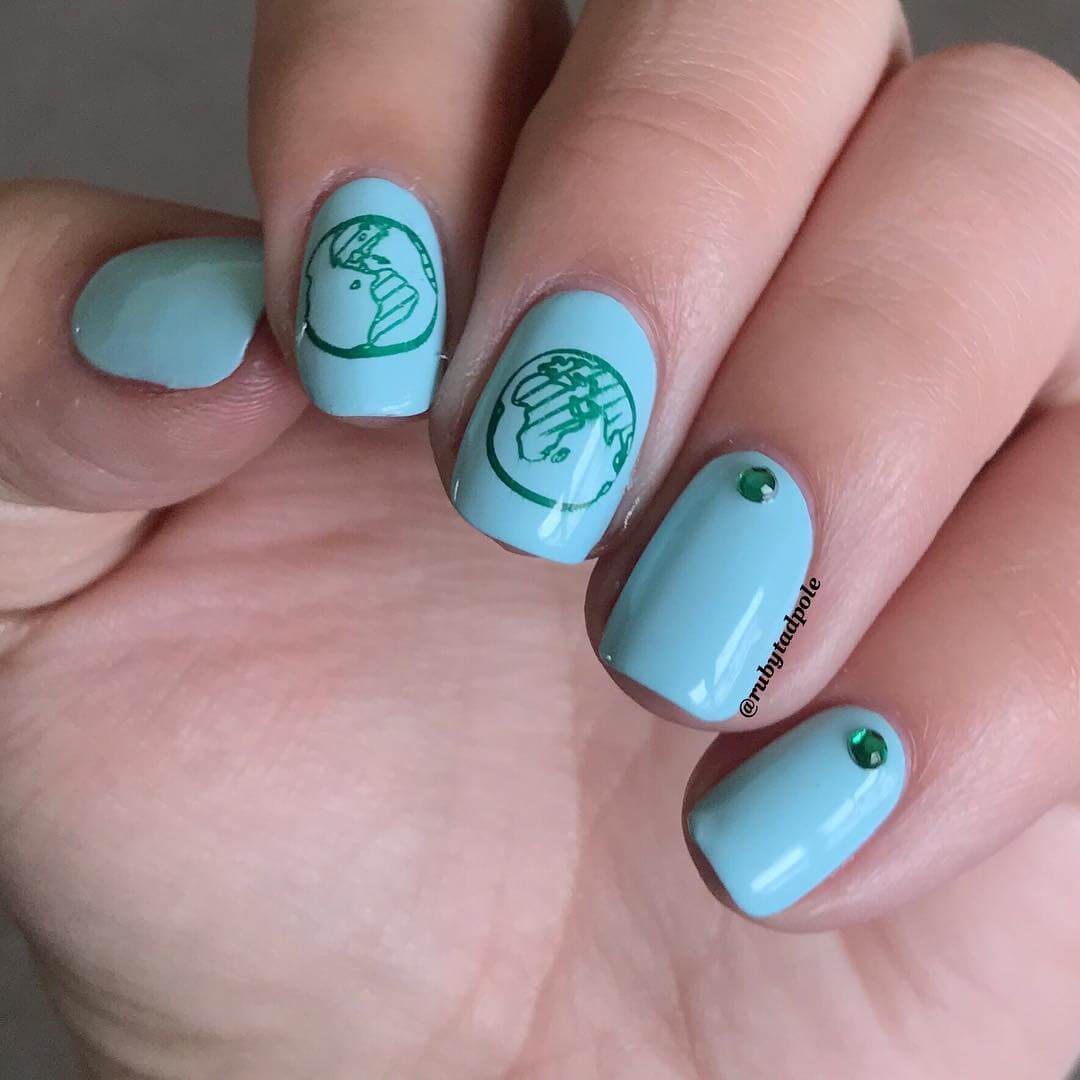
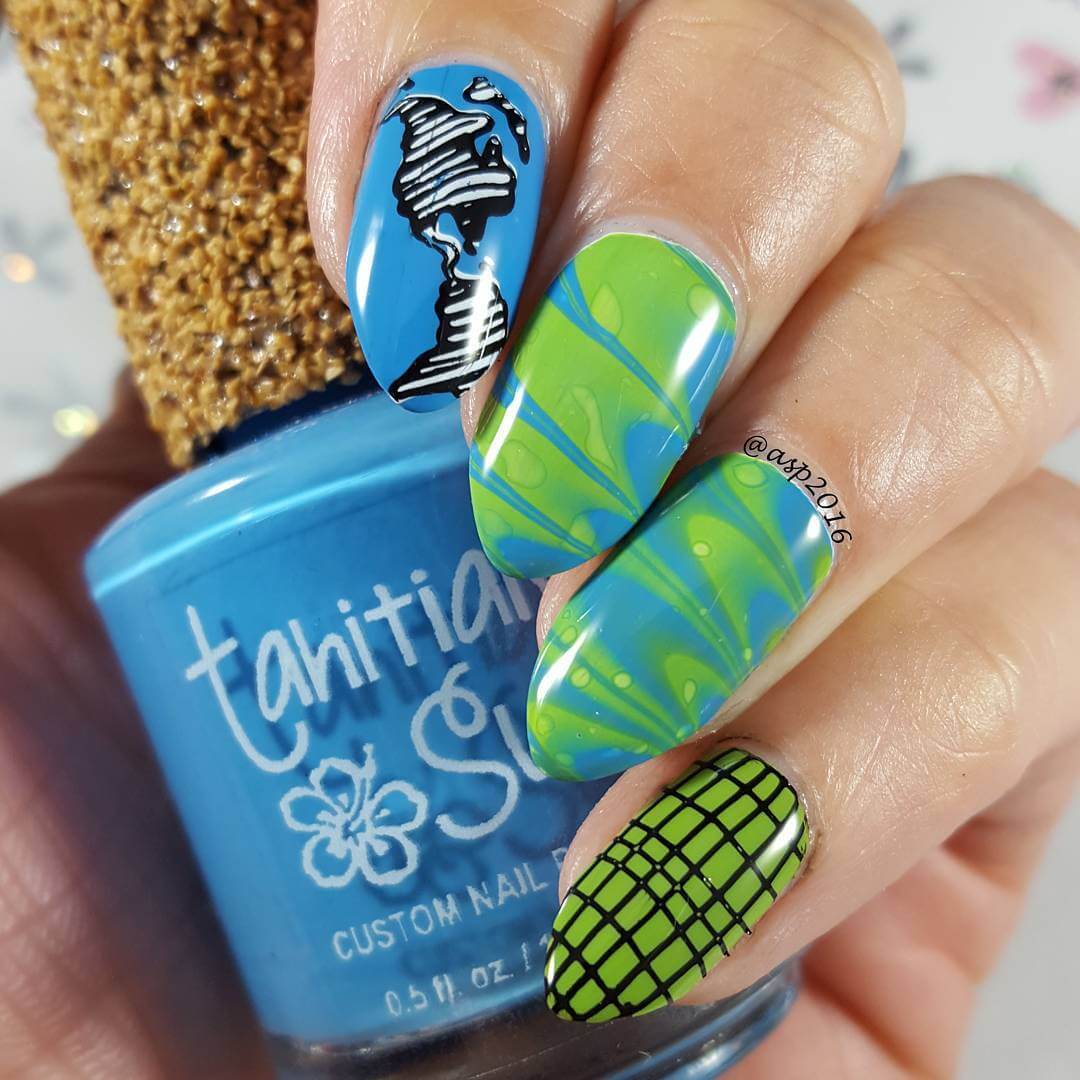
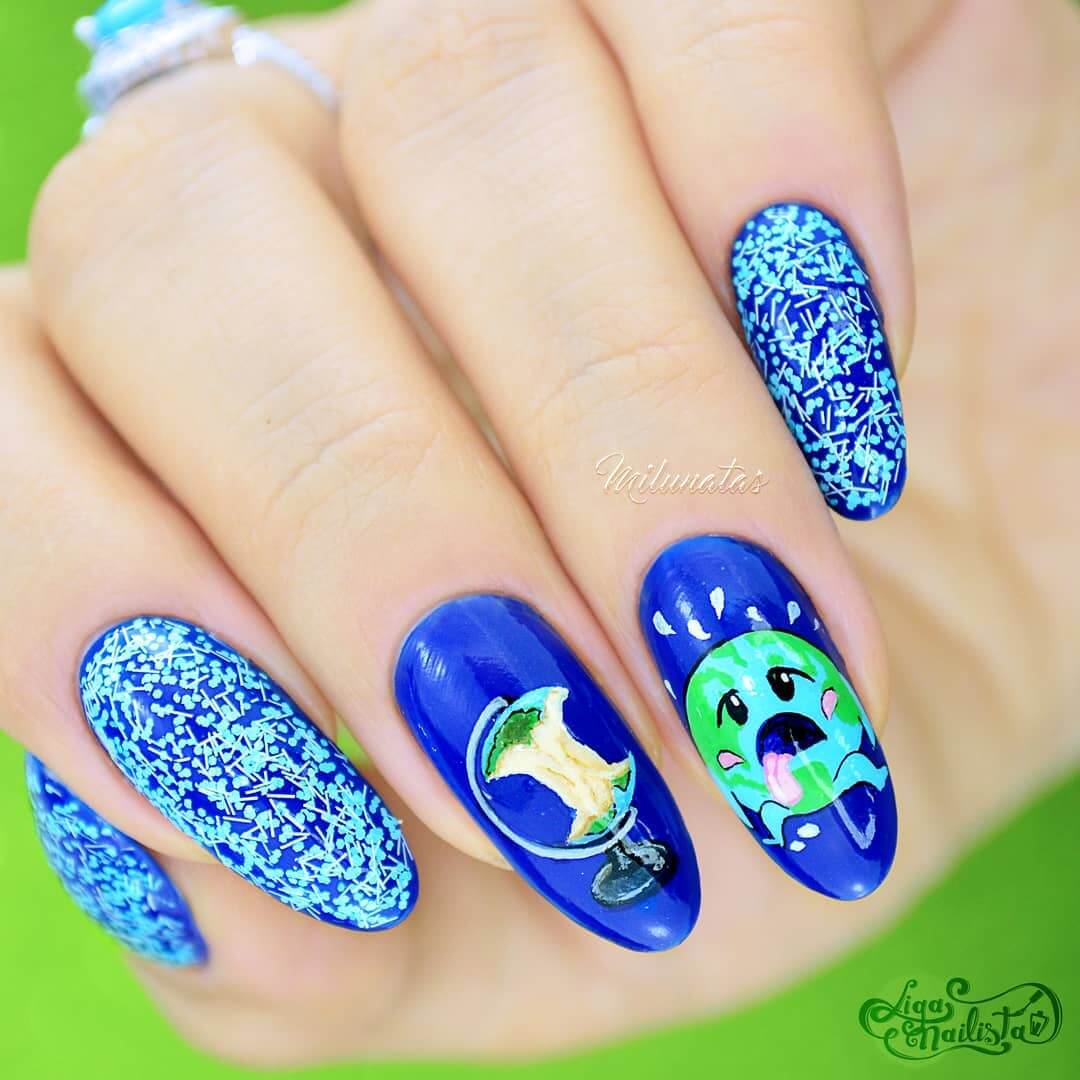
23. The Neon Globe Nail Art
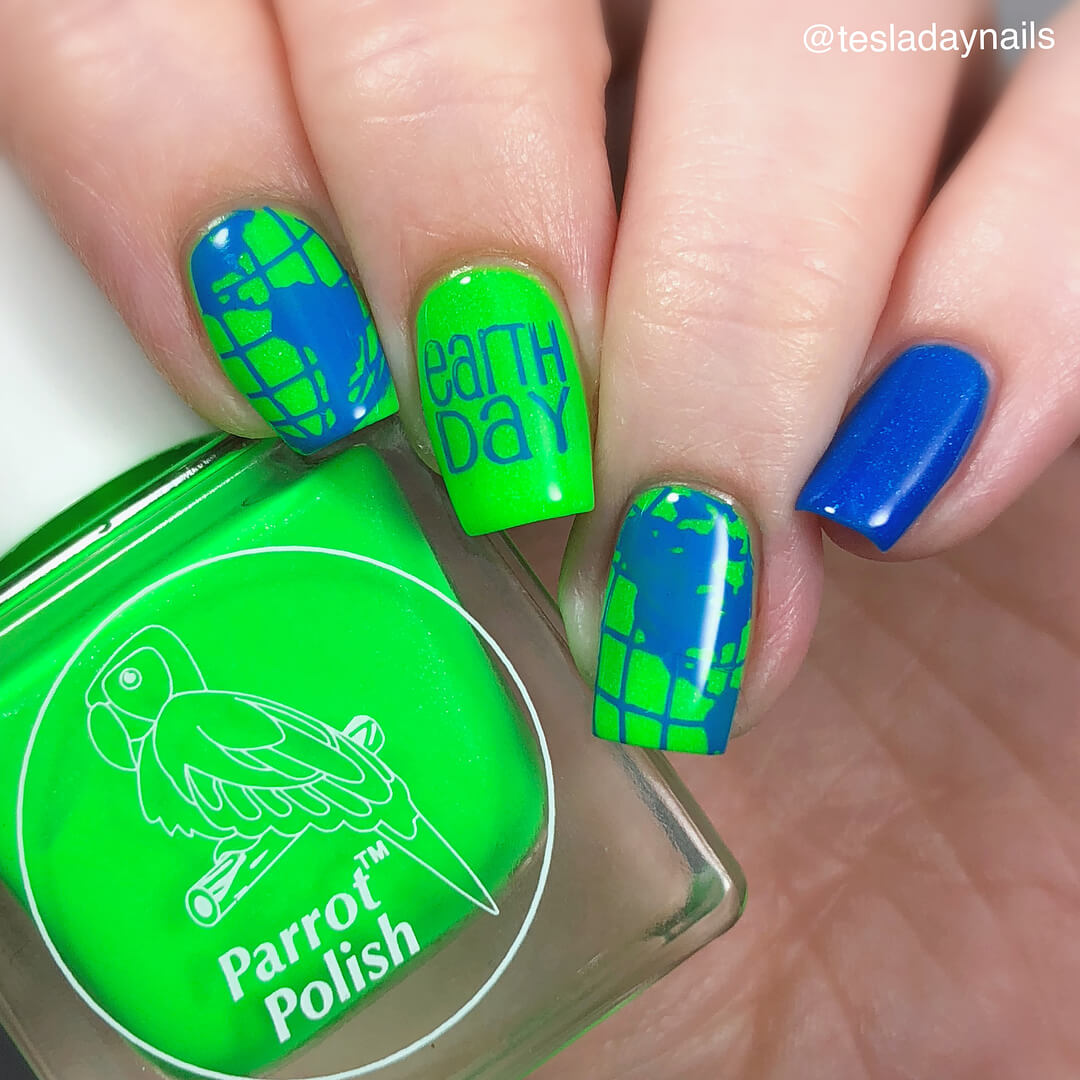
Neon colors are in trend these days and are just getting more famous day by day. This is also one of the must try earth day nail art designs.
Things you will need:
- Sky and Royal Blue Nail Polish
- Neon Green Nail Polish
- Clear Top Coat and Base Coat or Transparent Nail Polish
- Nail Polish Remover
- Stamper and Scraper
- A Thin Nail Art Brush
- A Silicone Stamping Mat
- Transparent Slow Drying Stamping Polish or Qtica Extending Top Coat
- A Nail Art Orange Stick
- A Stamping Plate that includes the map designs. If you don’t get this then you can just go with the stamping plate of your preference.
Steps To Apply:
- Paint a coat of the slow drying stamping polish onto the sections of nails on the mat and allow it to dry.
- Now using your stamper and scraper and the floral stamp image from the stamping plate, roll the stamp design onto the finger sections of the mat when the top coat has dried.
- After this is the fun part, take your nail art brush and the respective colors to fill the map designs. After it is done, allow it to dry.
- In the mean time you can apply the base coat onto your every nail with the respective nail polish colors.
- Now using a orange nail stick and sliding it under the brinks of the decal, slowly peel off the decal from the mat.
- After this you will paint the second coat of the respective nail polish and wait for it to become a little sticky that is in a state that is not too wet nor too dry. Then take the decal and slowly press it against your nails and you can use small scissors or the cuticle nippers to remove the excess decal on the sides of your nails.
- Then you can finish it off by applying the fast drying top coat.
24. Bumble Bee Nail Art
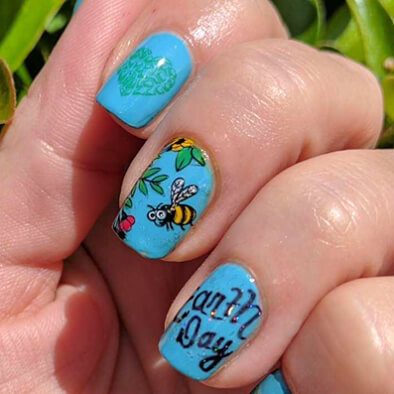
This is a special earth day nail art design which is just truly amazing and beautiful in its every aspect.
Things You Will Need:
- A Stamping Plate that includes the above designs. If you don’t get this then you can just go with the stamping plate of your preference.
- Stamper and Scraper
- A Thin Nail Art Brush
- A Silicone Stamping Mat
- Transparent Slow Drying Stamping Polish or Qtica Extending Top Coat
- A Base Coat and Fast Drying Top Coat
- Canary Yellow, Green and Black Nail Polish
- Sky Blue, Purple , Pink and White Nail Polish
- A Nail Art Orange Stick
Steps To Apply:
- Begin by painting a coat of the slow drying stamping polish onto the sections of nails on the mat and allow it to dry.
- Then using your stamper and scraper and the stamp image from the stamping plate, roll the stamp design onto the finger sections of the mat when the top coat has dried.
- After this is the fun part, take your nail art brush and the respective colors to fill the designs. Then outline the design with the black nail polish and you might need to overlap the outline also. After it is done, allow it to dry.
- In the mean time you can apply the base coat onto your every nail with the respective nail polish colors.
- Now using a orange nail stick and sliding it under the brinks of the decal, slowly peel off the decal from the mat.
- After this you will paint a second coat of the nail polish colors respectively and wait for it to become a little sticky that is in a state that is not too wet nor too dry. Then take the decal and slowly press it against your nails and you can use small scissors or the cuticle nippers to remove the excess decal on the sides of your nails.
- Finally, you can finish it off by applying the fast drying top coat.
25. Pastel Pink Nail Art
Patel colour have been really famous and trendy these days and it is also type of blushed nude colour in the above image which just makes it look more appealing and also simple at the same time.
Things you will need:
- Nail Art stickers. If you don’t get the exact one like in the image, feel free to buy your favorite nail art sticker either online or a store you visit often.
- Pastel Pink Nail Polish
- Top coat and Base coat or Transparent Nail Polish
- Tweezers
- Blow dryer
Steps to Apply:
- First, apply the base coat or the transparent nail polish on every nail evenly in a thin layer.
- After it dries, paint your nails with the pastel pink color nail polish.
- Then, again apply the base coat on every nail after the already applied nail polish dries.
- Cut the stickers in such a way that they fit your nail.
- Now use tweezers to lift the nail sticker you want to apply. While doing it, ensure that you don’t touch the sticky side of the sticker after removing the plastic sheet from the tattoo
- Then place the sticker on you nail and smooth it down from your nail bed to the tip.
- Do this on every nail and blow dry your nails for several seconds. Make sure that you hold blow dryer not too close to your nails.
- Apply the top coat or the transparent nail polish on every nail.
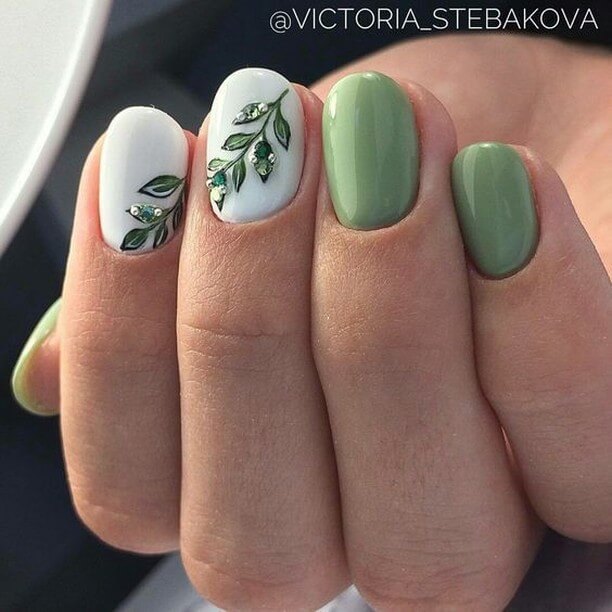
26. The Green Leaf motif nail art
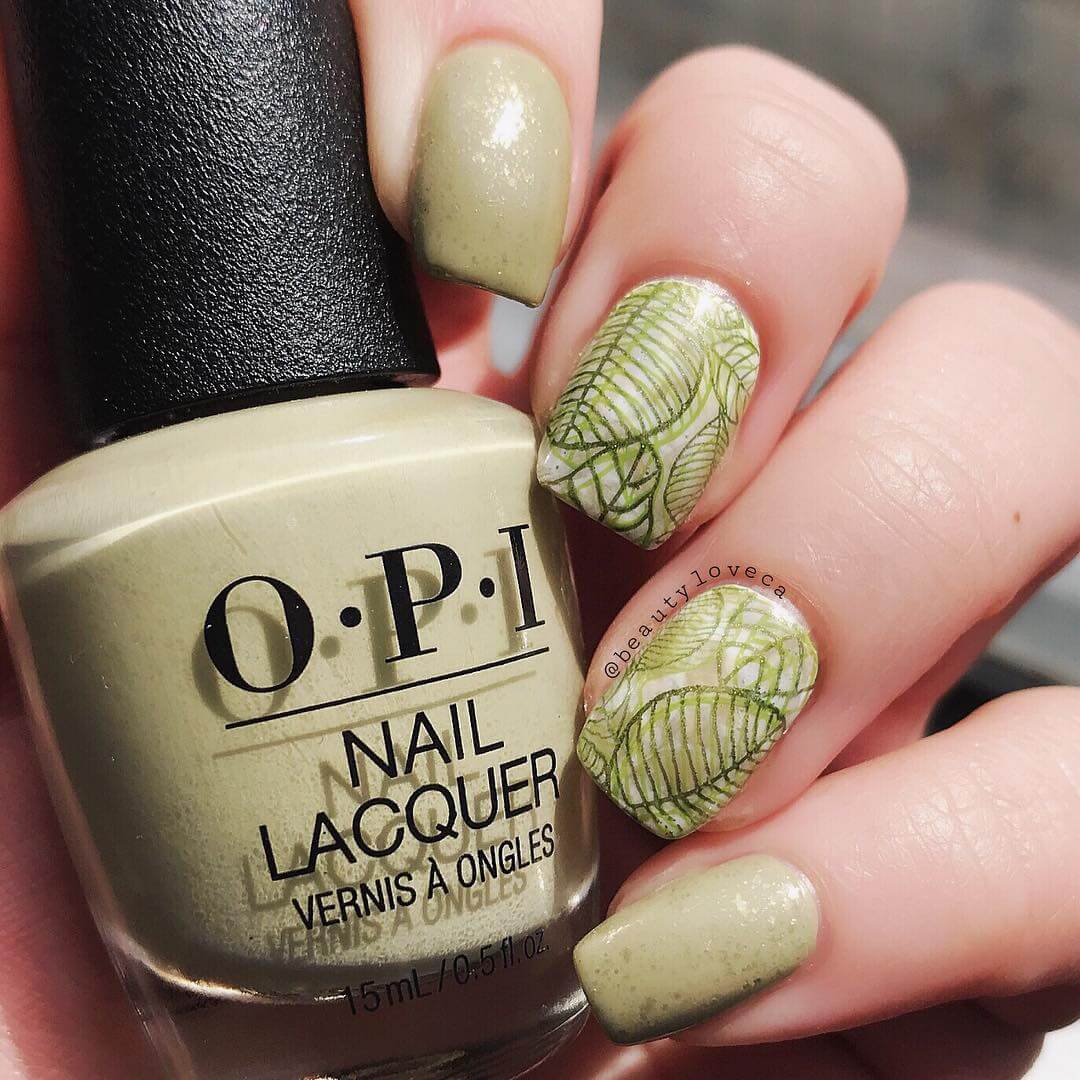
The leaf nail art has been tremendously becoming famous nowadays due to the popularity of what is the aesthetic designs. So do try this nail art if you are a fan of aesthetic designs as it will be the perfect choice.
Things you will need:
- Leaf Nail Art stickers. If you don’t get the exact one like in the image, feel free to buy your favorite nail art sticker either online or a store you visit often.
- Mint Green and White Nail Polish
- Top coat and Base coat or Transparent Nail Polish
- Tweezers
- Blow dryer
Steps to Apply:
- First, apply the base coat or the transparent nail polish on every nail evenly in a thin layer.
- After it dries, paint your middle finger and ring finger nails with the mint green color nail polish and the others with white colour nail polish.
- Then, again apply the base coat on every nail after the already applied nail polish dries.
- Cut the stickers in such a way that they fit your nail.
- Now use tweezers to lift the nail sticker you want to apply. While doing it, ensure that you don’t touch the sticky side of the sticker after removing the plastic sheet from the tattoo
- Then place the sticker on you nail and smooth it down from your nail bed to the tip.
- Do this on every nail and blow dry your nails for several seconds. Make sure that you hold blow dryer not too close to your nails.
- Apply the top coat or the transparent nail polish on every nail.
27. The Blue and Green Nail Art
This is one of the best nail art design mainly because of its color gradient and the color combination. If you love aqua blue color as much as I do, try this nail art as you will be stunned by the look it gives.
Things You Will Need:
- Mint Green Nail Polish
- Clear Base coat and Top Coat or a Transparent Nail Polish
- Matte Sky Blue and Turquoise Blue Nail Polish – you can either by Maybelline or go with the brand Look Nail Color. If you get the same color in a different brand also you can opt for it.
- Clear top coat and base coat or transparent nail polish
- Turquoise Green and Blue Color Nail Polish – Try getting a nail polish pen in this color as this well make the work more easy.
- White Color and Emerald Green Nail Polish
- A Nail Striper Brush
- Nail Polish remover
- Sponge and Plastic sheet and a toothpick
Steps to Apply:
- Apply base coat or a transparent nail polish on every nail evenly and as a thin layer.
- Paint white color nail polish on your ring finger as the base color for the nail art.
- Paint the sky blue color nail polish on your other fingers.
- On a flat surface, paint a generous amount of the turquoise green and blue and sky blue color right next to each other on to the plastic. Make sure they’re just about touching at the brinks.
- Use a toothpick to swirl the each of the colors in where they meet. So if you are thinking of a lengthy graduation, mix a bigger section of the colors, if you are thinking less of a fade, then just mix them together a teeny bit.
- Dab the sponge on the nail polish on the plastic for a few times. Then dab it directly on your nail.
- Then apply the top coat or the transparent nail polish on your nails.
- Clean up the sides of your nails with the remover.
28. Simple Earth Nail Art
This is a nail art which gives a simple as well as a chic look which makes it even more stunning. Do try this nail art if you are a keep it simple type of person.
Things You Will Need:
- A Stamping Plate that includes the above designs. If you don’t get this then you can just go with the stamping plate of your preference.
- Stamper and Scraper
- A Thin Nail Art Brush
- A Silicone Stamping Mat
- Transparent Slow Drying Stamping Polish or Qtica Extending Top Coat
- A Base Coat and Fast Drying Top Coat
- Pastel Blue and Green Nail Polish
- Green Color Nail Stud Stones
- A Nail Art Orange Stick
Steps To Apply:
- Begin by painting a coat of the slow drying stamping polish onto the sections of nails on the mat and allow it to dry.
- Then using your stamper and scraper and the stamp image from the stamping plate, roll the stamp design onto the finger sections of the mat when the top coat has dried.
- After this is the fun part, take your nail art brush and the respective colors to fill the designs. Then outline the design with the black nail polish and you might need to overlap the outline also. After it is done, allow it to dry.
- In the mean time you can apply the base coat onto your every nail with the respective nail polish colors.
- Now using a orange nail stick and sliding it under the brinks of the decal, slowly peel off the decal from the mat.
- After this you will paint a second coat of the nail polish colors respectively and wait for it to become a little sticky that is in a state that is not too wet nor too dry. Then take the decal and slowly press it against your nails and you can use small scissors or the cuticle nippers to remove the excess decal on the sides of your nails.
- Finally, you can finish it off by applying the fast drying top coat.
29. Water Marble Nail Art
It is a water marble nail art which is always assumed to be really hard. The only thing is stick to the steps and follow it correctly. You might not get it the first time itself but with several times of practices, you will get a hold of it. It is an amazing nail art which is a must do one.
Things you will Need:
- Royal Blue and Light Green Nail Polishes
- Clear Top Coat and Base Coat or Transparent Nail Polish
- White Nail Polish
- Nail Polish Remover
- Toothpicks and Cotton Swabs
- Tissues
- A Bowl or Cup of water
- Scissors and Sticky Tape
Steps To Apply:
- Start by applying the clear base coat or the transparent nail polish on every nail evenly in a thin layer.
- Now paint your nails with the white nail varnish by at least two coats.
- Wrap and paste the sticky tape around your cuticles and skin and also ensure that the tape doesn’t cover any part of your nail as it will spoil the effect.
- Add the Royal blue nail polish to the bowl of water by holding it one cm above the center of the waters brink.
- Slowly tap the handle of the brush till the nail polish drips into the water. Add green colour in the same way into the middle of the royal blue colour.
- Now use a tooth pick to stir the clear water encircling the circle of nail varnish polish. This will make the nail polish’s circle or ring expand. Be sure the toothpick does not touch the nail polish itself but only the clear water.
- Position the toothpick on the water, from about the third last ring out. Drag the toothpick inwards, in the direction of the centre of the nail polish.
- Dip your finger into the water along with tape at a forty-five degree angle.
- Put your finger in the water and use a new unused toothpick to roll around the leftover nail polish. Then, slowly remove your finger out of the water.
- After it dries, peel of the tape that wrapped around the finger.
- Now carefully clean the sides of your nail and cuticles using a nail polish remover and cotton swab.
- Finally the last step, apply the top coat or the transparent nail polish on your nails.
30. The Chic Earth Nail Art
This Nail Art is elegant as well as absolutely stunning in every sense. It is one of the classic nail arts of the earth day nail art designs which is also sophisticated in a way. This is also done by the stamping decal technique. It might look quite difficult to achieve but it is quite easy after you practice a few times.
Things You Will Need:
- A Stamping Plate that includes the above designs. If you don’t get this then you can just go with the stamping plate of your preference.
- Stamper and Scraper
- A Thin Nail Art Brush
- A Silicone Stamping Mat
- Transparent Slow Drying Stamping Polish or Qtica Extending Top Coat
- A Base Coat and Fast Drying Top Coat
- White and Dark Green Nail Polish
- Mint Green Nail Polish
- A Nail Art Orange Stick
Steps To Apply:
- Begin by painting a coat of the slow drying stamping polish onto the sections of nails on the mat and allow it to dry.
- Then using your stamper and scraper and the stamp image from the stamping plate, roll the stamp design onto the finger sections of the mat when the top coat has dried.
- After this is the fun part, take your nail art brush and the respective colors to fill the designs. Then outline the design with the black nail polish and you might need to overlap the outline also. After it is done, allow it to dry.
- In the mean time you can apply the base coat onto your every nail with the respective nail polish colors.
- Now using a orange nail stick and sliding it under the brinks of the decal, slowly peel off the decal from the mat.
- After this you will paint a second coat of the nail polish colors respectively and wait for it to become a little sticky that is in a state that is not too wet nor too dry. Then take the decal and slowly press it against your nails and you can use small scissors or the cuticle nippers to remove the excess decal on the sides of your nails.
- Finally, you can finish it off by applying the fast drying top coat.
31. The Classic Water Marble Nail Art
The water marble and decal techniques are used to do this nail art. This is the classic earth day nail art design which is also really trendy and loved by everyone. So do try this nail art as it might be the pristine nail art for you.
Things you will Need:
- Sky Blue, Black and Light Green Nail Polishes
- Clear Top Coat and Base Coat or Transparent Nail Polish
- White Nail Polish and Olive Green Nail Polish
- Nail Polish Remover
- Toothpicks and Cotton Swabs
- Tissues
- A Bowl or Cup of water
- Scissors and Sticky Tape
- A Stamping Plate that includes the above designs. If you don’t get this then you can just go with the stamping plate of your preference.
- Stamper and Scraper
- A Thin Nail Art Brush
- A Silicone Stamping Mat
- Transparent Slow Drying Stamping Polish or Qtica Extending Top Coat
- A Base Coat and Fast Drying Top Coat
- A Nail Art Orange Stick
Steps To Apply:
- Begin by applying the clear base coat or the transparent nail polish on every nail evenly in a thin layer.
- Now paint your nails with the respective base nail polishes by at least two coats.
- Wrap and paste the sticky tape around your middle finger and ring finger cuticles and skin and also ensure that the tape doesn’t cover any part of your nail as it will spoil the effect.
- Add the green color nail polish to the bowl of water by holding it one cm above the center of the waters brink.
- Slowly tap the handle of the brush till the nail polish drips into the water.
- Now use a tooth pick to stir the clear water encircling the circle of nail varnish polish. This will make the nail polish’s circle or ring expand. Be sure the toothpick does not touch the nail polish itself but only the clear water.
- Position the toothpick on the water, from about the third last ring out. Drag the toothpick inwards, in the direction of the centre of the nail polish.
- Dip your finger into the water along with tape at a forty-five degree angle.
- Put your finger in the water and use a new unused toothpick to roll around the leftover nail polish. Then, slowly remove your finger out of the water.
- After it dries, peel of the tape that wrapped around the finger.
- Now carefully clean the sides of your nail and cuticles using a nail polish remover and cotton swab.
- Finally you can do the stamping method as mentioned for the other images.
- Then the last step, apply the top coat or the transparent nail polish on your nails.
32. The Simple Earth Day Nail Art Design
It is one of the best earth day nail art designs done by the decal technique. This will look amazing on every woman’s nail regardless of age. Do try this design on the earth day.
What you will need:
- Base Coat and Top Coat
- Neon Green Nail Polish . If you can’t find this color, then you can buy any green color nail polish.
- Sky Blue Color Nail Polish
- Nail Polish Remover
- Stamper and Scraper
- A Thin Nail Art Brush
- A Silicone Stamping Mat
- Transparent Slow Drying Stamping Polish or Qtica Extending Top Coat
- A Nail Art Orange Stick
- A Stamping Plate that includes the map designs. If you don’t get this then you can just go with the stamping plate of your preference.
Steps To Apply:
- Paint a coat of the slow drying stamping polish onto the sections of nails on the mat and allow it to dry. This a slow drying polish.
- Now using your stamper and scraper and the stamp image from the stamping plate, roll the stamp design onto the finger sections of the mat when the top coat has dried.
- After this is the fun part, take your nail art brush and the respective colors to fill the map designs. After it is done, allow it to dry.
- In the mean time you can apply the base coat onto your every nail and then paint your nails evenly with one coat of the blue nail polish.
- Now using a orange nail stick and sliding it under the brinks of the decal, slowly peel off the decal from the mat.
- After this you will paint the second coat of the blue nail polish and wait for it to become a little sticky that is in a state that is not too wet nor too dry. Then take the decal and slowly press it against your nails and you can use small scissors or the cuticle nippers to remove the excess decal on the sides of your nails.
- Then you can finish it off by applying the top coat.
33. Lines and Countries Nail Art Designs
This is a special earth day nail art designs which is just absolutely appealing and perfect in every sense. The lines is what makes the nail art unique and beautiful in a way. Don’t hesitate to try this nail art. This beautiful earth day nail art is done by the decal stamping technique too.
Things you will need:
- Base Coat and Top Coat
- Matte Neon Green Nail Polish . If you can’t find this color, then you can buy any green color nail polish.
- Matte Sky Blue Color, Canary Yellow and Black Color Nail Polish
- Nail Polish Remover
- Stamper and Scraper
- A Thin Nail Art Brush
- A Silicone Stamping Mat
- Transparent Slow Drying Stamping Polish or Qtica Extending Top Coat
- A Nail Art Orange Stick
- A Stamping Plate that includes the map designs. If you don’t get this then you can just go with the stamping plate of your preference.
Steps To Apply:
- Paint a coat of the slow drying stamping polish onto the sections of nails on the mat and allow it to dry. This a slow drying polish.
- Now using your stamper and scraper and the stamp image from the stamping plate, roll the stamp design onto the finger sections of the mat when the top coat has dried.
- After this is the fun part, take your nail art brush and the respective colors to fill the map designs. After it is done, allow it to dry.
- In the mean time you can apply the base coat onto your every nail and then paint your nails evenly with one coat of the blue nail polish.
- Now using a orange nail stick and sliding it under the brinks of the decal, slowly peel off the decal from the mat.
- After this you will paint the second coat of the blue nail polish and wait for it to become a little sticky that is in a state that is not too wet nor too dry. Then take the decal and slowly press it against your nails and you can use small scissors or the cuticle nippers to remove the excess decal on the sides of your nails.
- Then you can finish it off by applying the top coat.
34. The Elegant Blue Nail Art
This nail art exactly represents for what earth day is celebrated and at the same time it also carries a chic look which also carries a message. This might look quite difficult to get but it is quite easy if you just follow the steps properly without missing any. This nail art is done using nail art stickers which is what makes it quite easy than others.
Things you will need:
- Nail Art stickers of the same design above . If you don’t get the exact one like in the image, feel free to buy your favorite nail art sticker either online or a store you visit often.
- Royal Blue Nail Polish
- Top coat and Base coat or Transparent Nail Polish
- Tweezers
- Blow dryer
Steps to Apply:
- First, apply the base coat or the transparent nail polish on every nail evenly in a thin layer.
- After it dries, Paint all your nails with the royal blue color nail polish and the others with white colour nail polish.
- Then, again apply the base coat on every nail after the already applied nail polish dries.
- Cut the stickers in such a way that they fit your nail.
- Now use tweezers to lift the nail sticker you want to apply. While doing it, ensure that you don’t touch the sticky side of the sticker after removing the plastic sheet from the tattoo
- Then place the sticker on you nail and smooth it down from your nail bed to the tip.
- Do this on every nail and blow dry your nails for several seconds. Make sure that you hold blow dryer not too close to your nails.
- Apply the top coat or the transparent nail polish on every nail.
35. The Aesthetic Green Color Nail Art
These days the aesthetic look has been becoming famous regardless of age. It is loved by almost every girl and woman these days. Aesthetic nail art have been all over social media these days and everyone tries to capture the aesthetic look as much as possible. This nail art is just absolutely stunning and appealing. This special earth day nail art is done by the decal stamping technique.
Things you will need:
- Leaf Nail Art stickers. If you don’t get the exact one like in the image, feel free to buy your favorite nail art sticker either online or a store you visit often.
- Sage Green and White Nail Polish
- White and Green Nail Stud Stones
- Nail Art Glue
- Top coat and Base coat or Transparent Nail Polish
- Tweezers
- Blow dryer
Steps to Apply:
- First, apply the base coat or the transparent nail polish on every nail evenly in a thin layer.
- After it dries, paint your pinky finger and ring finger nails with the sage green color nail polish and the others with white colour nail polish.
- Then, again apply the base coat on every nail after the already applied nail polish dries.
- Cut the stickers in such a way that they fit your nail.
- Now use tweezers to lift the nail sticker you want to apply. While doing it, ensure that you don’t touch the sticky side of the sticker after removing the plastic sheet from the tattoo
- Then place the sticker on you nail and smooth it down from your nail bed to the tip.
- Do this on every nail and blow dry your nails for several seconds. Make sure that you hold blow dryer not too close to your nails.
- After this, Apply a small drop of glue like a dot to your nail and Stick the stones. Ensure that you are holding it in the place you want to stick it with the tweezers and wait for the glue to dry.
- Finally you can finish it off by applying the top coat or the transparent nail polish on every nail.
36. The Butterfly Wing Nail Art Designs
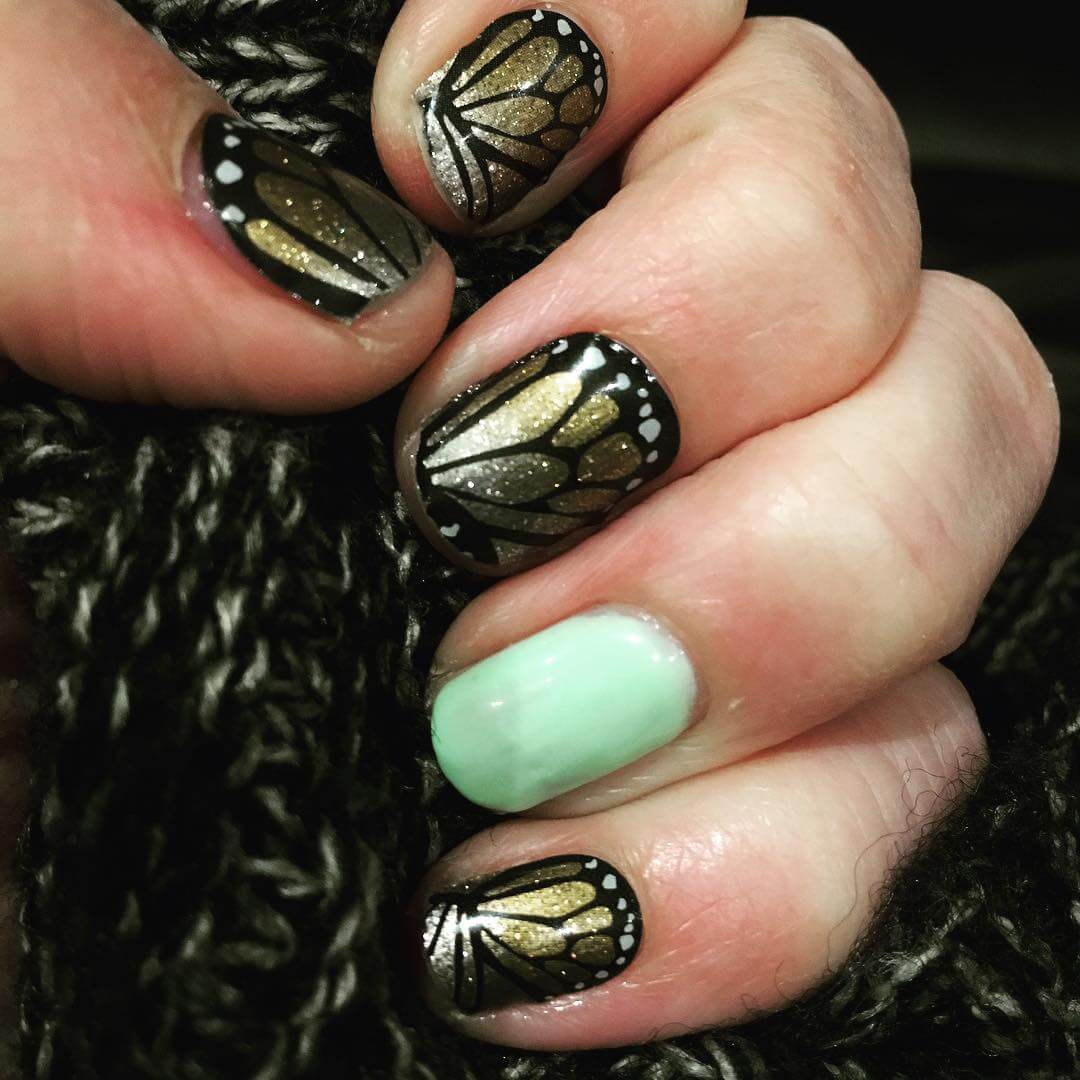
This butterfly effect nail art is one of the best nail art designs of all the earth day nail art designs. It is quite unique as well a really attractive in every sense too. The butterfly wing design in the nail just takes the look of the nail art to a whole new level. This is also done by the decal stamping technique.
Things you will need:
- Base Coat and Top Coat
- Pastel Green Nail Polish . If you can’t find this color, then you can buy any green color nail polish.
- Black Color Nail Polish and Gold and Silver Sparkly Nail Polish
- Nail Polish Remover
- Stamper and Scraper
- A Thin Nail Art Brush
- A Silicone Stamping Mat
- Transparent Slow Drying Stamping Polish or Qtica Extending Top Coat
- A Nail Art Orange Stick
- A Stamping Plate that includes the above designs. If you don’t get this then you can just go with the stamping plate of your preference.
Steps To Apply:
- Paint a coat of the slow drying stamping polish onto the sections of nails on the mat and allow it to dry. This a slow drying polish.
- Now using your stamper and scraper and the stamp image from the stamping plate, roll the stamp design onto the finger sections of the mat when the top coat has dried.
- After this, take your nail art brush and the respective colors that is the gold and silver sparkly nail polish to fill the designs. After it is done, allow it to dry.
- In the mean time you can apply the base coat onto your every nail and then paint your nails evenly with one coat of the respective nail polish.
- Now using a orange nail stick and sliding it under the brinks of the decal, slowly peel off the decal from the mat.
- After this you will paint the second coat of the nail polish colors and wait for it to become a little sticky that is in a state that is not too wet nor too dry. Then take the decal and slowly press it against your nails and you can use small scissors or the cuticle nippers to remove the excess decal on the sides of your nails.
- Then you can finish it off by applying the top coat.
37. Sparkly Earth Day Nail Art Design
This nail is quite simple as well as chic in style. This is one of the cool earth day nail art ideas This is done by the stamping decal technique. It is quite easy if you follow the steps and it is also tricky in a sense too.
Things you will need:
- Base Coat and Top Coat
- Pastel Green Nail Polish . If you can’t find this color, then you can buy any green color nail polish.
- Black Color Nail Polish and Brown Sparkly Nail Polish
- Nail Polish Remover
- Stamper and Scraper
- A Thin Nail Art Brush
- A Silicone Stamping Mat
- Transparent Slow Drying Stamping Polish or Qtica Extending Top Coat
- A Nail Art Orange Stick
- A Stamping Plate that includes the above designs. If you don’t get this then you can just go with the stamping plate of your preference.
Steps To Apply:
- Paint a coat of the slow drying stamping polish onto the sections of nails on the mat and allow it to dry. This a slow drying polish.
- Now using your stamper and scraper and the stamp image from the stamping plate, roll the stamp design onto the finger sections of the mat when the top coat has dried.
- After this, take your nail art brush and the respective colors to fill the designs. After it is done, allow it to dry.
- In the mean time you can apply the base coat onto your every nail and then paint your nails evenly with one coat of the respective nail polish.
- Now using a orange nail stick and sliding it under the brinks of the decal, slowly peel off the decal from the mat.
- After this you will paint the second coat of the nail polish colors and wait for it to become a little sticky that is in a state that is not too wet nor too dry. Then take the decal and slowly press it against your nails and you can use small scissors or the cuticle nippers to remove the excess decal on the sides of your nails.
- Then you can finish it off by applying the top coat.
38. Simple Earth Day Motif Nail Art
This is also a simple earth day nail art design but at the same time it is also aesthetic in a sense which is what makes the nail art special. The steps to do this nail art is given below, follow it properly so that you can get a pristine look of that nail art.
Things You Will Need:
- Clear Base coat and Top Coat or a Transparent Nail Polish
- Brown Nail Polish – you can either by Maybelline or go with the brand Look Nail Color. If you get the same color in a different brand also you can opt for it.
- Clear top coat and base coat or transparent nail polish
- A Nail Striper Brush
- Nail Polish remover
- Sponge and Plastic sheet and a toothpick
- Leaf Nail Art stickers. If you don’t get the exact one like in the image, feel free to buy your favorite nail art sticker either online or a store you visit often.
- Sage Green and White Nail Polish
- Tweezers
- Blow dryer
Steps to Apply:
- Apply base coat or a transparent nail polish on every nail evenly and as a thin layer.
- Paint white color nail polish on your ring finger as the base color for the nail art.
- Paint the sky blue color nail polish on your other fingers.
- On a flat surface, paint a generous amount of brown color and white color nail polish right next to each other on to the plastic. Make sure they’re just about touching at the brinks.
- Use a toothpick to swirl the each of the colors in where they meet. So if you are thinking of a lengthy graduation, mix a bigger section of the colors, if you are thinking less of a fade, then just mix them together a teeny bit.
- Dab the sponge on the nail polish on the plastic for a few times. Then dab it directly on your nail.
- After this you can cut the stickers in such a way that they fit your nail.
- Then, use the tweezers to lift the nail sticker you want to apply. While doing it, ensure that you don’t touch the sticky side of the sticker after removing the plastic sheet from the tattoo
- Then place the sticker on your ring finger nail and smooth it down from your nail bed to the tip.
- Do this on every nail and blow dry your nails for several seconds. Make sure that you hold blow dryer not too close to your nails.
- Then apply the top coat or the transparent nail polish on your nails.
- Clean up the sides of your nails with the remover.
39. The Sparkly Green Earth Day Nail Art
This is a quite unique nail art which is also a really appealing and fabulous. It is one of the best earth day nail art designs. This nail art is done by the decal technique. It is quite hard to get in the first time itself but eventually with practice you will get a hold of it.
Things you will need:
- Base Coat and Top Coat
- Shimmery Green Nail Polish . If you can’t find this color, then you can buy any green color nail polish.
- Black, Green, White and Brown Nail Polish
- Nail Polish Remover
- Stamper and Scraper
- A Thin Nail Art Brush
- A Silicone Stamping Mat
- Transparent Slow Drying Stamping Polish or Qtica Extending Top Coat
- A Nail Art Orange Stick
- A Stamping Plate that includes the above designs. If you don’t get this then you can just go with the stamping plate of your preference.
Steps To Apply:
- Paint a coat of the slow drying stamping polish onto the sections of nails on the mat and allow it to dry. This a slow drying polish.
- Now using your stamper and scraper and the stamp image from the stamping plate, roll the stamp design onto the finger sections of the mat when the top coat has dried.
- After this, take your nail art brush and the respective colors to fill the designs. After it is done, allow it to dry.
- In the mean time you can apply the base coat onto your every nail and then paint your nails evenly with one coat of the shimmery green nail polish.
- Now using a orange nail stick and sliding it under the brinks of the decal, slowly peel off the decal from the mat.
- After this you will paint the second coat of the nail polish colors and wait for it to become a little sticky that is in a state that is not too wet nor too dry. Then take the decal and slowly press it against your nails and you can use small scissors or the cuticle nippers to remove the excess decal on the sides of your nails.
- Then you can finish it off by applying the top coat.
40. The Pastel Earth Day Nail Art

Now a days Pastel nail art have become really famous for the serene and simple look it gives. It is loved and admired by many women around the globe. This nail art is a perfect one which is loved by kids as well as adults.
Things you will need:
- Base Coat and Top Coat
- Pastel Green Nail Polish . If you can’t find this color, then you can buy any green color nail polish.
- Pastel Blue, Pink and Yellow Nail Polish
- White Nail Polish
- Nail Polish Remover
- Stamper and Scraper
- A Thin Nail Art Brush
- A Silicone Stamping Mat
- Transparent Slow Drying Stamping Polish or Qtica Extending Top Coat
- A Nail Art Orange Stick
- A Stamping Plate that includes the above designs. If you don’t get this then you can just go with the stamping plate of your preference.
- Sponge and Plastic Sheet
Steps To Apply:
- Paint a coat of the slow drying stamping polish onto the sections of nails on the mat and allow it to dry. This a slow drying polish.
- Now using your stamper and scraper and the stamp image from the stamping plate, roll the stamp design onto the finger sections of the mat when the top coat has dried.
- After this, take your nail art brush and the respective colors to fill the designs. After it is done, allow it to dry.
- In the mean time you can apply the base coat of white color onto your every nail and then paint your nails with the pastel color nail polishes with the sponge.
- Now using a orange nail stick and sliding it under the brinks of the decal, slowly peel off the decal from the mat.
- After this you will paint the second coat of the nail polish colors and wait for it to become a little sticky that is in a state that is not too wet nor too dry. Then take the decal and slowly press it against your nails and you can use small scissors or the cuticle nippers to remove the excess decal on the sides of your nails.
- Then you can finish it off by applying the top coat.
41. The Classy Black Earth Day Nail Art
This classy black nail art is just going to make everyone go crazy around you. Black is one color which has been famous regardless of generations and age. This is one color which makes everyone go crazy. This specific nail art design is done by the decal stamping technique. It is quite an interesting technique which is loved by many women but while doing this technique, you have to follow the steps carefully and properly. So that it doesn’t get messed up. However for beginners, you will probably face some problems and some areas might messed up but don’t give up ladies, keep trying. You will get it after several times and practices. Do try this nail art if you are a black lover.
Things you will need:
- Base Coat and Top Coat
- Shimmery Gold Nail Polish . If you can’t find this color, then you can buy any green color nail polish.
- Black and Light Green Nail Polish
- Nail Polish Remover
- Stamper and Scraper
- A Thin Nail Art Brush
- A Silicone Stamping Mat
- Transparent Slow Drying Stamping Polish or Qtica Extending Top Coat
- A Nail Art Orange Stick
- A Stamping Plate that includes the above designs. If you don’t get this then you can just go with the stamping plate of your preference.
Steps To Apply:
- Paint a coat of the slow drying stamping polish onto the sections of nails on the mat and allow it to dry. This a slow drying polish.
- Now using your stamper and scraper and the stamp image from the stamping plate, roll the stamp design onto the finger sections of the mat when the top coat has dried.
- After this, take your nail art brush and the respective colors to fill the designs. After it is done, allow it to dry.
- In the mean time you can apply the base coat onto your every nail and then paint your nails evenly with one coat of the black nail polish.
- Now using a orange nail stick and sliding it under the brinks of the decal, slowly peel off the decal from the mat.
- After this you will paint the second coat of the nail polish colors and wait for it to become a little sticky that is in a state that is not too wet nor too dry. Then take the decal and slowly press it against your nails and you can use small scissors or the cuticle nippers to remove the excess decal on the sides of your nails.
- Then you can finish it off by applying the top coat.
42. The Earth Day Acrylic Nail Art

Acrylic Nails are quite tricky to get hold of. Hence if you want to try it, follow the steps correctly in order to get the acrylic look but at the same time it would be better if you are a beginner and haven’t tried nail art at all. I would advise you to try this after learning the other methods as this can be quite tricky to obtain.
Things You Will Need:
- Electric File Buffer Kit as it is an apt choice for beginners and also professionals. It kmakes the work easier. Buy a one which you can use for filing as well as buffering.
- Lint Free Cotton Pads
- Acrylic Nail Tips – you can get it in the desired color and Nail Glue
- Nail Polish Remover ( Acetone)
- Acrylic Nail Clipper and Acrylic Liquid
- Nail Dust Remover and Nail Cuticle Stick
- Acrylic Brush and Acrylic Powder
- Acrylic Dish and Acid Free Nail Primer. Use an acid free nail primer so that you don’t harm or burn your skin around the nails.
Steps to Follow:
- First you should begin by prepping your nails and it has to be done carefully and properly or else you might face some problems. Start by cleaning your hands properly with hand sanitizer or soap. If you have applied nail polish on your fingers already, ensure that you clean it with an acetone nail polish remover.
- Now trim your nails a little short but not too short using a nail clipper. Then using a soft nail filer file your nails so that it becomes more sticky and coarse which will help the acrylic stick to the nail strongly.
- Dip your hand in hot water and then apply cuticle remover on your cuticles. Then use the cuticle pusher to very slightly push the cuticles backwards. Be careful while you do this of not trimming or removing any living tissue but only dead ones because the trimming of living tissues might lead to septic. So please be careful while you do this.
- Next use the nail primer with cotton pad to dry as well as remove the oils from your nails so that the acrylic sticks better and be sure that you don’t overuse it.
- Use a nail cleanser with the help of lint free cotton pads to clean your nails thoroughly. After this apply a little amount of nail glue on the tips of the nail and slide it down you nail halfway. Ensure that you hold it in position about 35 to 45 seconds.
- After this take two separate acrylic dishes and then put the acrylic liquid in one dish and the acrylic powder in another dish. Now Slowly dip the tip of the acrylic brush into the liquid and then immediately dip the tip of the same brush into the powder and ensure you don’t take too much powder.
- You will have to do this step at least four to five times so that the mixture of liquid and powder is equal on the tip of brush that eventually looks like a tiny ball looking like a bead. You have to make a perfect bead to get the right look and also ensure that the bead is neither too wet nor too dry. In case you find that the bead is too wet then try using paper towel to remove the extra liquid.
- Now apply this bead onto the nails tips and smile lines as shown in the image. Put a lot of pressure so that it. Be careful that you don’t apply it to your skin.
- Then let it dry for some time. After it completely dries, the apply the blue and green nail paint onto your nails.
43. The Chic Earth Day Nail Art
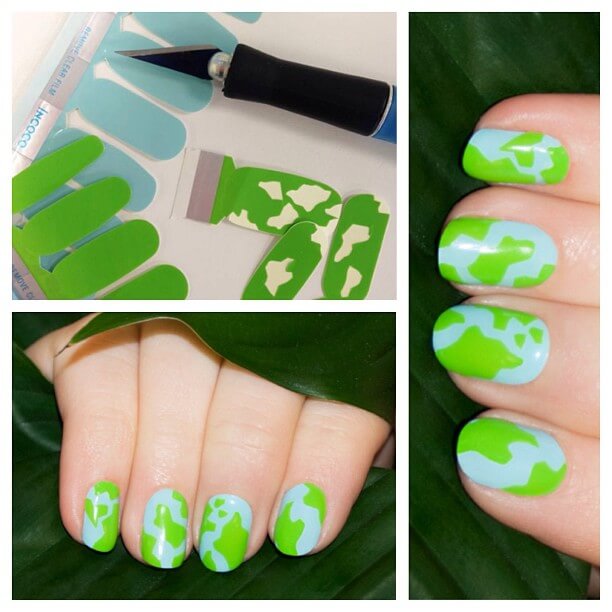
This special earth day nail art design is also done by the decal technique.Don’t hesitate to try this nail art design as it is just what you are looking for. It is trendy, chic as well as it also carries a simple look which is what makes this design special.
Things you will need:
- Base Coat and Top Coat
- Matte Neon Green Nail Polish . If you can’t find this color, then you can buy any green color nail polish.
- Matte Sky Blue Color, Canary Yellow and Black Color Nail Polish
- Nail Polish Remover
- Stamper and Scraper
- A Thin Nail Art Brush
- A Silicone Stamping Mat
- Transparent Slow Drying Stamping Polish or Qtica Extending Top Coat
- A Nail Art Orange Stick
- A Stamping Plate that includes the map designs. If you don’t get this then you can just go with the stamping plate of your preference.
Steps To Apply:
- Paint a coat of the slow drying stamping polish onto the sections of nails on the mat and allow it to dry. This a slow drying polish.
- Now using your stamper and scraper and the stamp image from the stamping plate, roll the stamp design onto the finger sections of the mat when the top coat has dried.
- After this is the fun part, take your nail art brush and the respective colors to fill the map designs. After it is done, allow it to dry.
- In the mean time you can apply the base coat onto your every nail and then paint your nails evenly with one coat of the blue nail polish.
- Now using a orange nail stick and sliding it under the brinks of the decal, slowly peel off the decal from the mat.
- After this you will paint the second coat of the blue nail polish and wait for it to become a little sticky that is in a state that is not too wet nor too dry. Then take the decal and slowly press it against your nails and you can use small scissors or the cuticle nippers to remove the excess decal on the sides of your nails.
- Then you can finish it off by applying the top coat.
These are some of the best earth day nail art designs which will give your nails a whole new and unique look that takes it to another level. Some of these designs are for professionals and some are for beginners but what matters most is that with the required amount of practice you will be able to get hold of the technique. If you would like to change the colors or add some nail accessories, please go ahead and explore it. There are step by step tutorials for a variety of nail art techniques including decal technique, stamping technique, sponge nail art and acrylic nail art technique given in the article. These nail arts are the latest trendy as well as unique nail art designs. Each nail art design is unique in its own way and has a different look and style to it. So do try these nail art designs for earth day and post it on your social media.
Marble Nail Art Designs & Ideas to Upgrade Your Manicure

For more updates, stay tuned to K4 Fashion! And be sure to follow on Pinterest for more ideas. You can also join us on Instagram for daily fashion updates!
You’ll Also Like


